Mobile App
- Work with modules
- Work with sensors
- Work with devices
- Types and viewing
- Adding new device
- Switching on device
- Switching off device
- Deleting device
- Rules
- Adding new device to DimmerDirector module
- Switching on/off device on the DimmerDirector module
- Protective Shutdown
- Multiple Rules and Prioritization
- Time Framework
- Trigger delay
- Rules on the Dimmer Director module
- Dashboard
- AI Section
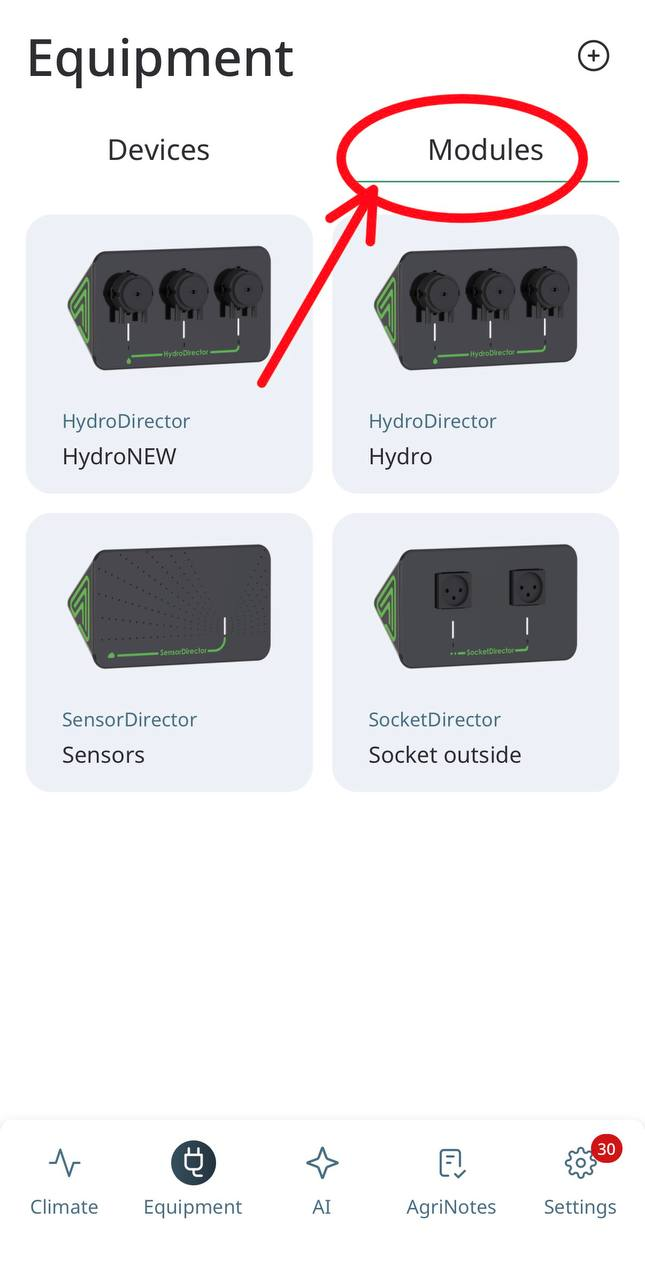
Work with modules
Connecting module
When user opens the GrowDirector App for the very first time, there are no Modules in the System yet. Therefore, user must first add (connect) the first Module to proceed.
Note: Ensure your Wi-Fi is switched on. Make sure your router is compatible with the 2.4 GHz frequency, as Modules require this frequency for connection:
● Check the router's label: Look for a label or sticker on your router that lists the supported frequencies. Most routers will have either "2.4 GHz" or "Dual-Band" (which means it supports both 2.4 GHz and 5 GHz) mentioned on the label.
● Router's user manual: Refer to the user manual or product documentation that came with your router. Look for information on supported frequencies. If you don't have the physical copy, you can search online for your router's make and model to find a digital version of the manual.
● Router's web interface: Access your router's web interface by typing the router's IP address into a web browser. The IP address is typically found on the router's label or in the user manual. It often looks like "192.168.1.1" or "192.168.0.1". Once you've logged in to the web interface, navigate to the wireless settings and check if the 2.4 GHz frequency band is available.
● Manufacturer's website: Visit the manufacturer's website and search for your router's model number. Check the product specifications for information about supported frequency bands.
● If your router supports the 2.4 GHz frequency, you should be able to connect devices that require this frequency for operation.
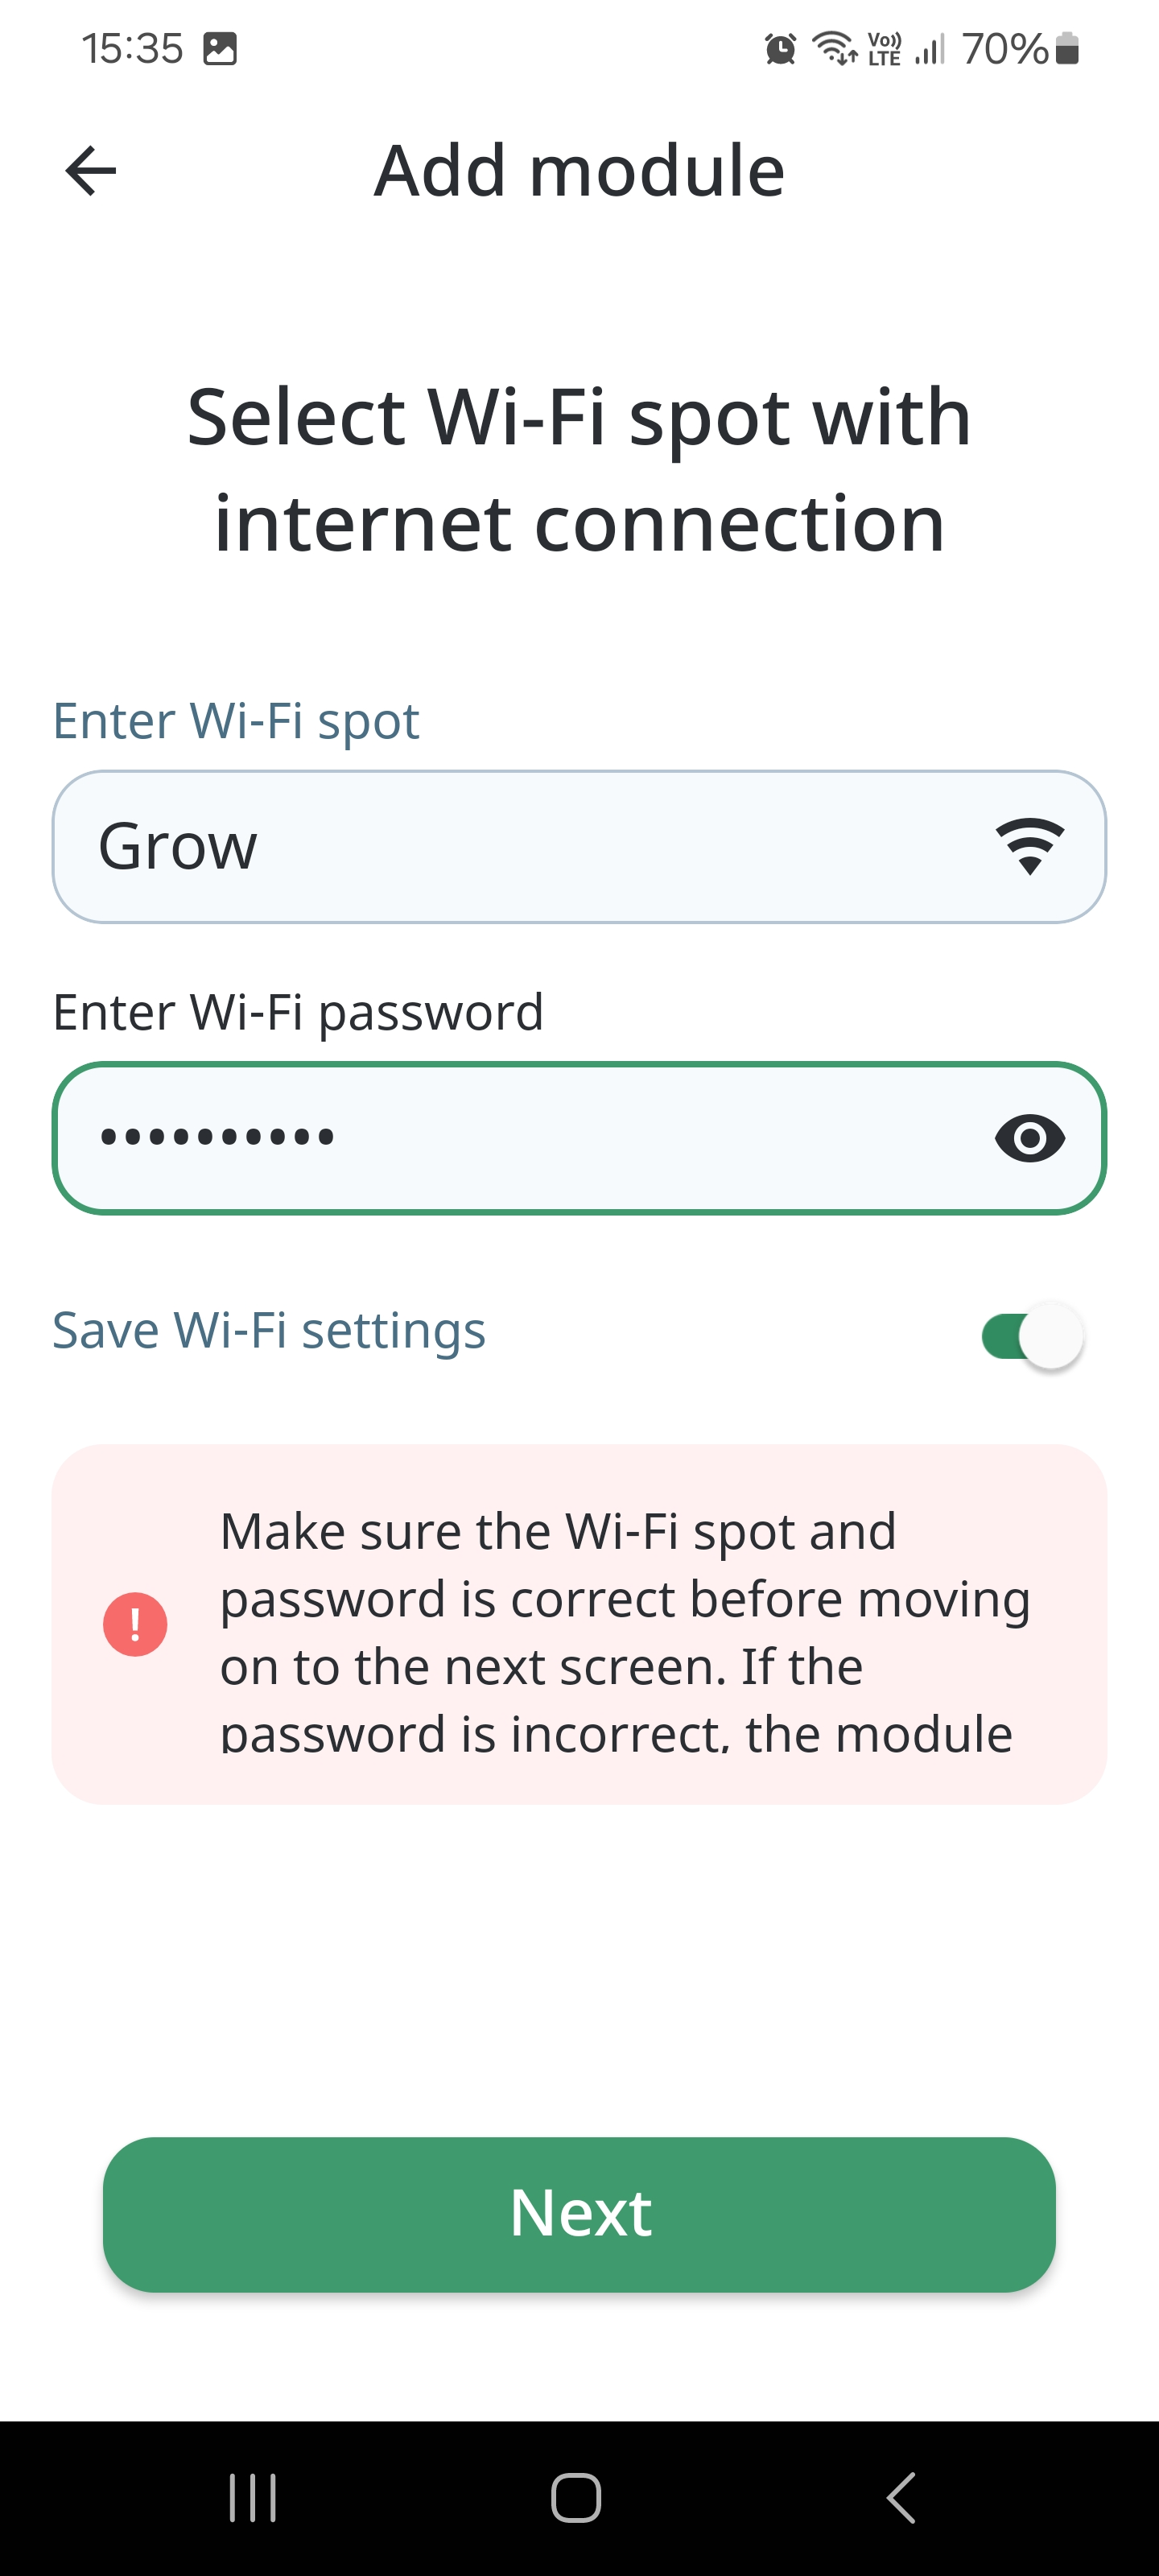
To connect a Module, please, follow these steps:
-
Ensure your phone is connected to the same Wi-Fi network as the one you plan to use for the Module.
-
Stay within 10 meters (30 feet) from the Module during setup.
-
Connect the Module to a power source, then locate the 'sync' button on its back panel. Press and hold the button for 10 seconds.
-
Wait for a blinking green light.
-
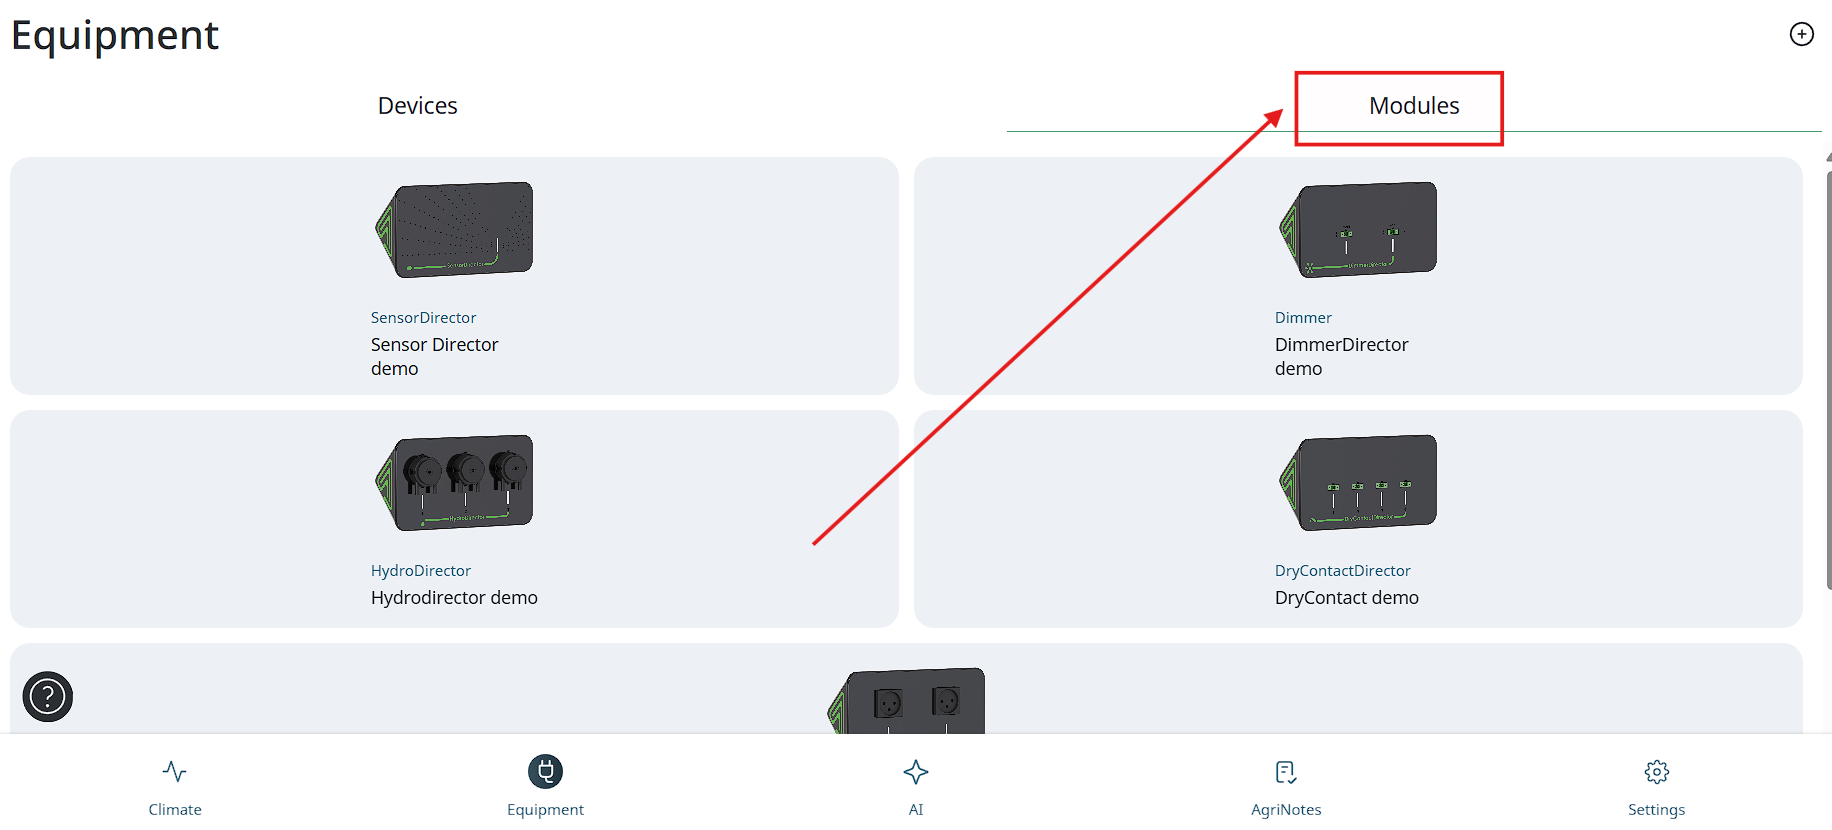
In the App, tap on the Equipment tab, and then on the “Connect module” button (icon) in the “Modules” section.
-
The App should automatically detect your Wi-Fi network. Verify that it matches the network you want to connect the Module to.
-
When prompted, input your Wi-Fi network password and tap Save to proceed.
-
Access your phone's Wi-Fi settings through the settings menu.
-
Browse the list of available Wi-Fi networks tap and select your module's name (e.g., HydroDirector, SensorDirector).

10. Only if it’s your first connection to this module.: You'll be prompted to enter a password for your module. Use the default password (123456789) for the first-time setup and tap 'Connect'.
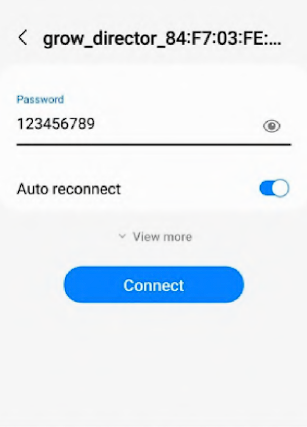
11. If this is NOT your first connection to THIS module, please skip to step 13.
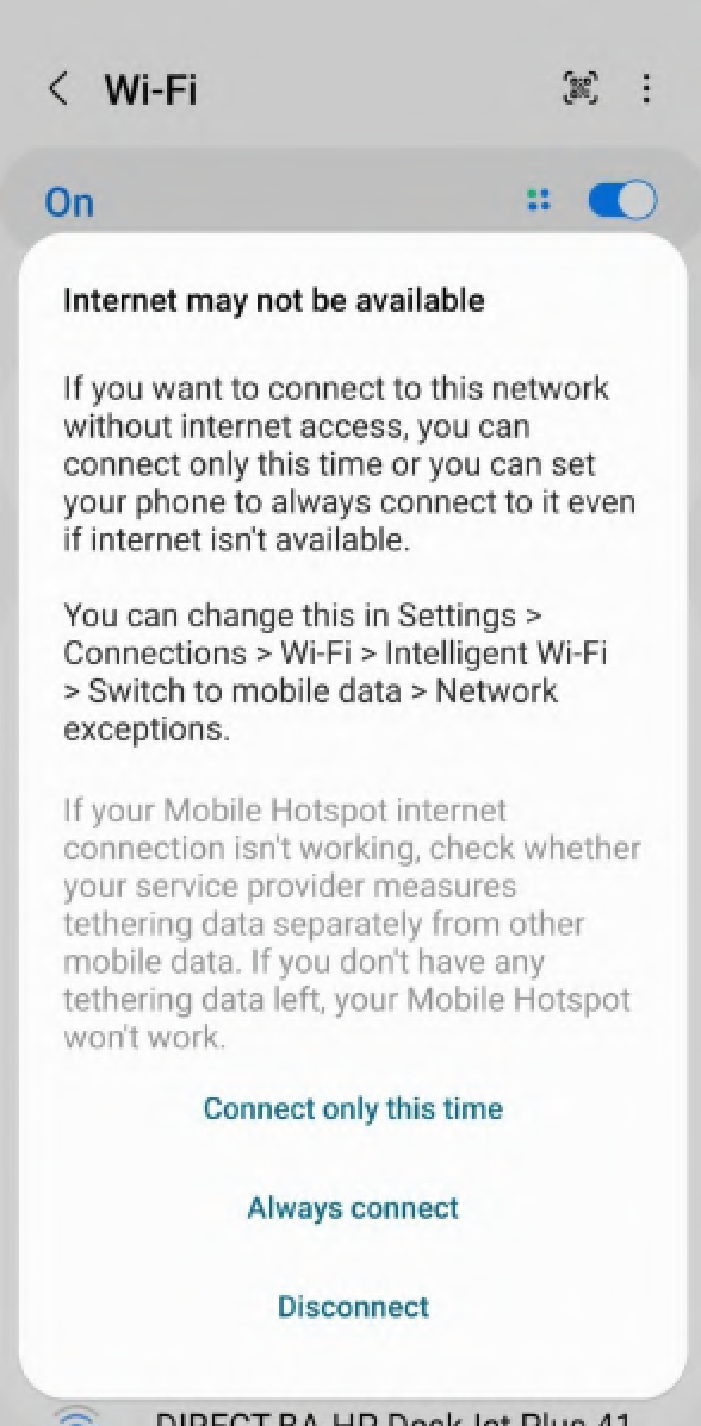
12. If a message appears stating 'Internet may not be available', select the 'Always connect' option to bypass this warning.
13.The App will begin connecting the module to your Wi-Fi network. Wait for up to 2 minutes, for the 'Module successfully connected!' screen to appear, signaling that the process is complete.


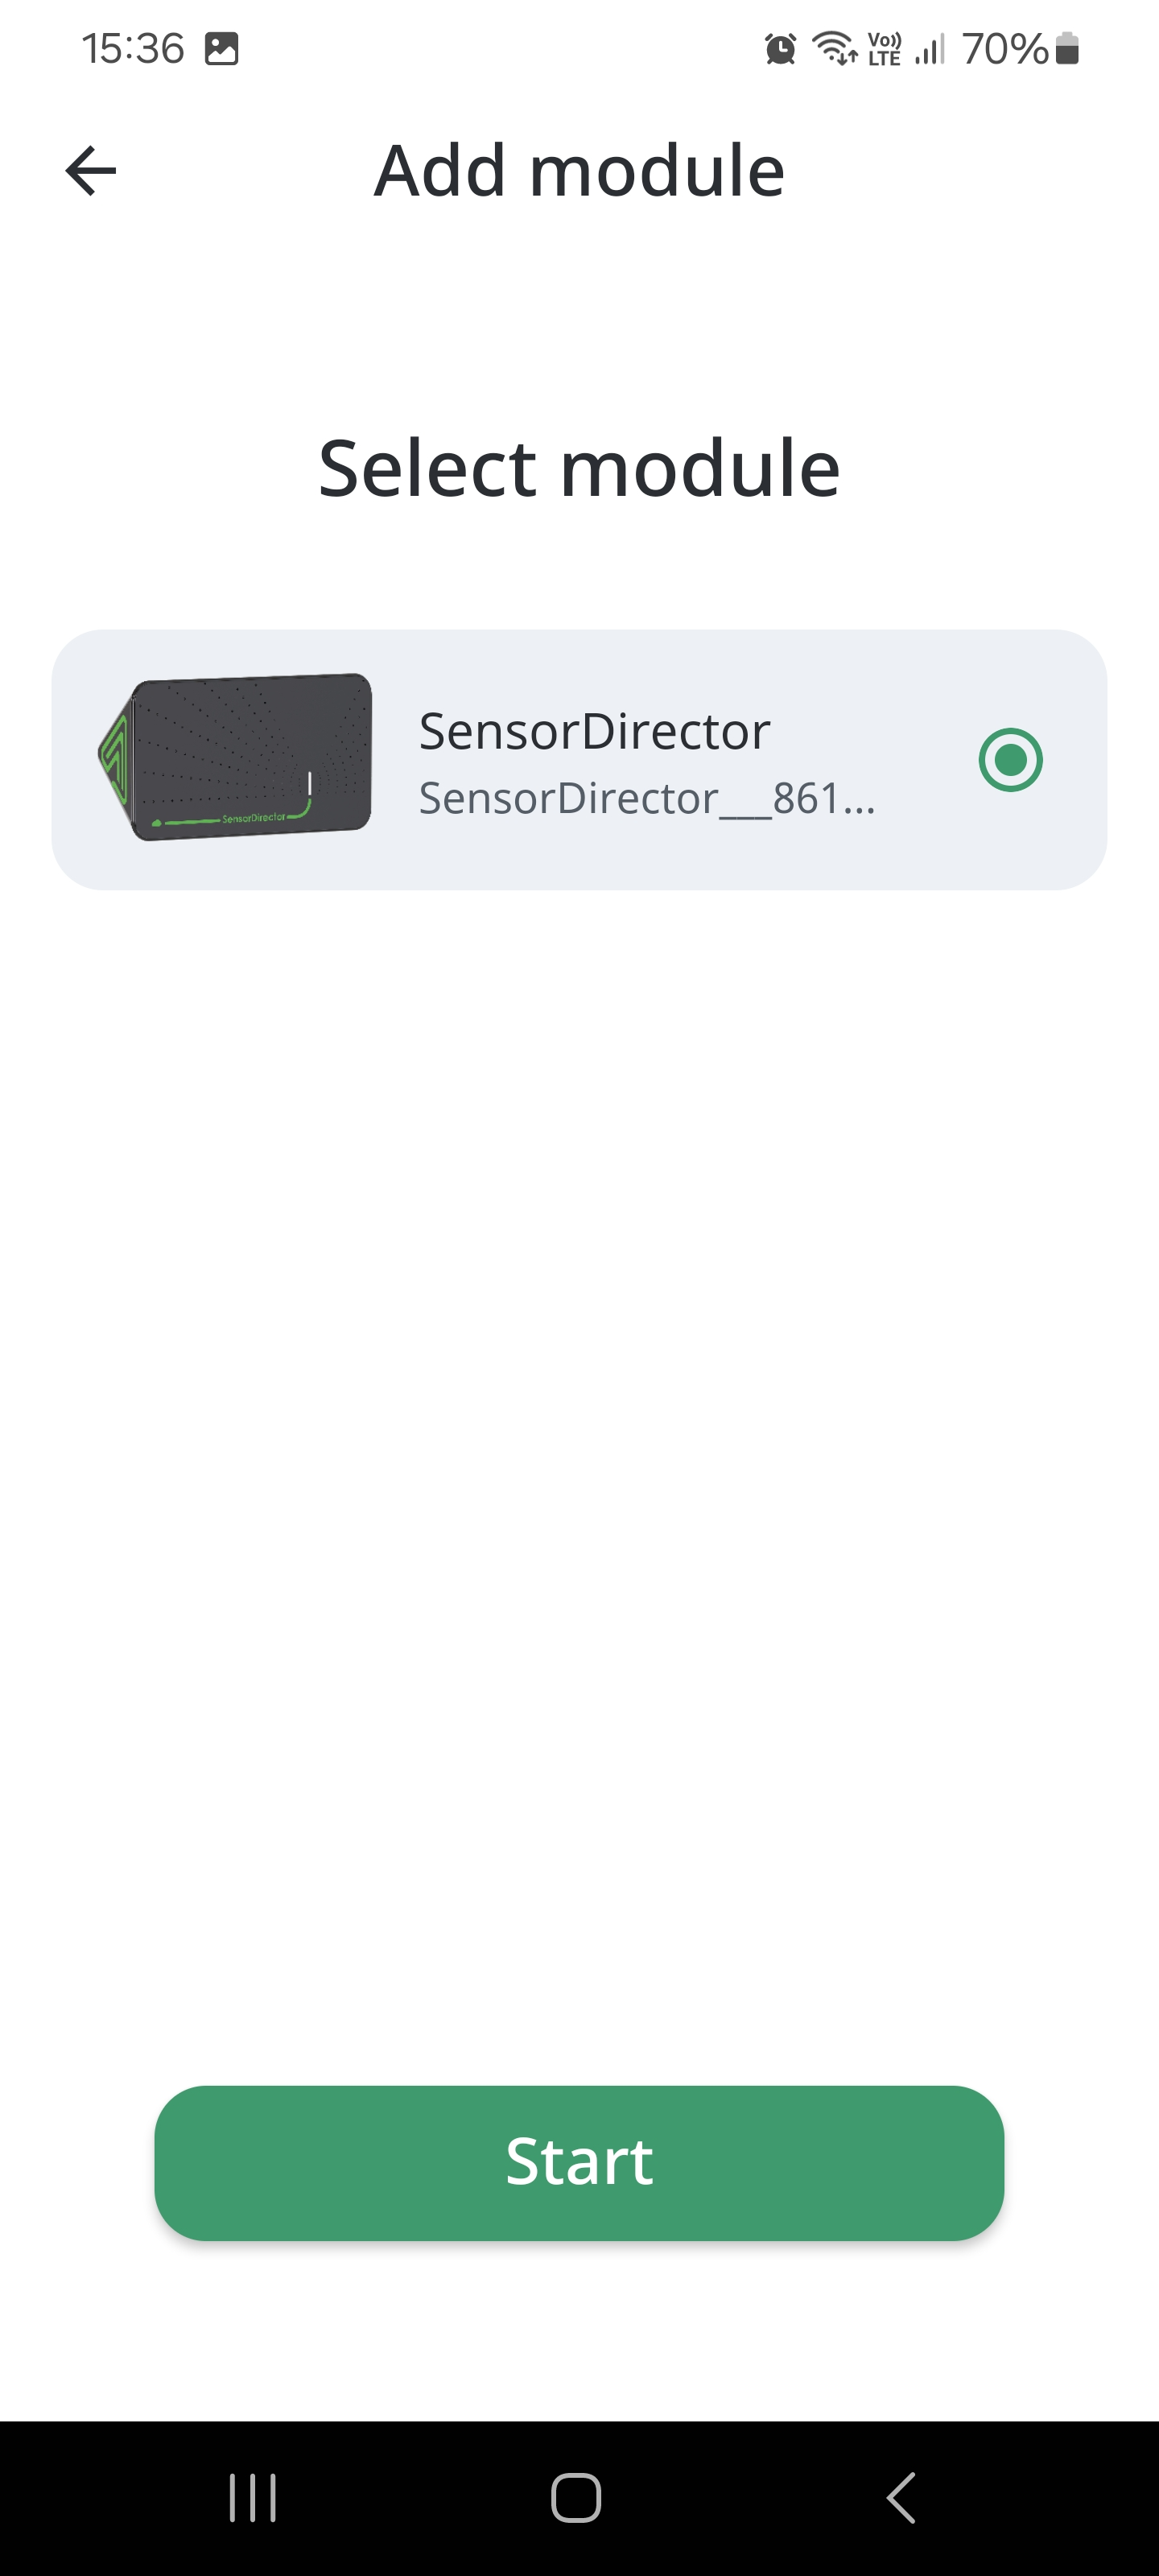
14.Tap the Connect another one button to connect one more Module.
15.Tap the Finish button to complete the process. The Module is added to the Modules screen, and marked with a green sign New:
- Resetting the module to factory settings
It is necessary to turn off the power supply of the module, hold down the function button and supply power to the module. Continue to hold down the button for 10-20 seconds. The module will switch to factory settings mode and will be available for adding it to the system. One LED will flash red and yellow every second.
- Switching the module to the add mode
It is necessary to hold down the function button and hold it down for 10-20 seconds. The module will switch to the add mode. One LED will flash green every second.
- Switching the module to testing mode
In operating mode (when power is supplied to the module), hold down the function button, turn off the power and apply it again. Hold the button down for 10-20 seconds. After switching the module to Test mode, none of the LEDs will light up. To remove the module from the test mode, it is necessary to reboot the module - turn off and turn on the power, after which the module will switch to factory settings mode.
Reconnecting module with saving rules
To reconnect module with and save devices rules users can follow next steps:
-
Press power button on the module until the LED indicator stops glowing and then starts blinking green.
-
Add this module again to the GrowDirector App without deleting.
After this steps your module will be readded with saving rules.
Renaming module
- Go to the Equipment tab.
- In the Modules section, open the specific module you want to rename.
- Click the three dots in the top-right corner.
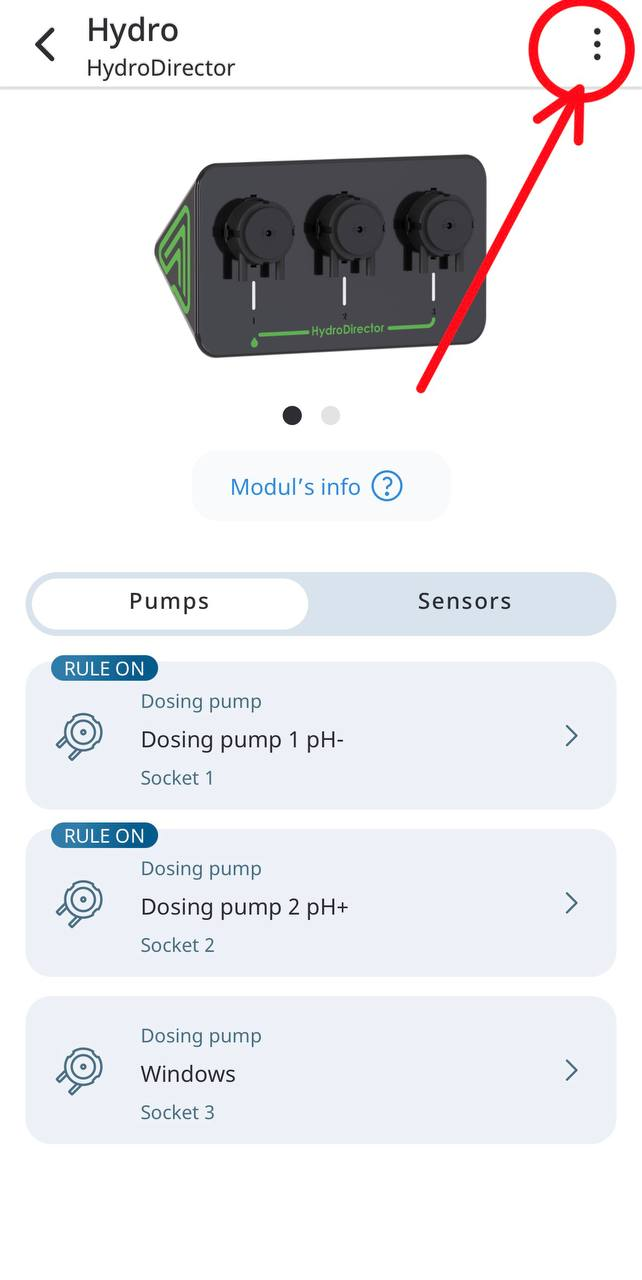
- Select Edit module’s name.
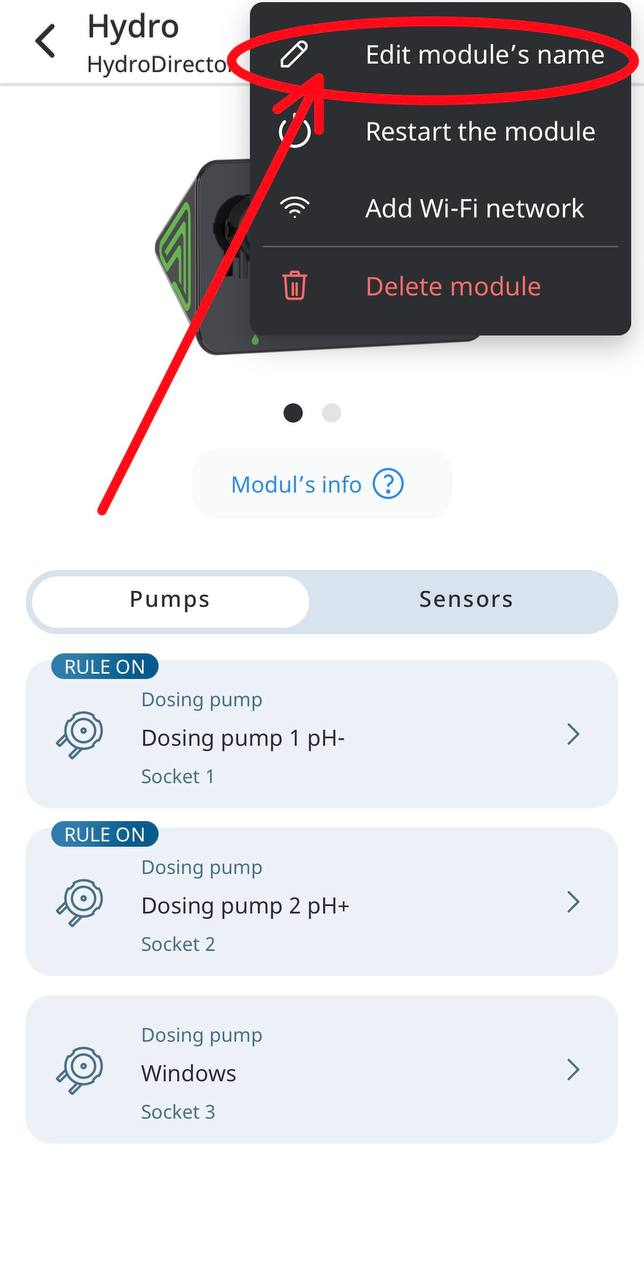
- Enter the new module name and click Rename.

Deleting module
In order to delete a Module, you need to delete Devices and/or Sensors connected to a Module first. If there are Rules associated with Devices, you need to delete the Rules as well. This is made in order not to delete a Module occasionally. To delete a Module, please, follow these steps:
- Tap the Module that you want to delete. The following screen appears:
- Tap the Manage and then Delete button on the top-right corner of the screen. The following screen appears:
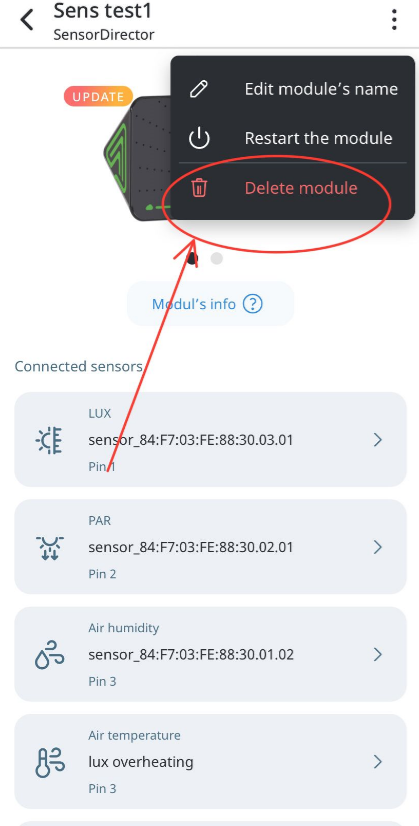
-
Tap the Delete button.
-
If you do not want to proceed with deleting, tap the Cancel button.
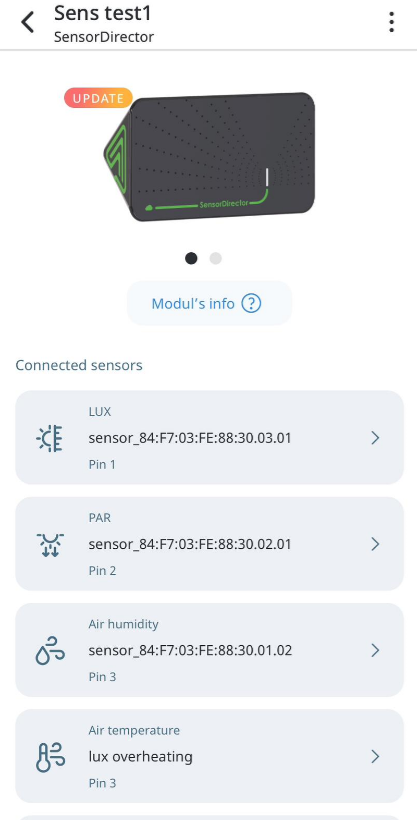
Updating module
In previous software versions, updating the module required that both the module itself and the user’s mobile device be connected to the same local Wi-Fi network. This constraint was necessary to establish direct communication between the devices for the update process.
As of the latest update, this requirement has been eliminated. The system now supports enhanced flexibility and convenience by introducing a remote update mechanism, which does not rely on the local network configuration of the module and the mobile device.
Current Update Methods
There are now two supported methods for updating the module firmware:
- Remote Update (Default Method):
This is the primary and default method enabled in the system. It allows the module to be updated via a secure cloud-based connection, regardless of the network to which the user’s mobile device is connected. The update is performed automatically when initiated through the application interface, provided that the module is connected to the internet.
- Local Network Update (Legacy Method):
This method replicates the behavior of the earlier versions. It requires both the module and the mobile device to be connected to the same local Wi-Fi network. Although this method remains available for compatibility and troubleshooting purposes, it is no longer the default and should be used only when the remote update method is not feasible.
Terms:
-
Mobile app is used to module update.
-
Must be new mobile app version.
-
Connecting to same Wi-Fi network (app and modules).
Update process:
- When user is entering to the app and when modules need update, users will see notification on main screen.
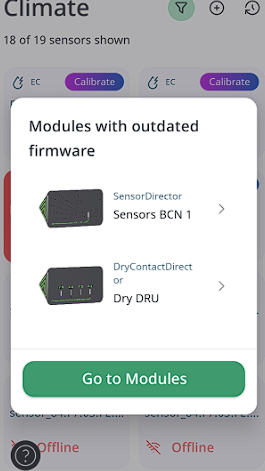
- On page “Modules” users can see the module that need to update. For updating user needs to press tile where he sees an “update” notification.

- Then user needs to press “Module’s info” button on the module screen.
- Then user must to press an “Update” button.
- Then press “Start updating” button.
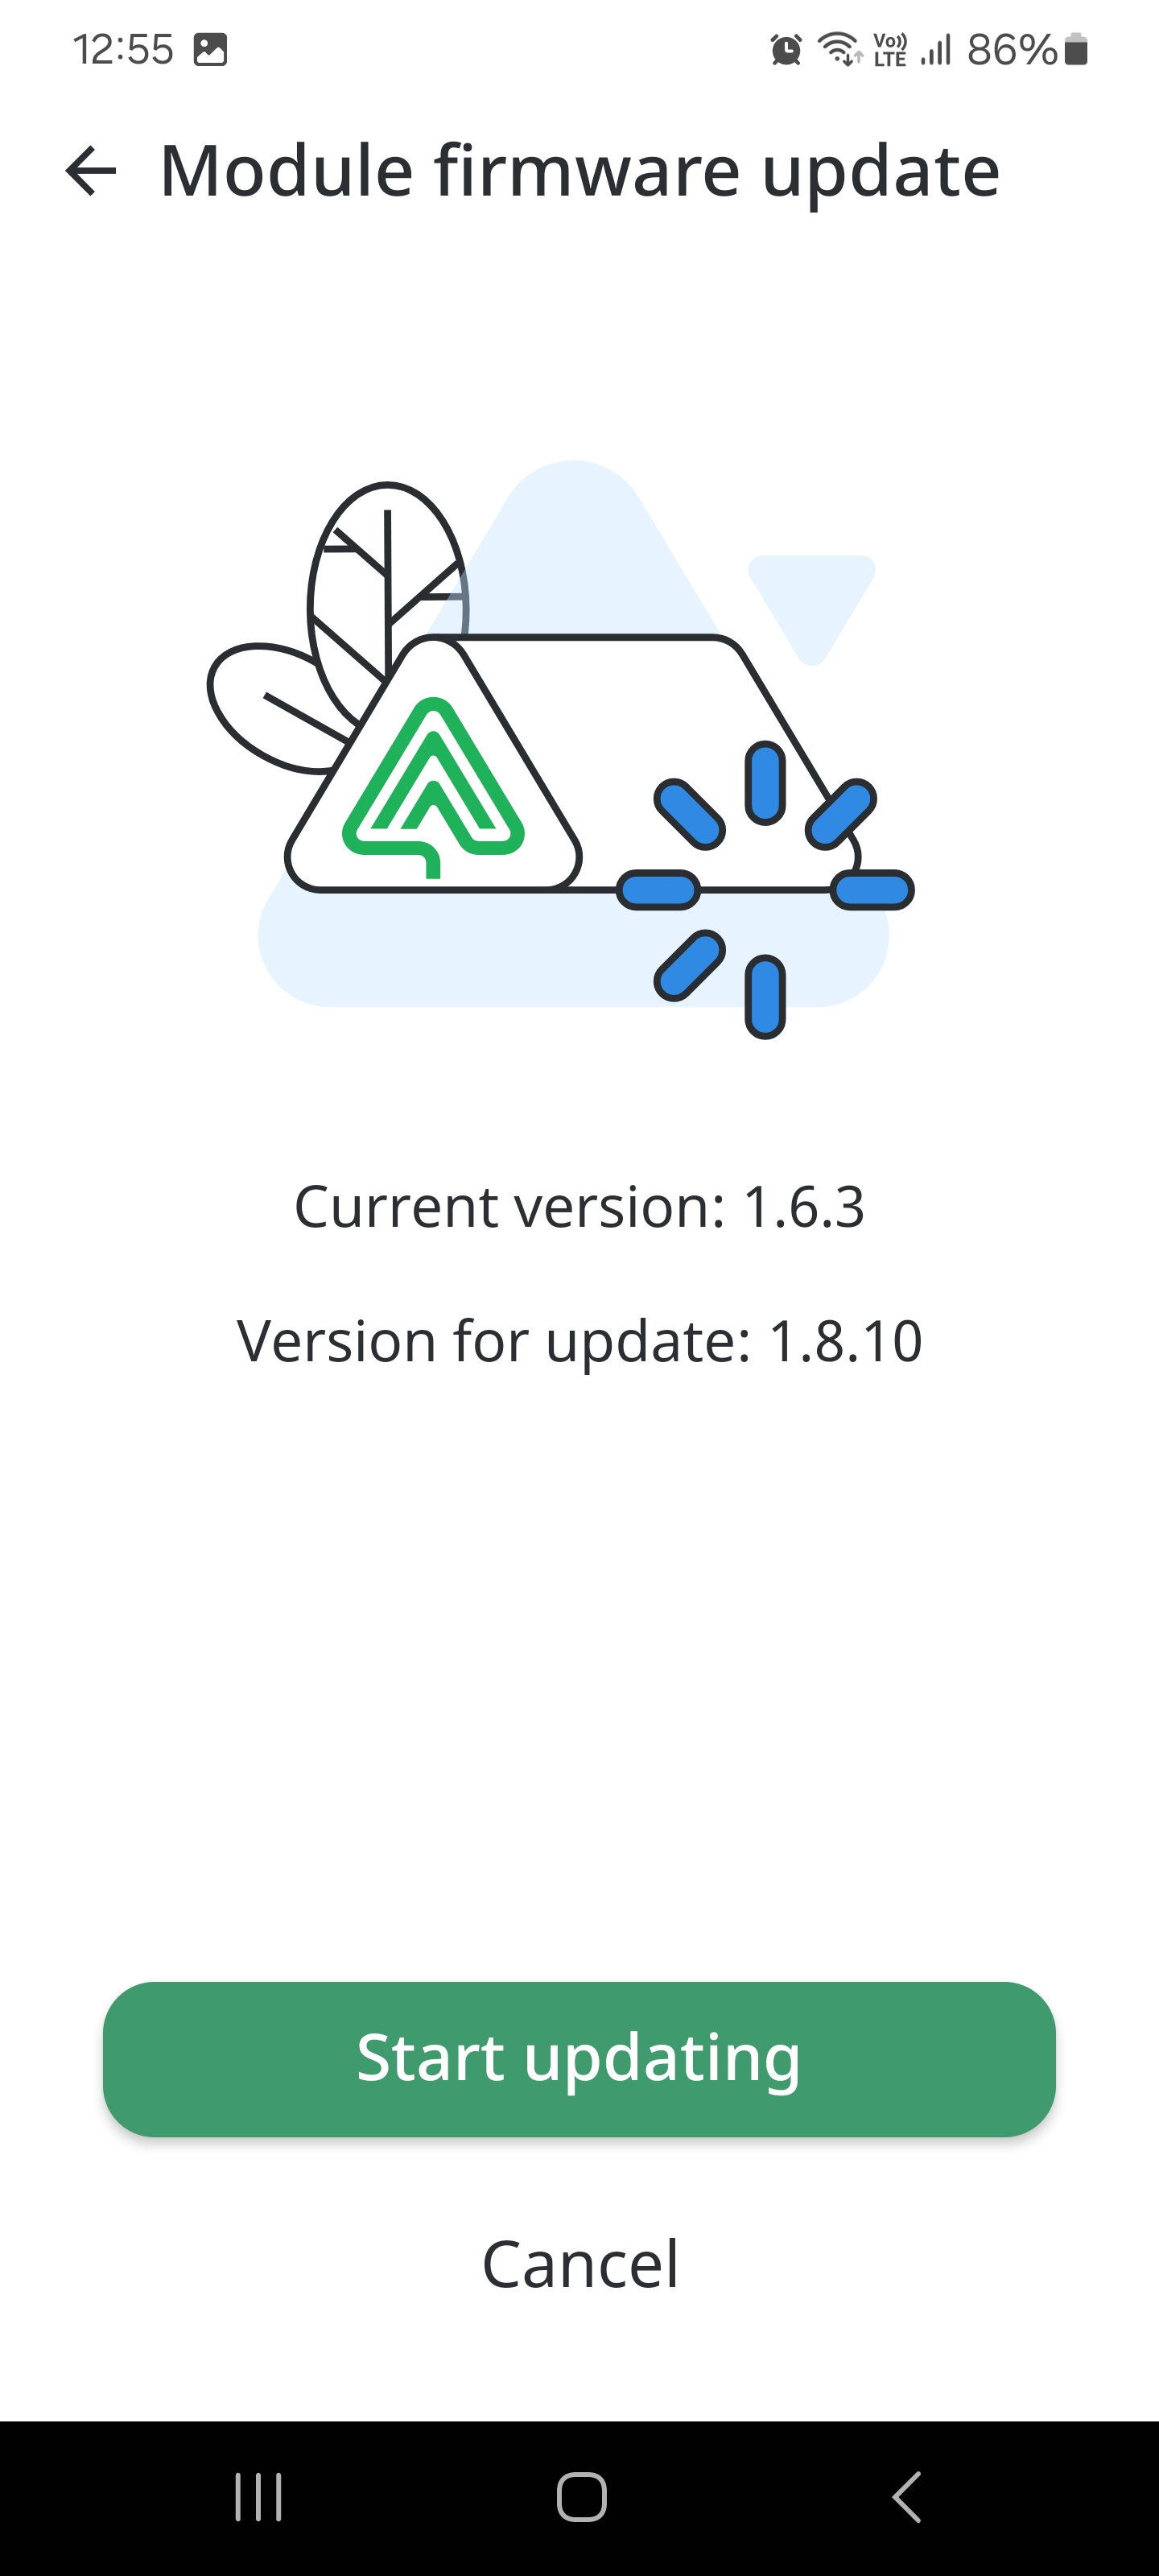
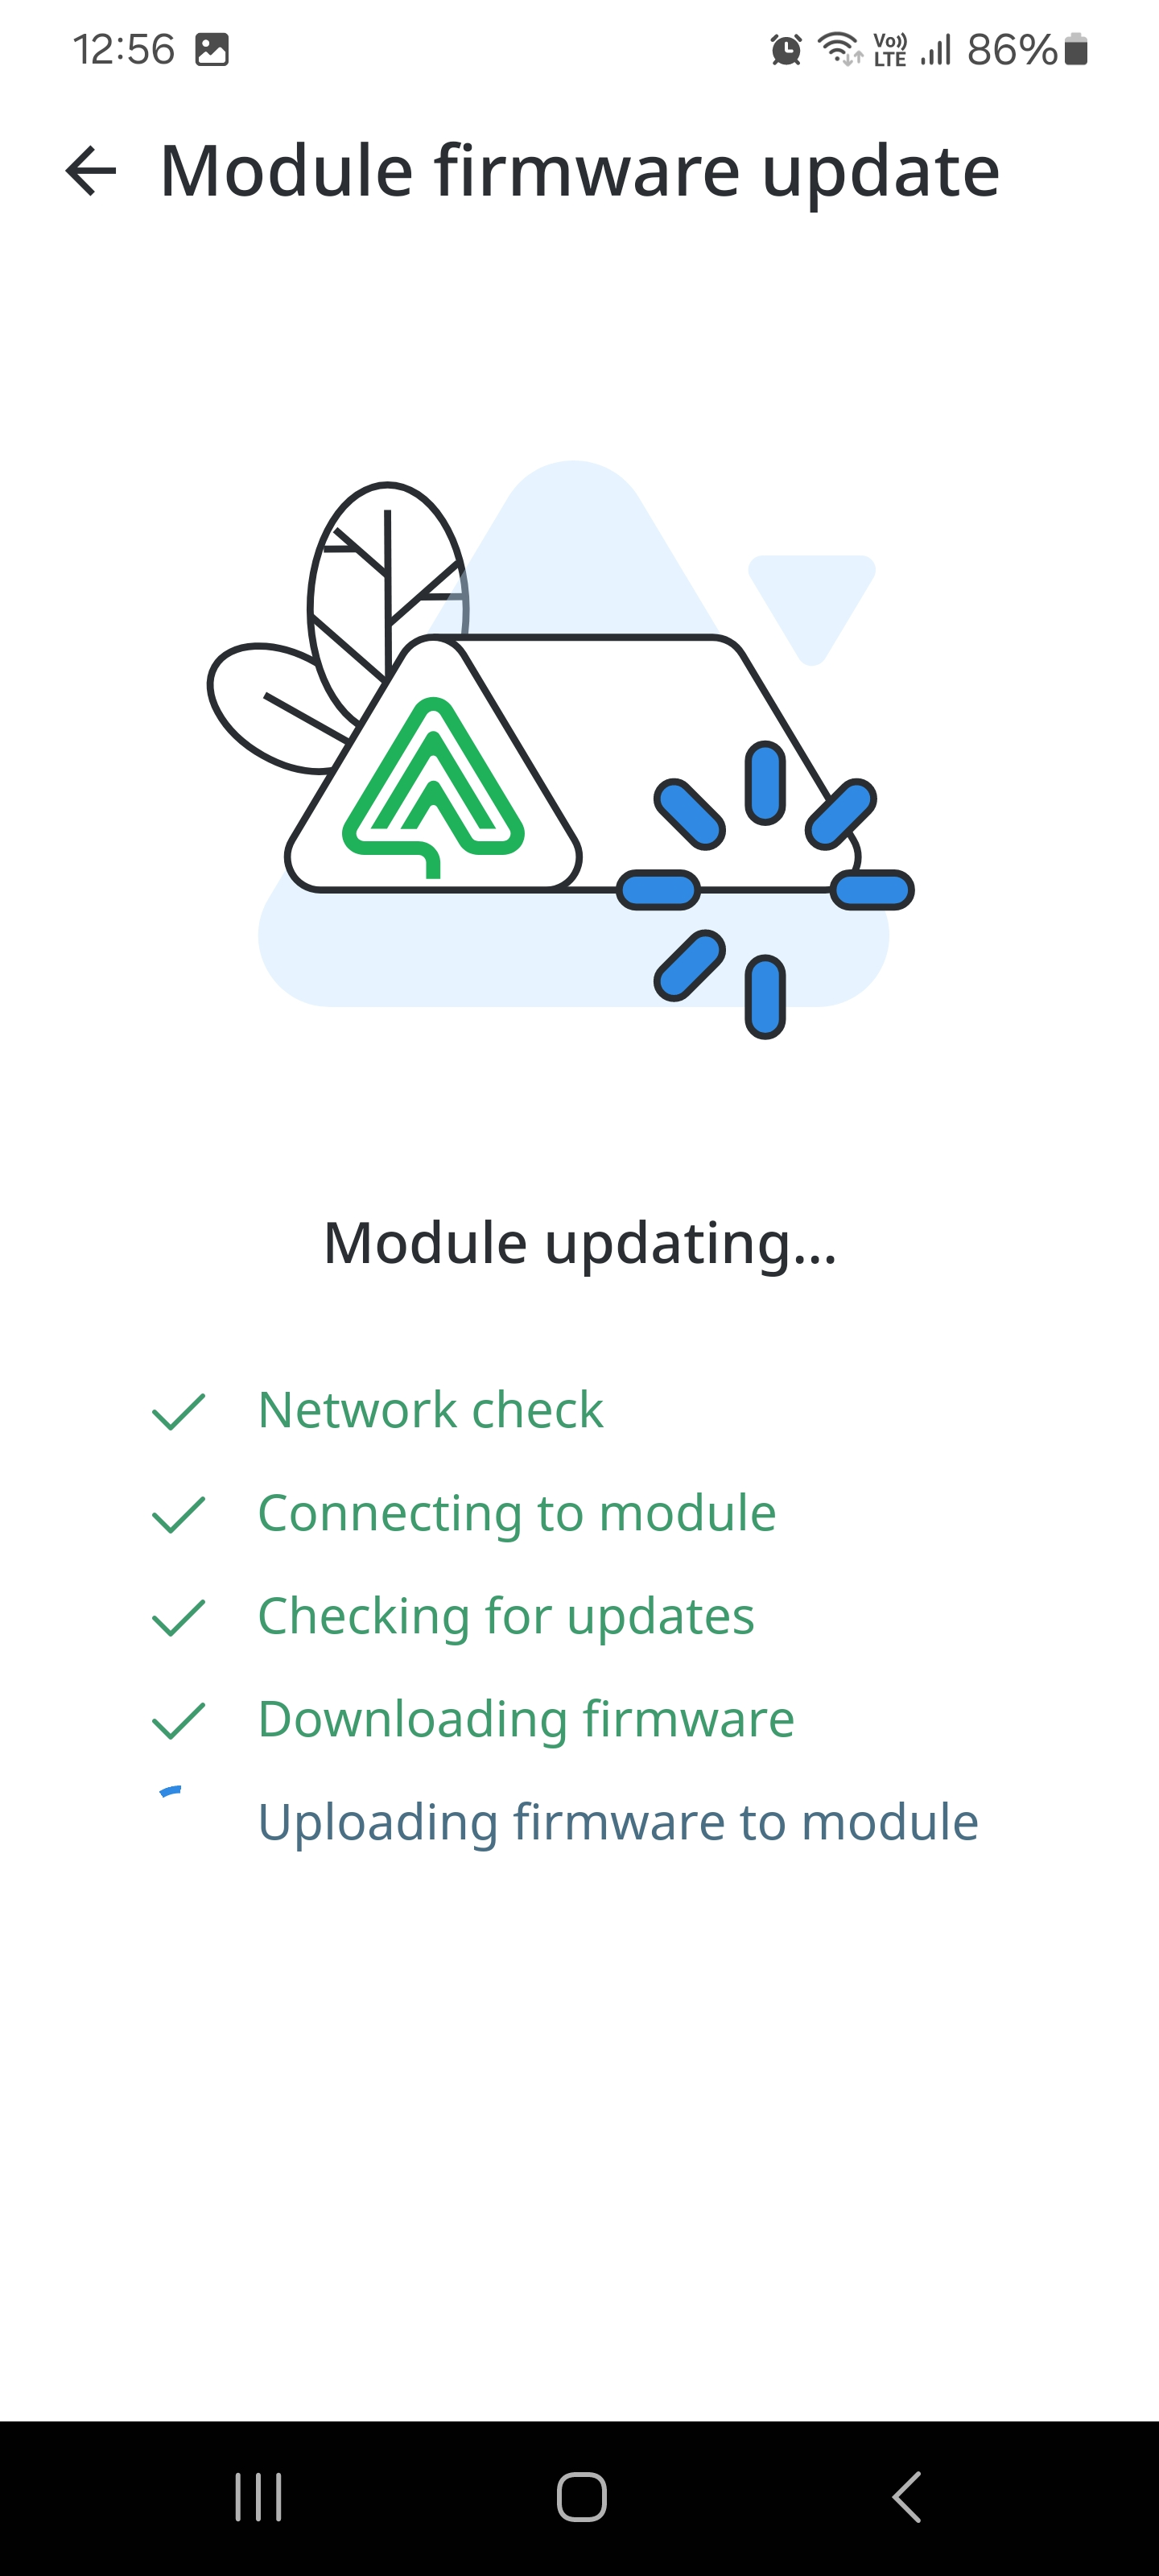
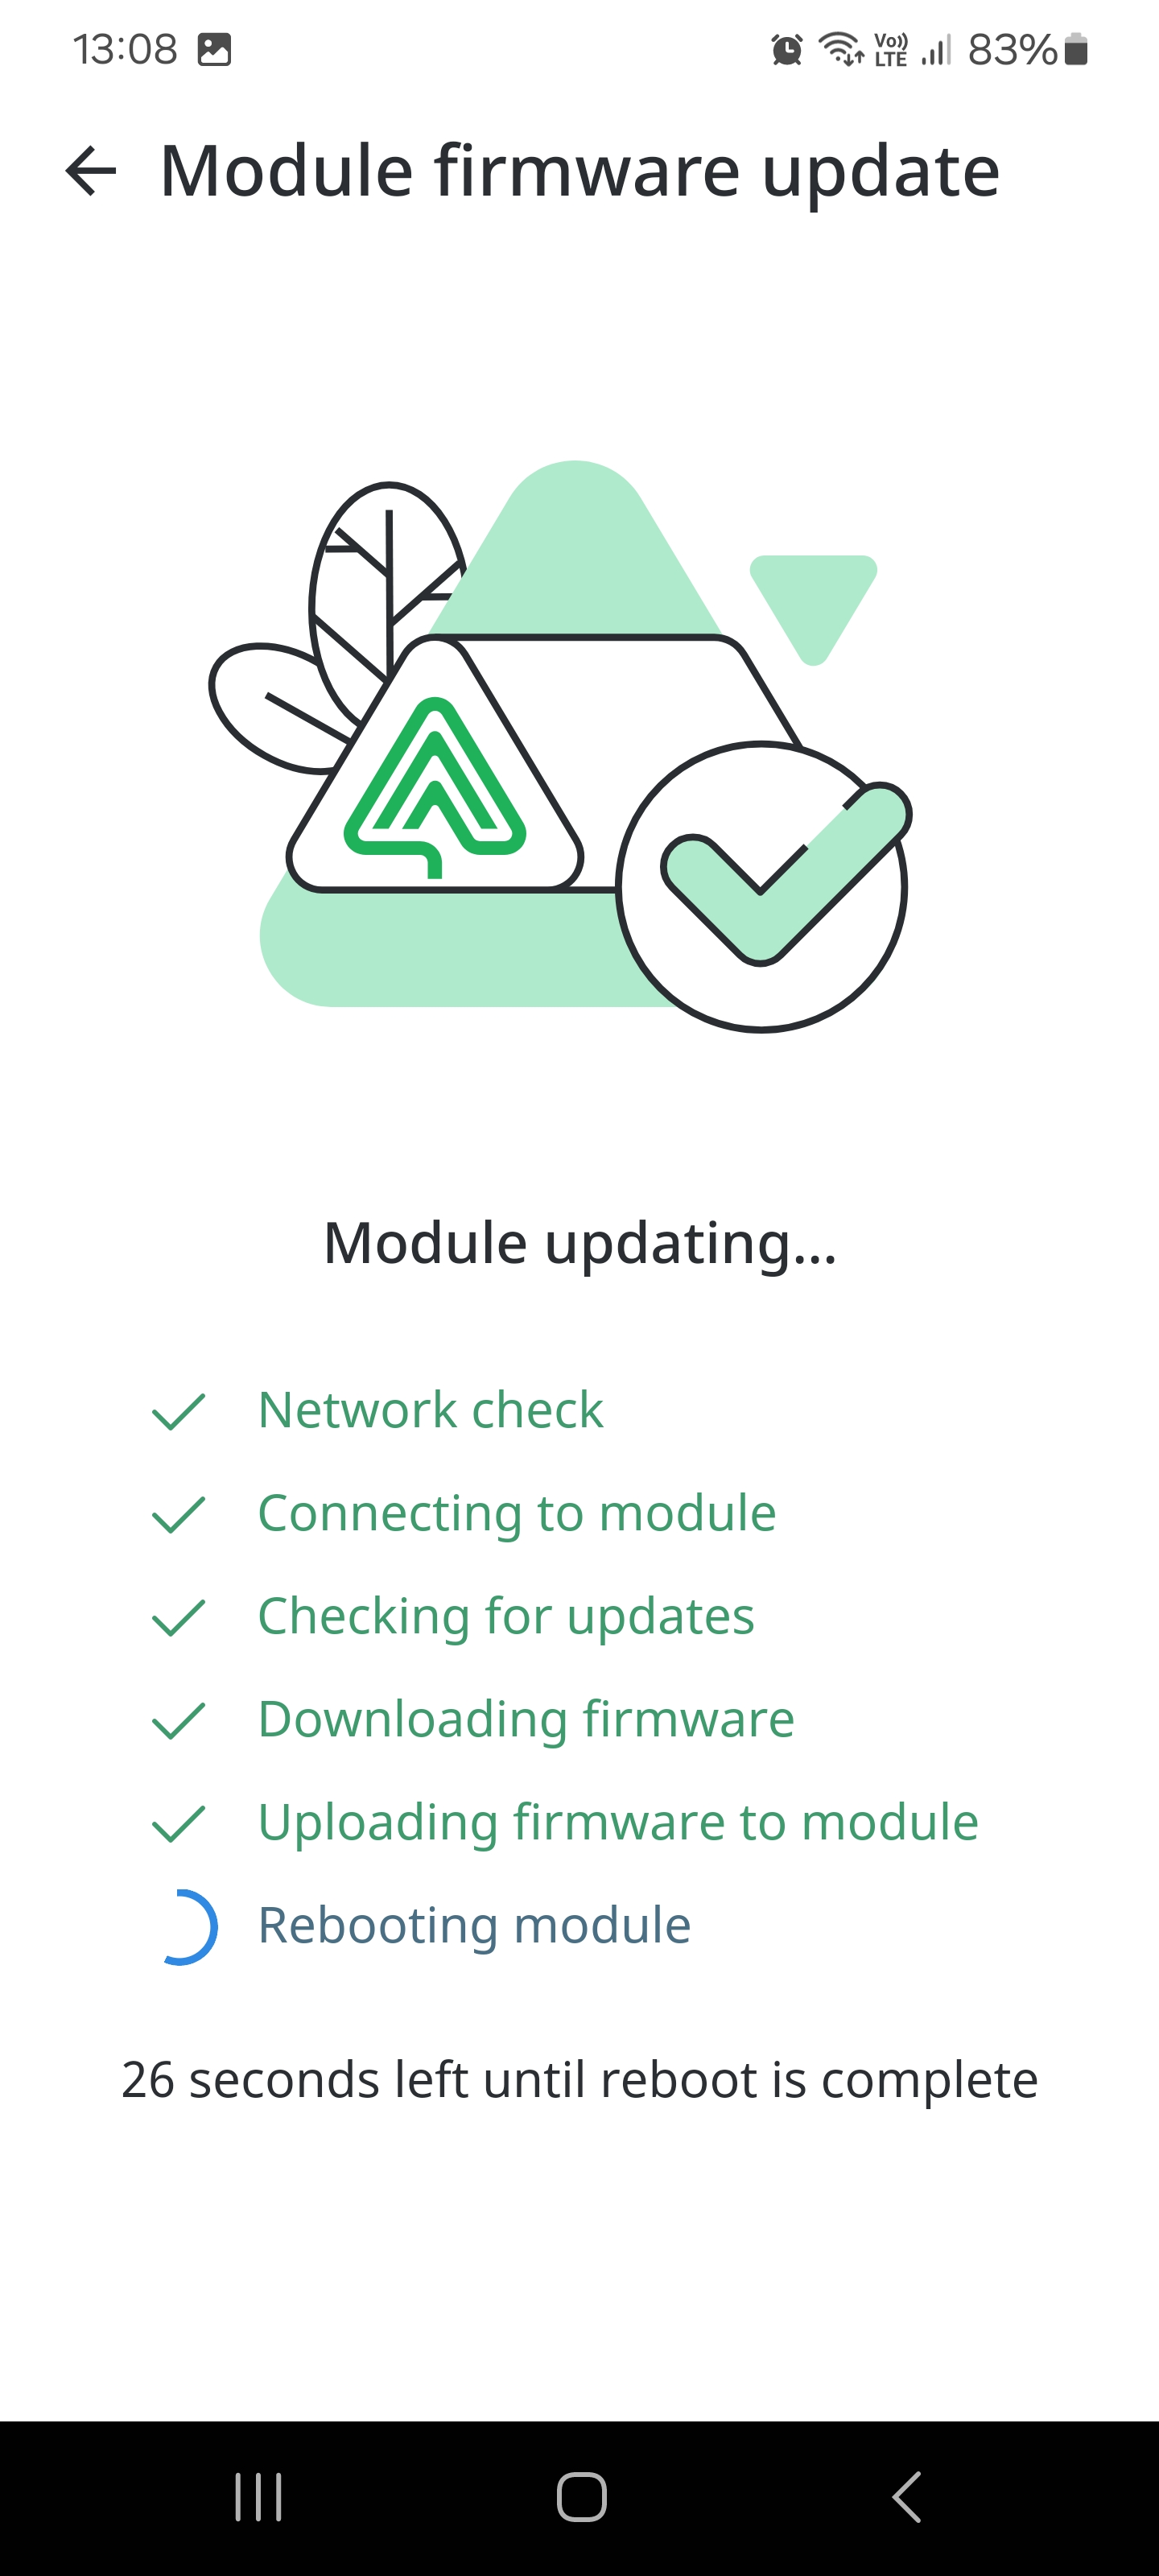
- After updating module will be automatically rebooted. Then user will see the module (in “Modules info”) updated to latest firmware.
Each module occasionally needs to be updated. System tracks the current module workload to find the perfect time to make an auto update. Rules to check if auto update possible:
-
System should store time when auto update was initiated.
-
System should check all rules that are assigned to devices which are connected to the module and find a timeline at least 1h to make an auto update. In case devices has rules by sensor data, then check by previous days or by current sensor data if no action with devices needed at least for 1h.
-
System will try to find 1h time frame for 24 h. Only in case there is no free 1h time frame, then system, send notification about manual module update. See details below.
-
Only in the case described above the system should auto update the module. And show successful notification. Description of notification are in Notifications part of documentation:
-
Module was successfully updated
-
Module could not update automatically
-
Module firmware update failed
-
While user click on Manual update button, then system shows screen with progress bar: “Module firmware update is in process…”
-
“Back” button - by click stops firmware update and shows >List of notification< page
-
After successful firmware update close progress screen and send successful firmware update notification described in 4th item list.
-
In case system could not update the module manually for 2 times (2 error messages sent), then system does not send notification about the failed update. System will try to make module firmware update later (up to developers’ flow)
Module LED indication
Possible colors: GREEN, YELLOW, RED.
Modules led indications
Each module has an indication led light. There several indication types that shows different states of modules:
*Statements above belongs to all sensors that has led light indicator. Behavior should be the same for all.
State | Indication |
First module connection | One Yellow led fastly blinking |
Connection to Wi-Fi | One Yellow LED light permanently |
Module is connected and work (idle) | All Green LEDs blinking slowly |
When one of devices of module is working | One of the green LEDs will light permanently and other LEDs will blinking green slowly |
When the module is offline | All of the LEDs light RED permanently |
"Find module" mode | All of rhe LEDs fastly blinking red |
Modules info
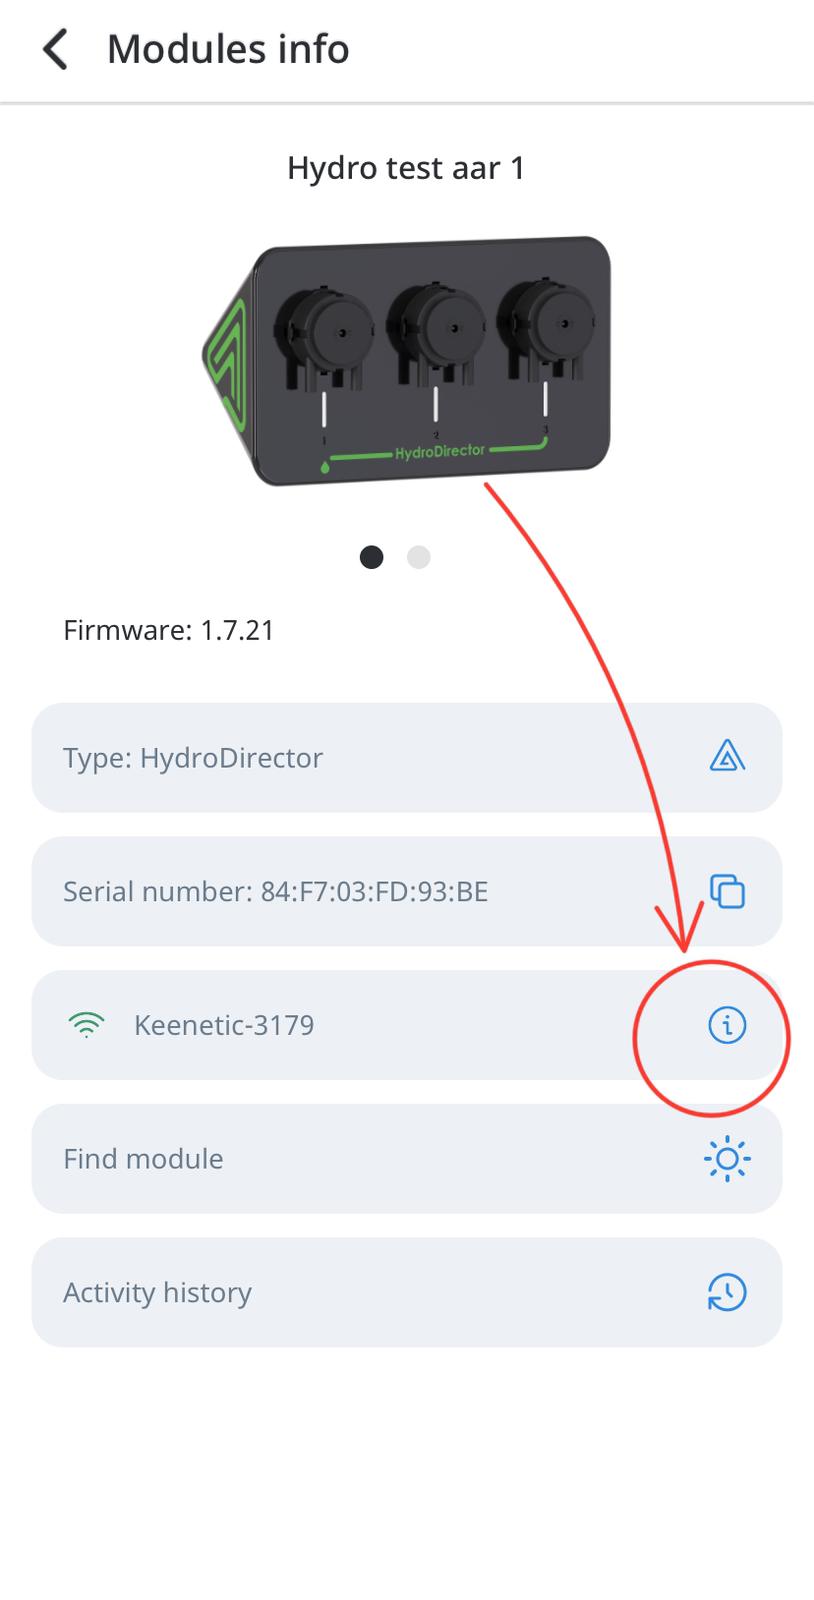
Checking modules info
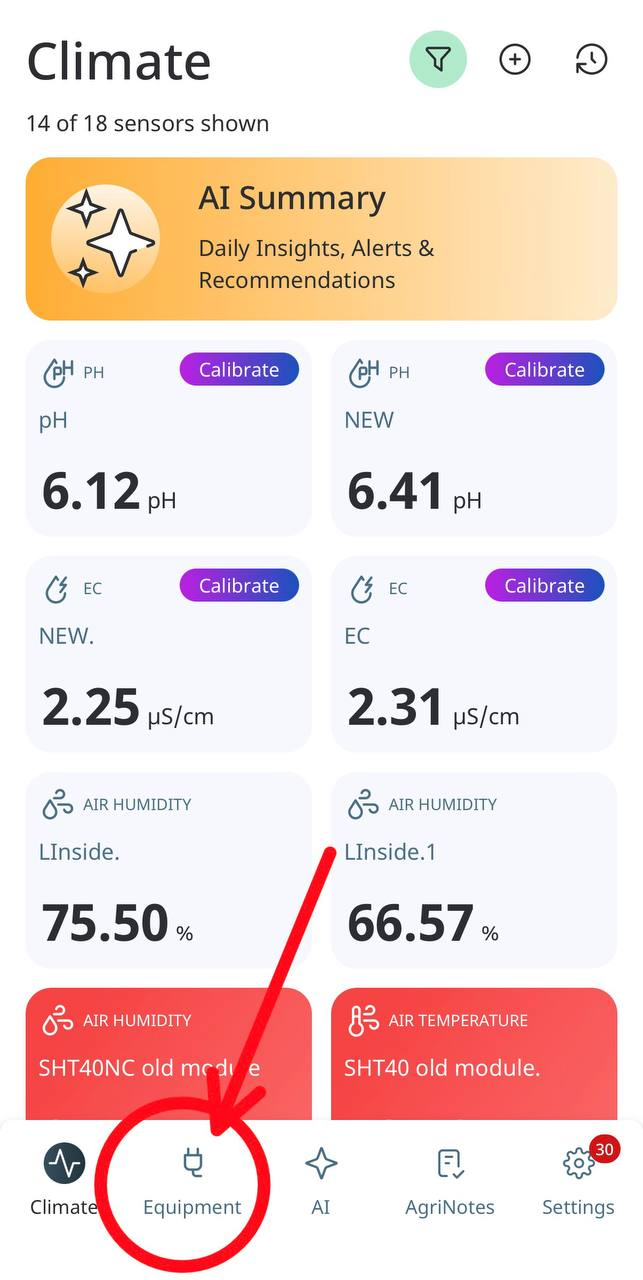
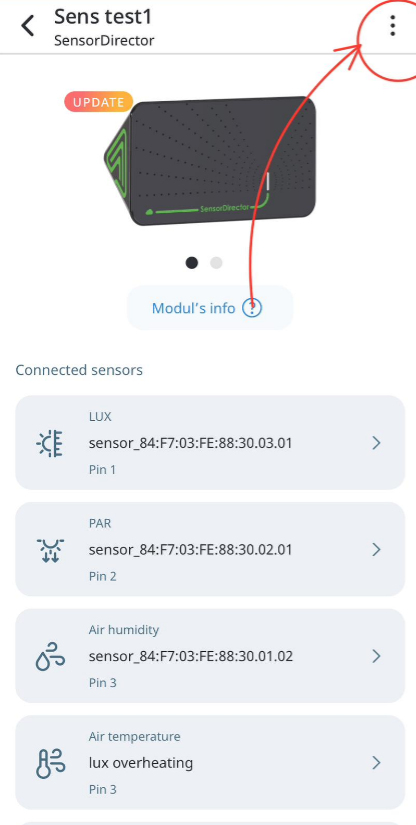
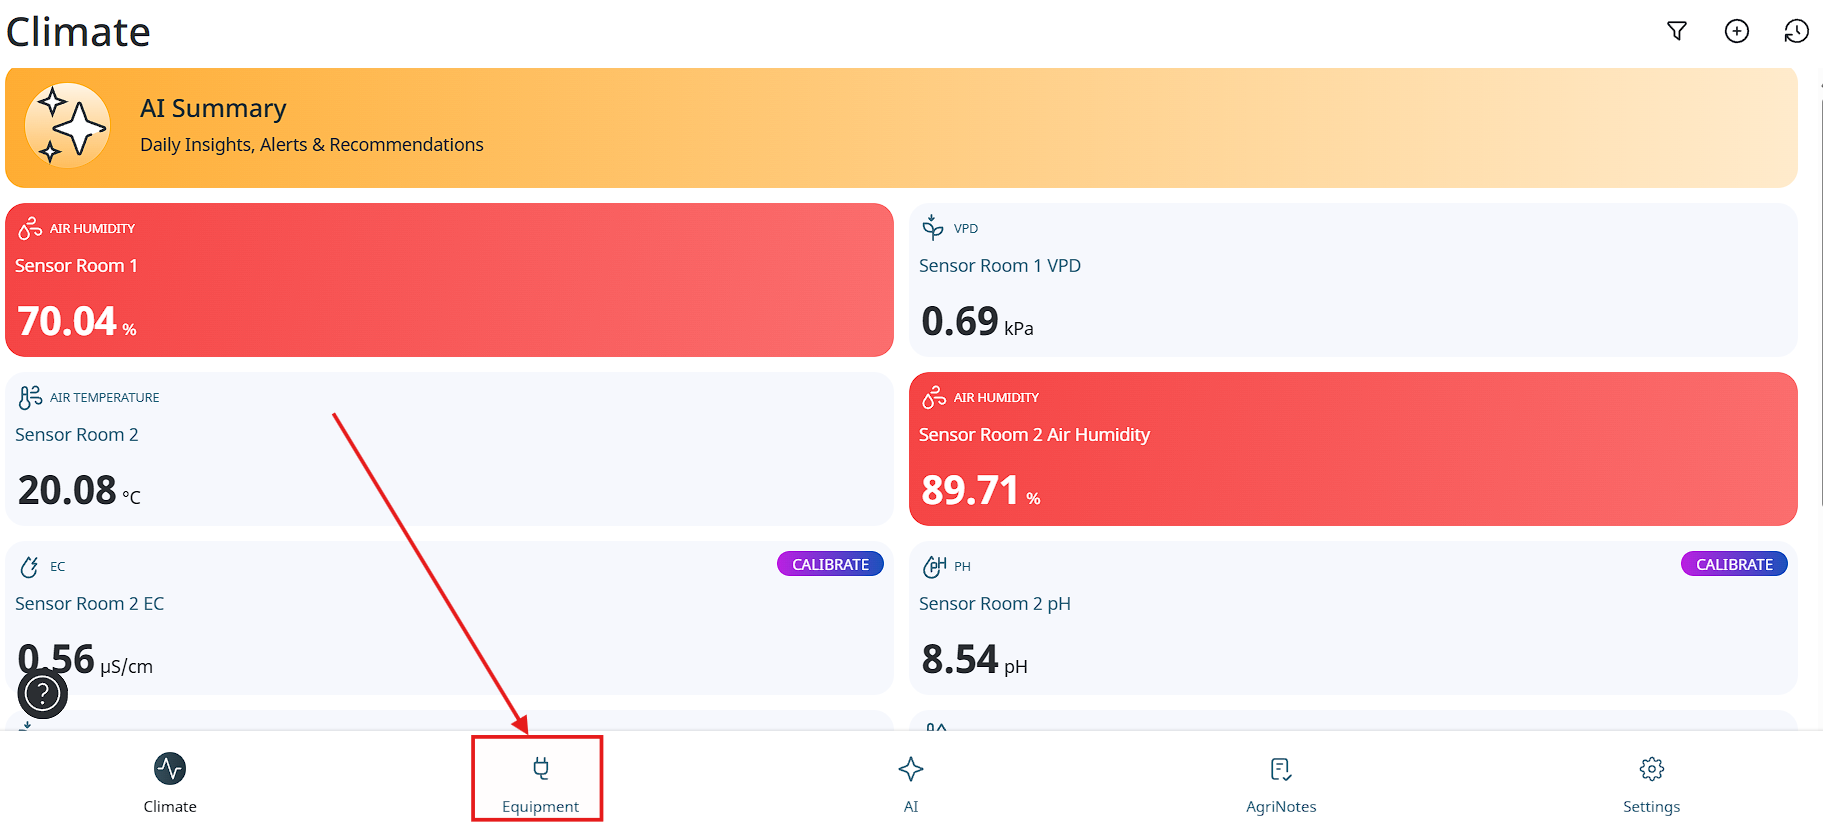
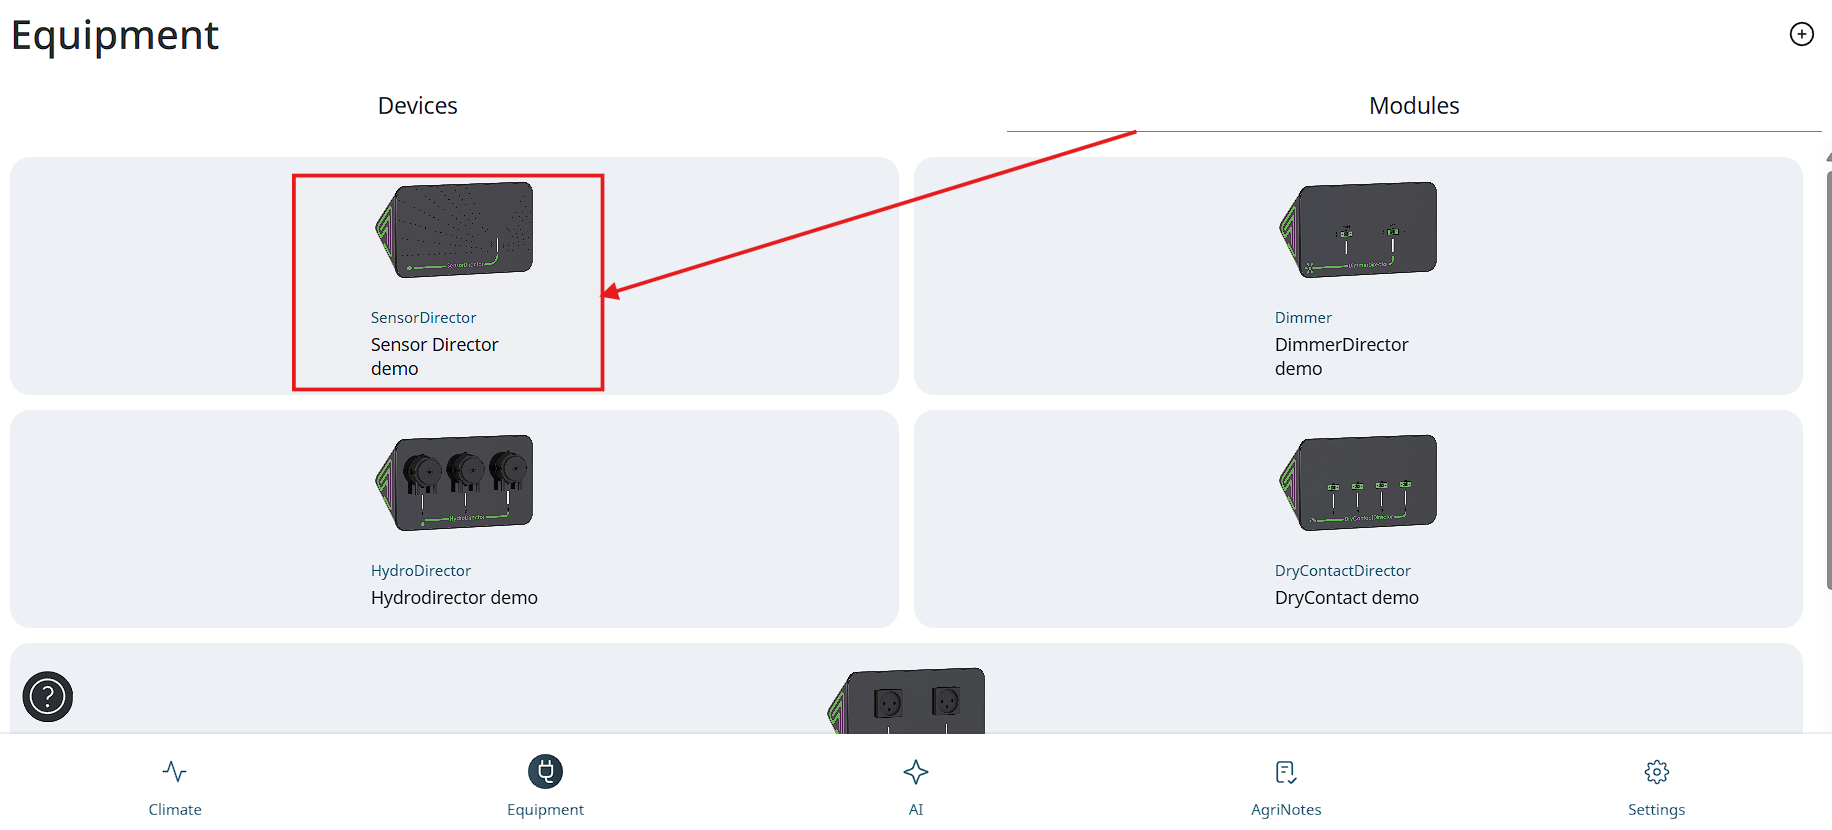
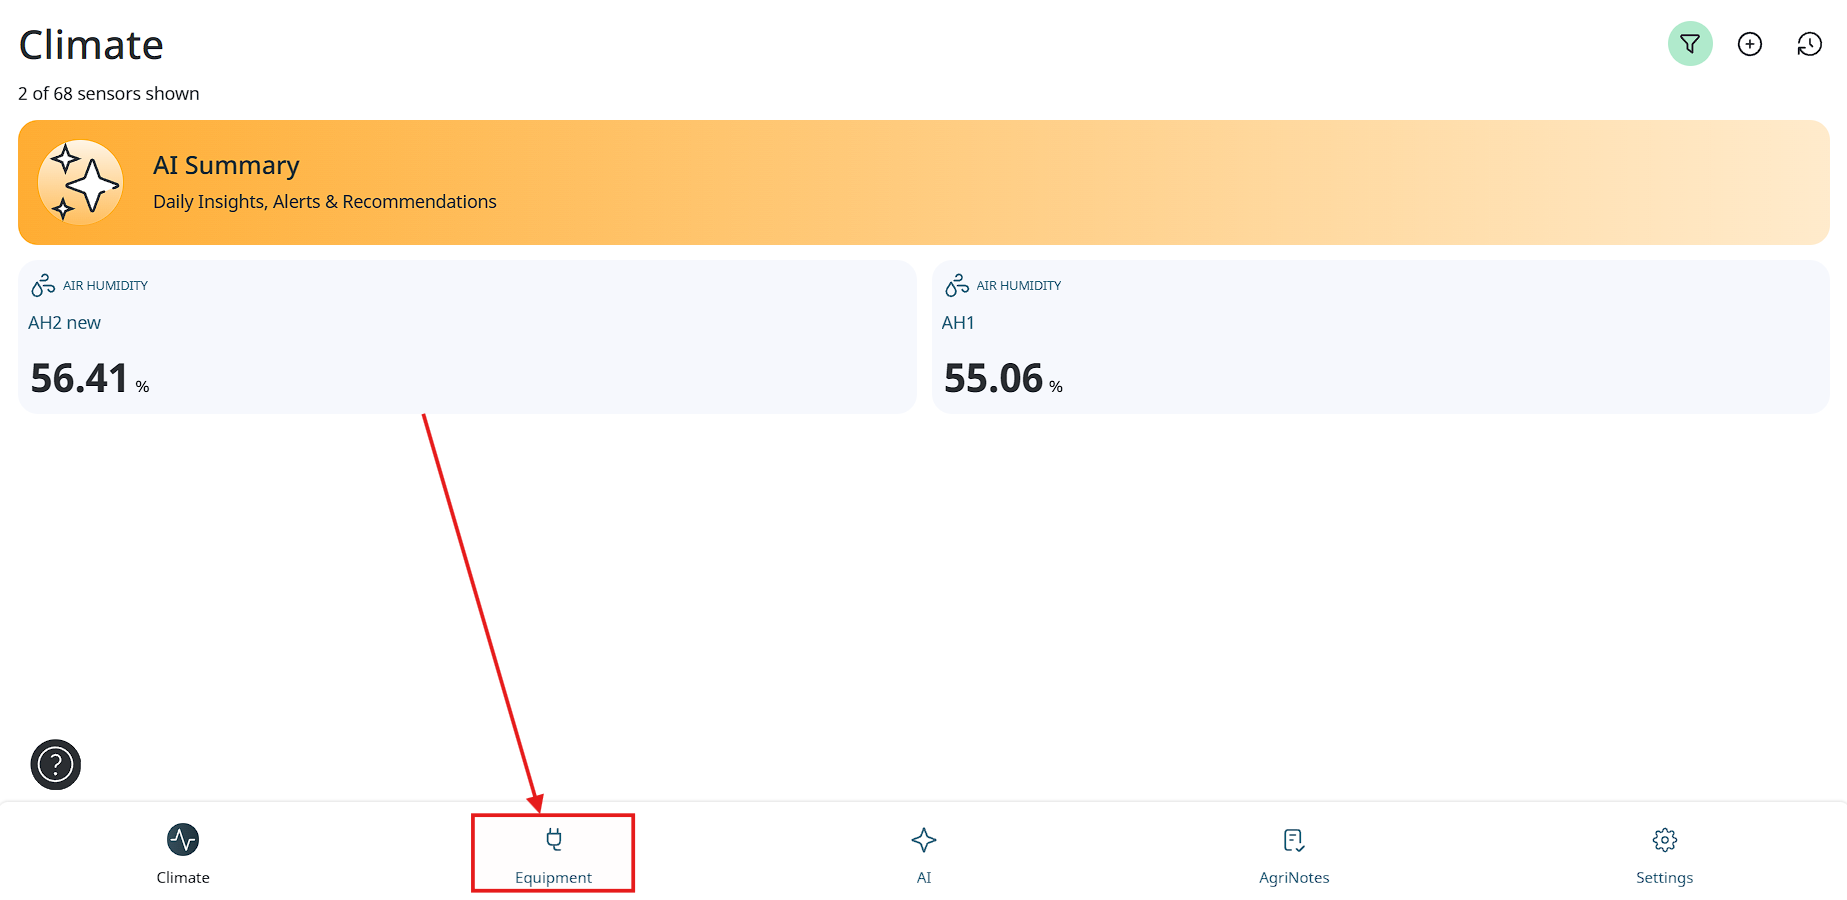
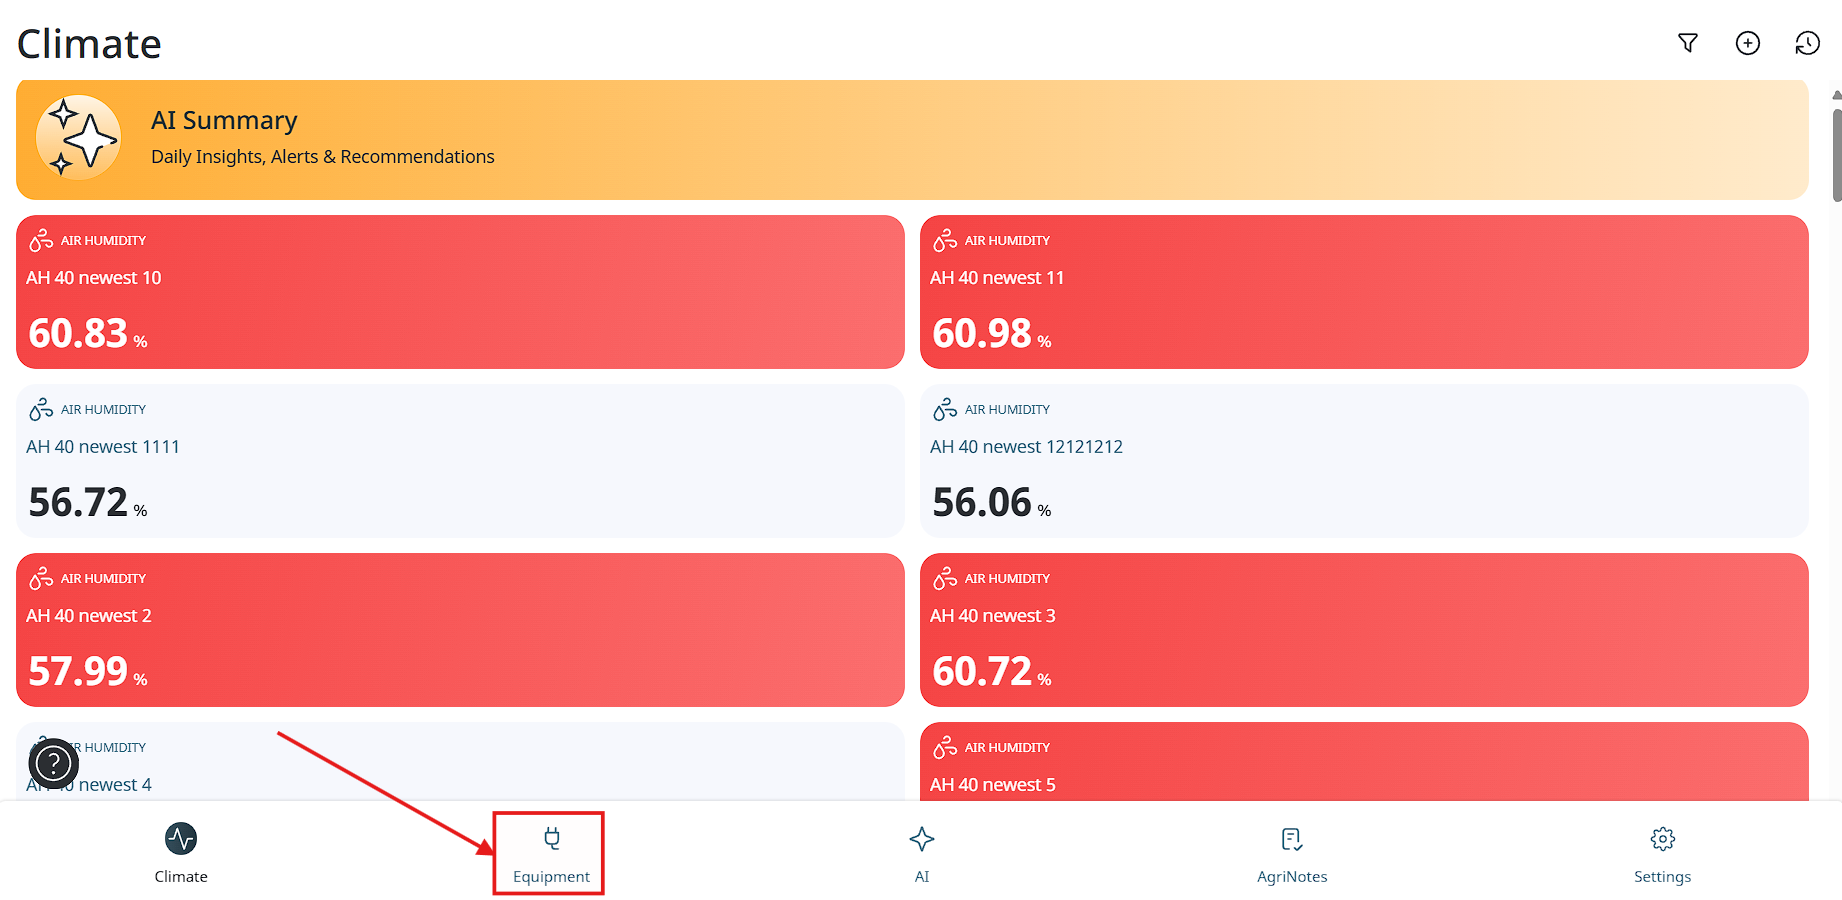
- For checking modules info tap the “Equipment” button on the main screen and then press “Modules” section.
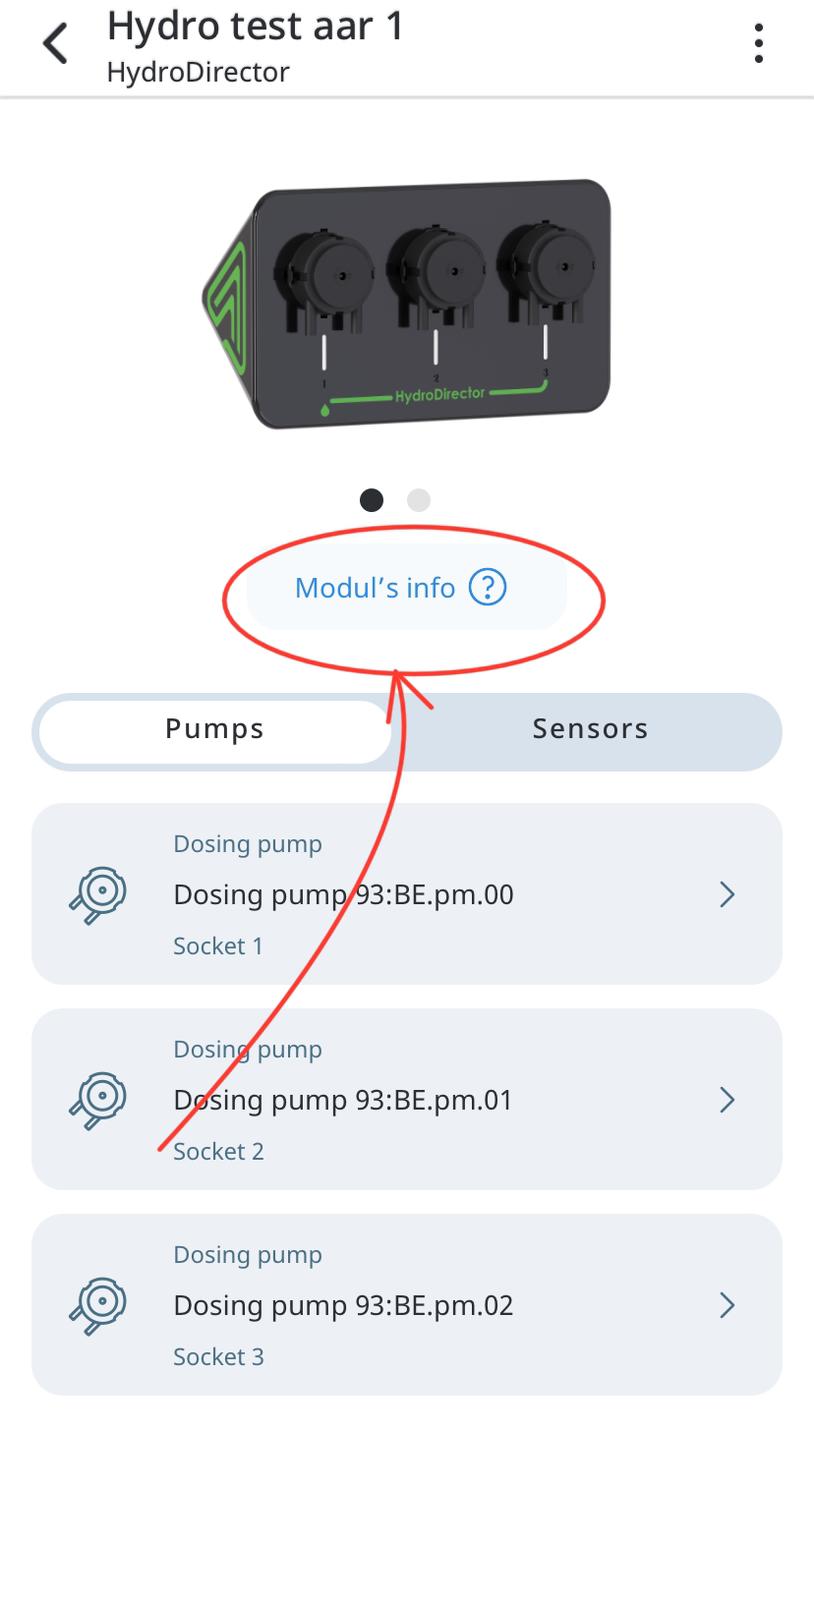
- Then on the modules screen you will see your modules list, choose one of your modules and tap on it.
- Next in the opened screen you need to tap on the “Modul`s info” button.
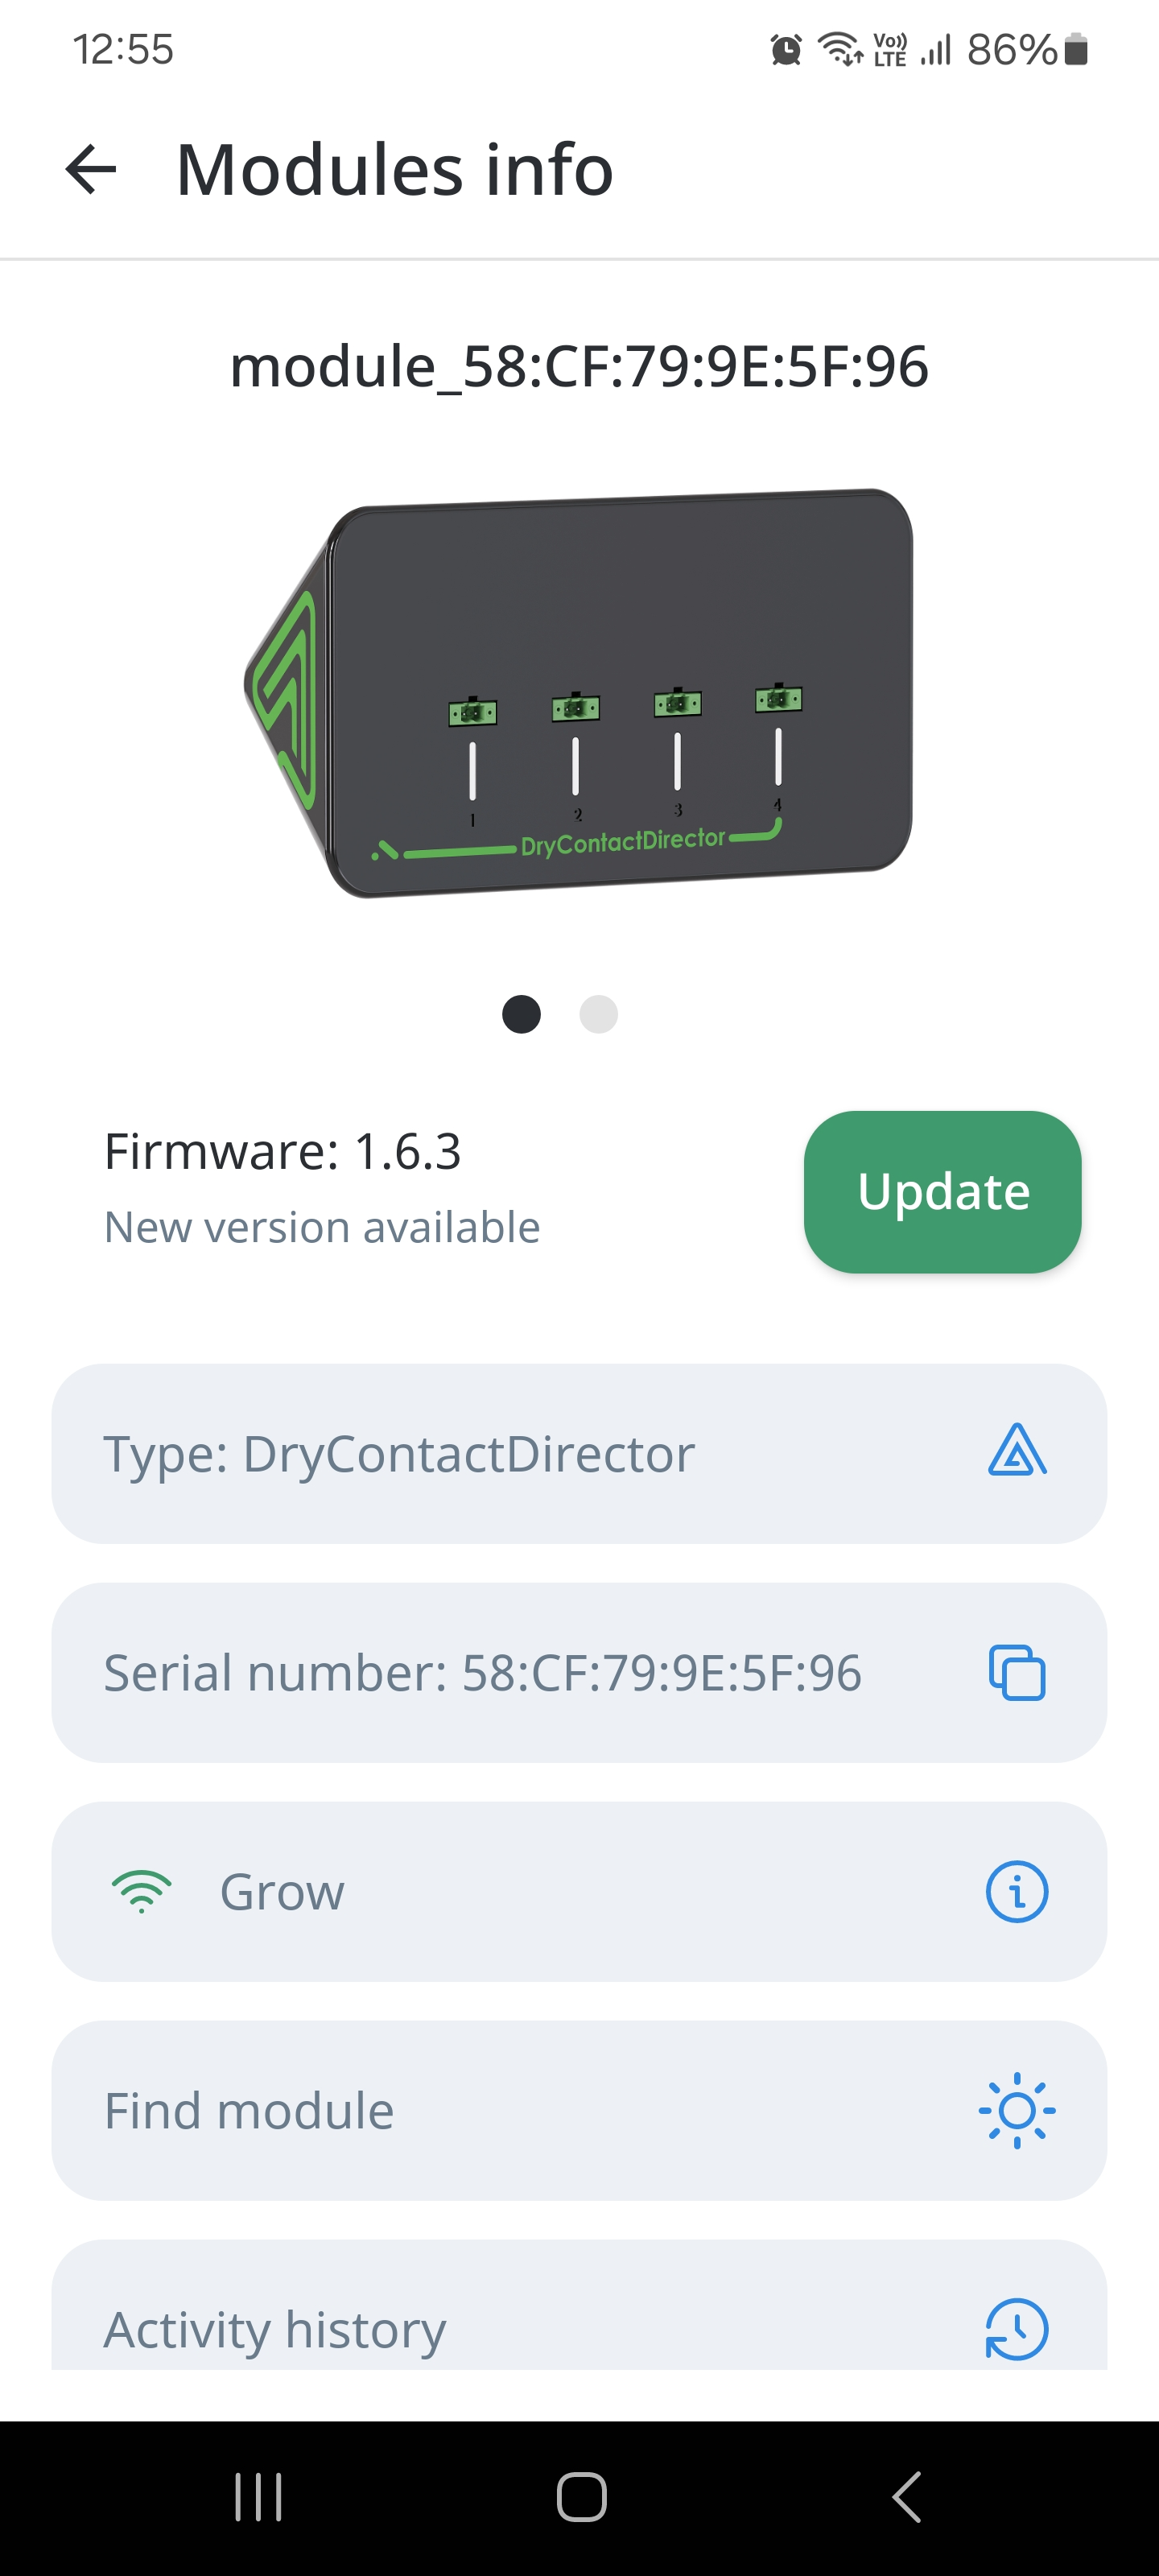
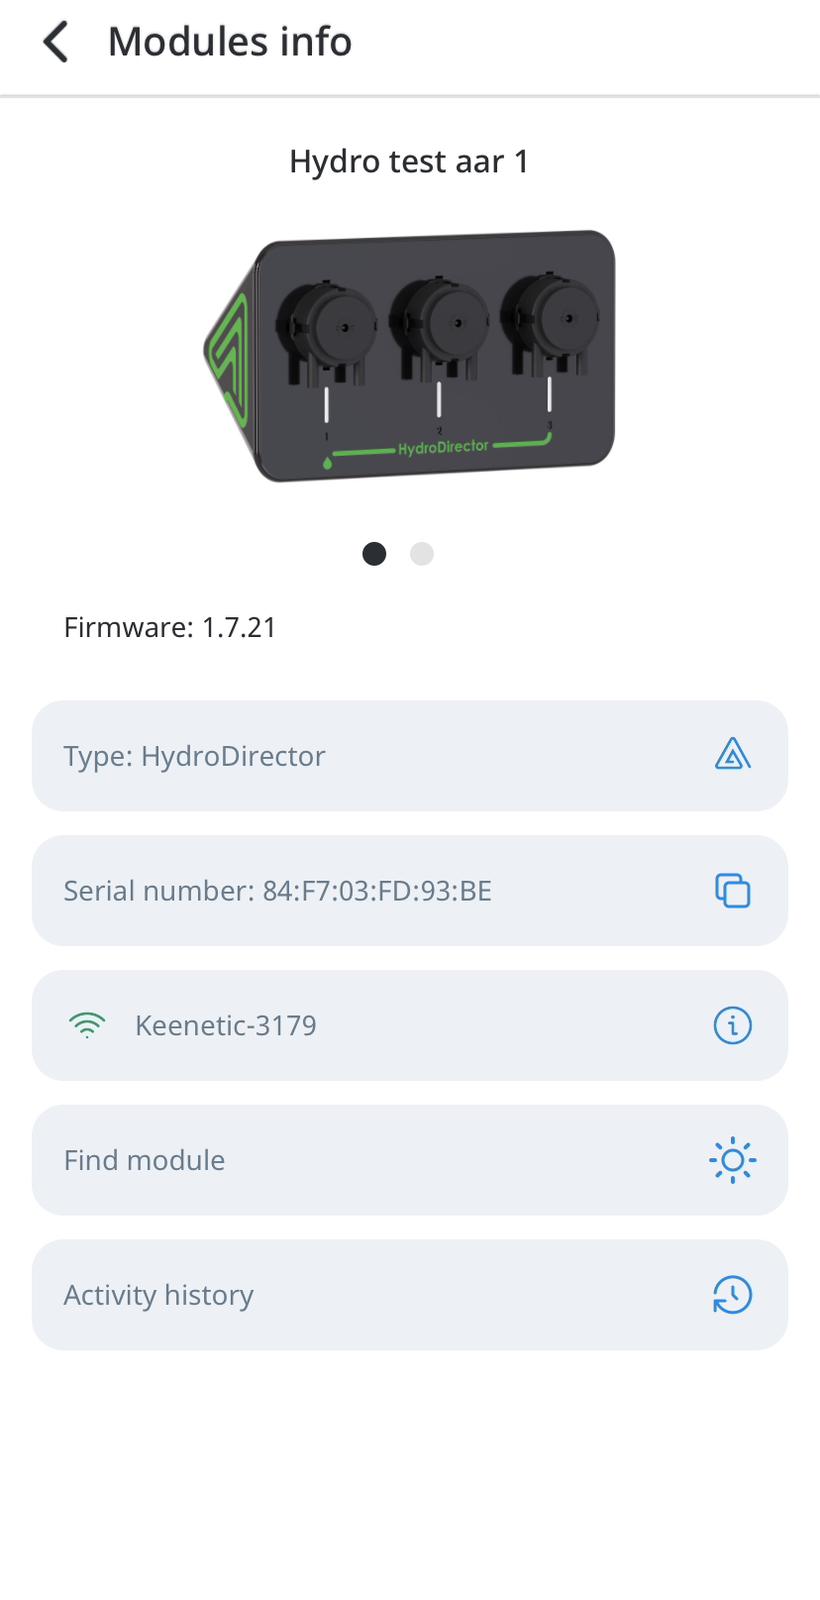
- Now you can see your module`s info:
-
Module`s name - a logical name of the module used for identification within the management system. It can be assigned by the user or automatically by the system and is displayed in the monitoring interface.
-
Firmware version - the current version of the module’s embedded firmware. Used for compatibility control, updates, and diagnostic purposes.
-
Module`s type - defines the functional category of the module and its supported capabilities. This value is set by the manufacturer and cannot be modified by the user.
-
Serial number - a unique identifier assigned by the manufacturer. Used for device identification, inventory tracking, and service support.
-
Network - displays the module’s network configuration or current network connection status.
-
Find module button - a control used to physically identify the module. When activated, the module emits a visual signal.
-
Activity history - a log of events and actions related to the module’s operation, including status changes and configuration updates.
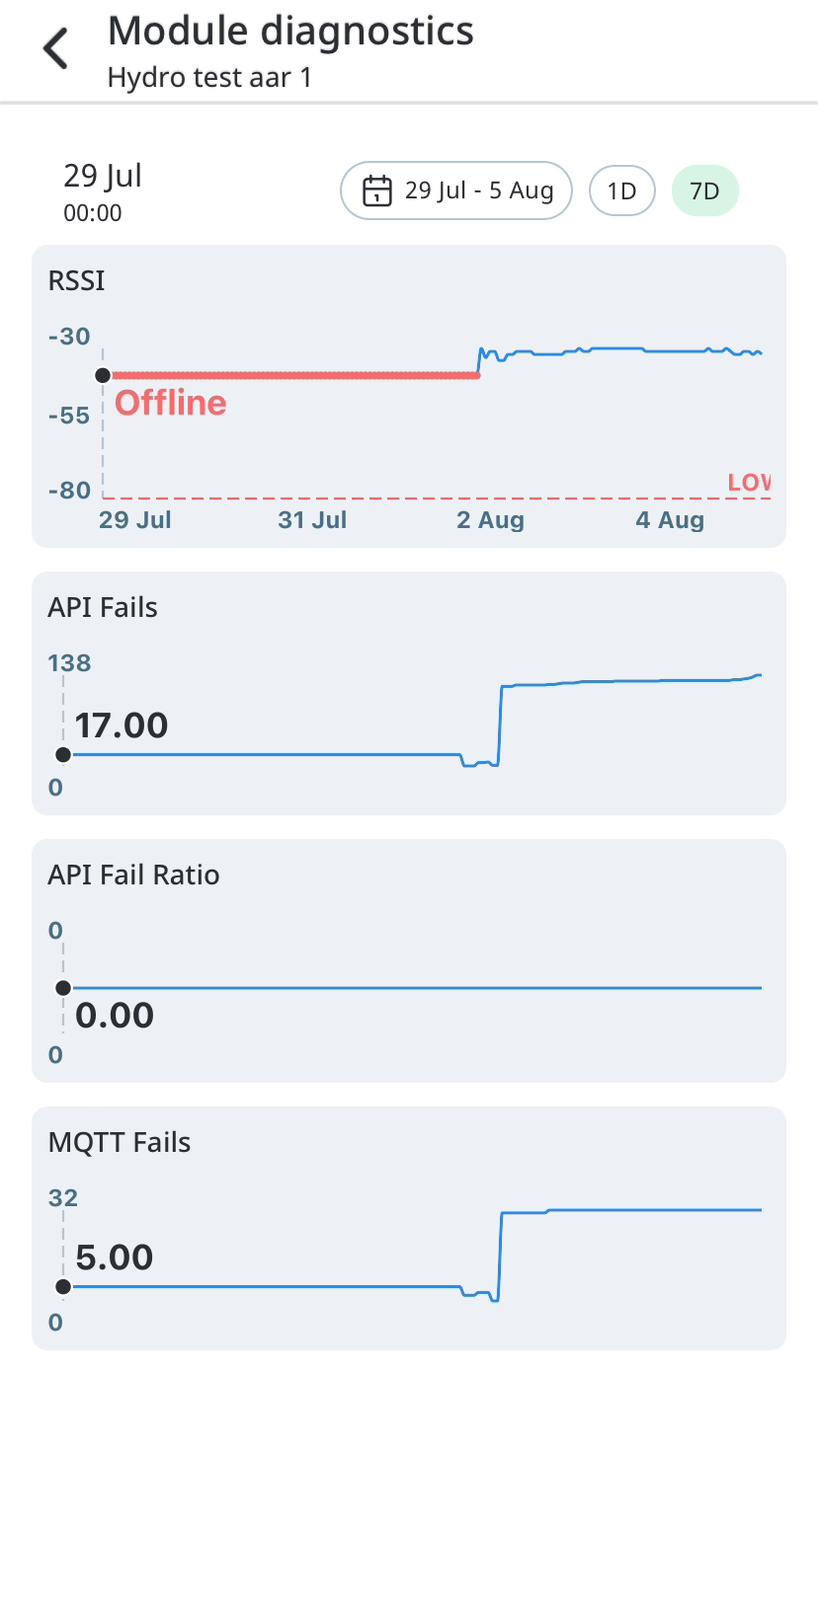
Module diagnostics
- To see module diagnostics tap the “Equipment” button on the main screen and then press “Modules” section.
- Then on the modules screen you will see your modules list, choose one of your modules and tap on it.
- Next in the opened screen you need to tap on the “Modul`s info” button.

- On the screen “Module`s info” tap on the button with the name of your network.
- On the “Module diagnostic” screen you can choose needed date and see next parameters:
RSSI - Received Signal Strength Indicator. Measures the strength of a wireless signal in dBm. Values closer to 0 indicate a stronger signal.
API Fails - Number of failed API requests within a defined time period.
API Fail Ratio - Ratio of failed API requests to the total number of API requests.
Calculation: API Fails / Total API Requests.
MQTT Fails - Number of errors related to MQTT connections or message delivery (connection failures, session drops, message delivery failures).
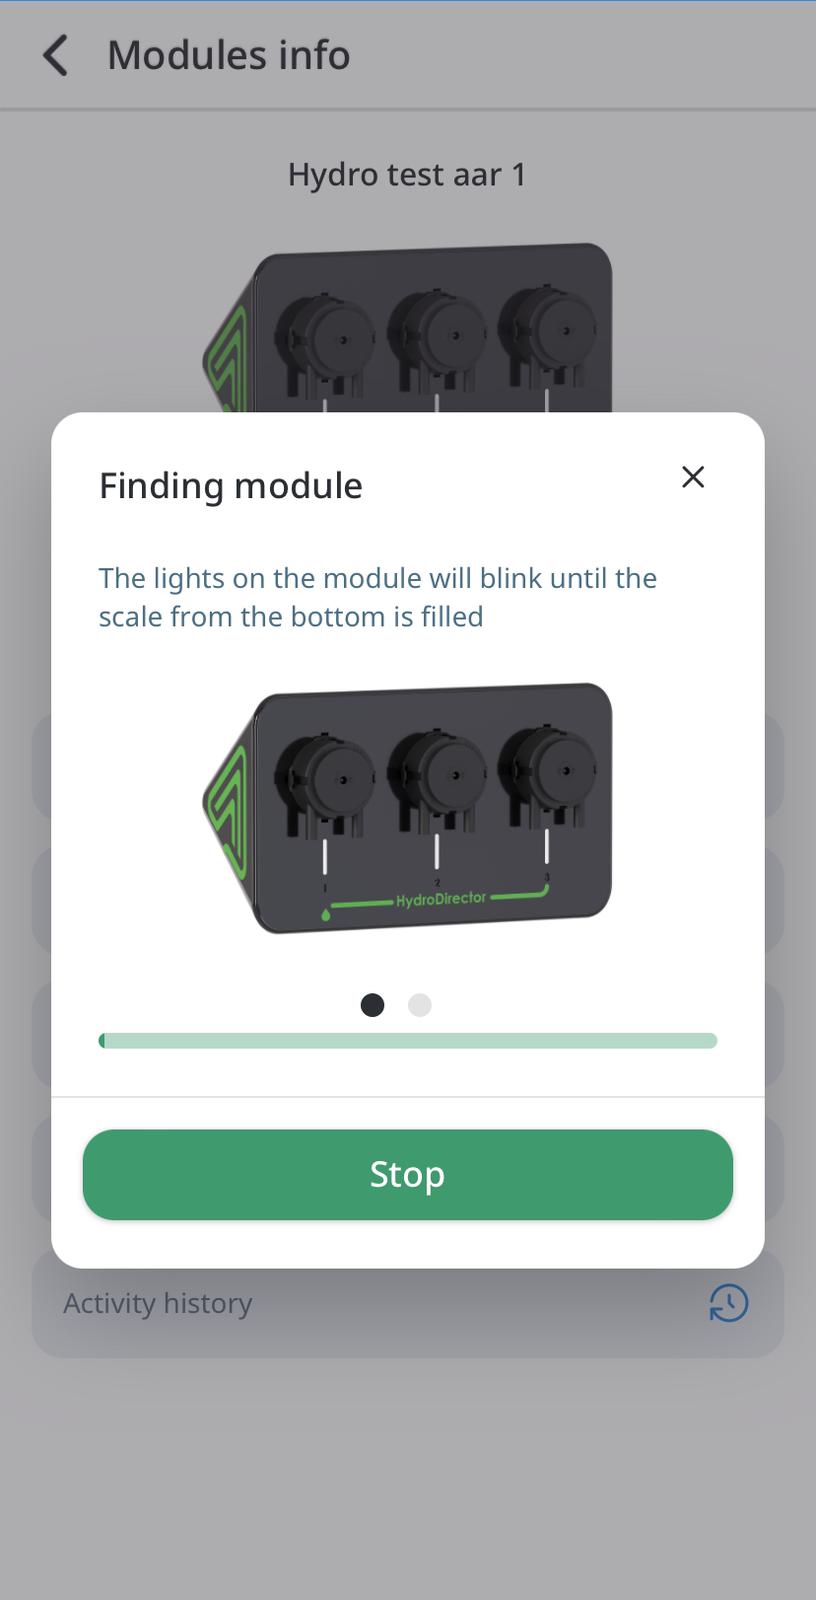
Find module
- For finding module tap the “Equipment” button on the main screen and then press “Modules” section.
- Then on the modules screen you will see your modules list, choose one of your modules and tap on it.
- Next in the opened screen you need to tap on the “Modul`s info” button.

- Then you need to tap the “Find module” button.
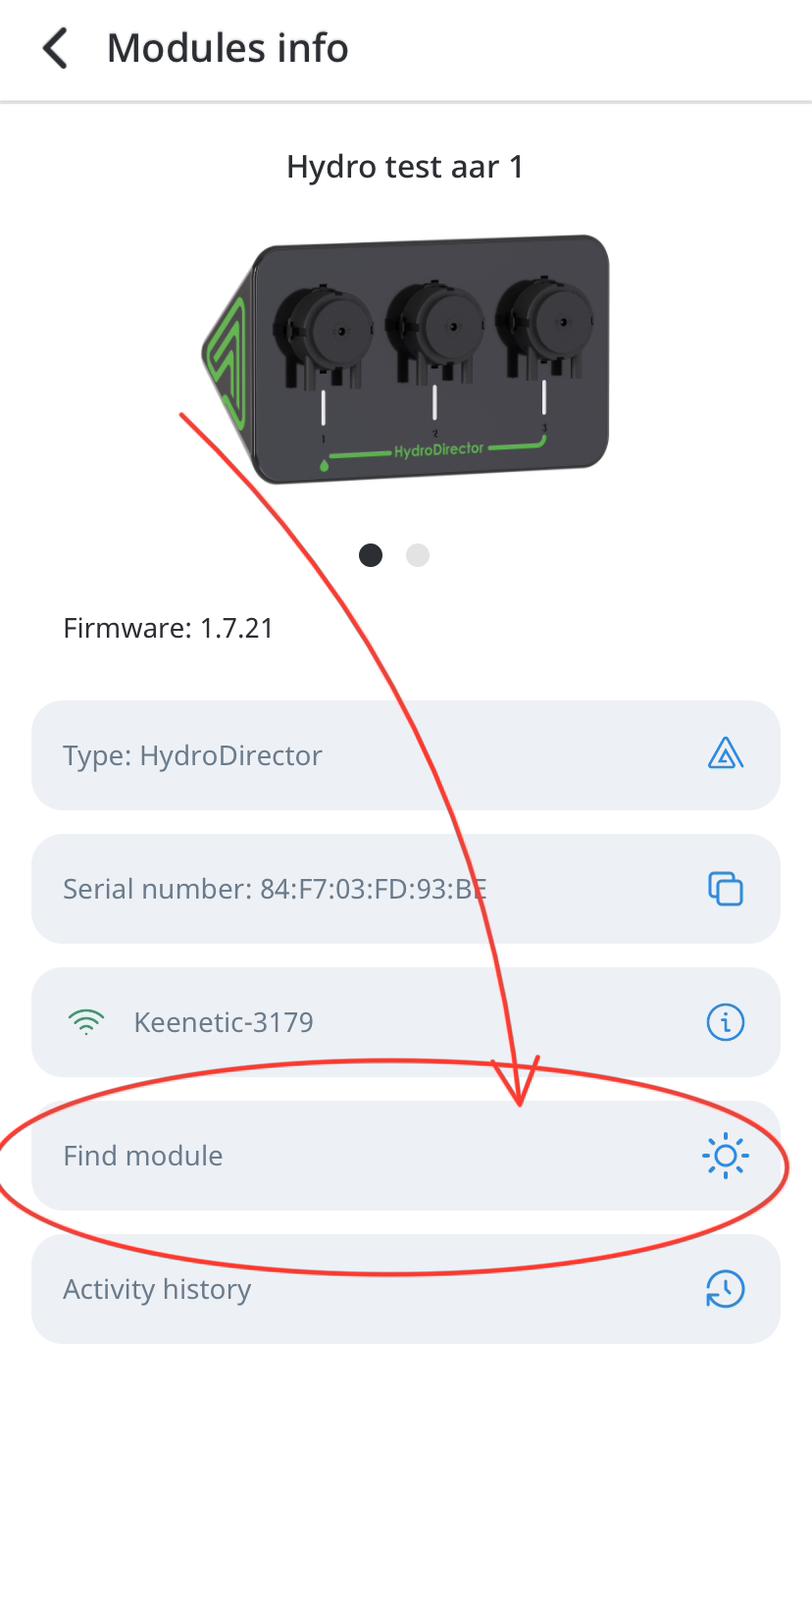
- The LED indicators on your module will blink until the scale from the bottom on the screen is failed. You can tap on the “Stop” button to end LED indicators blinking.
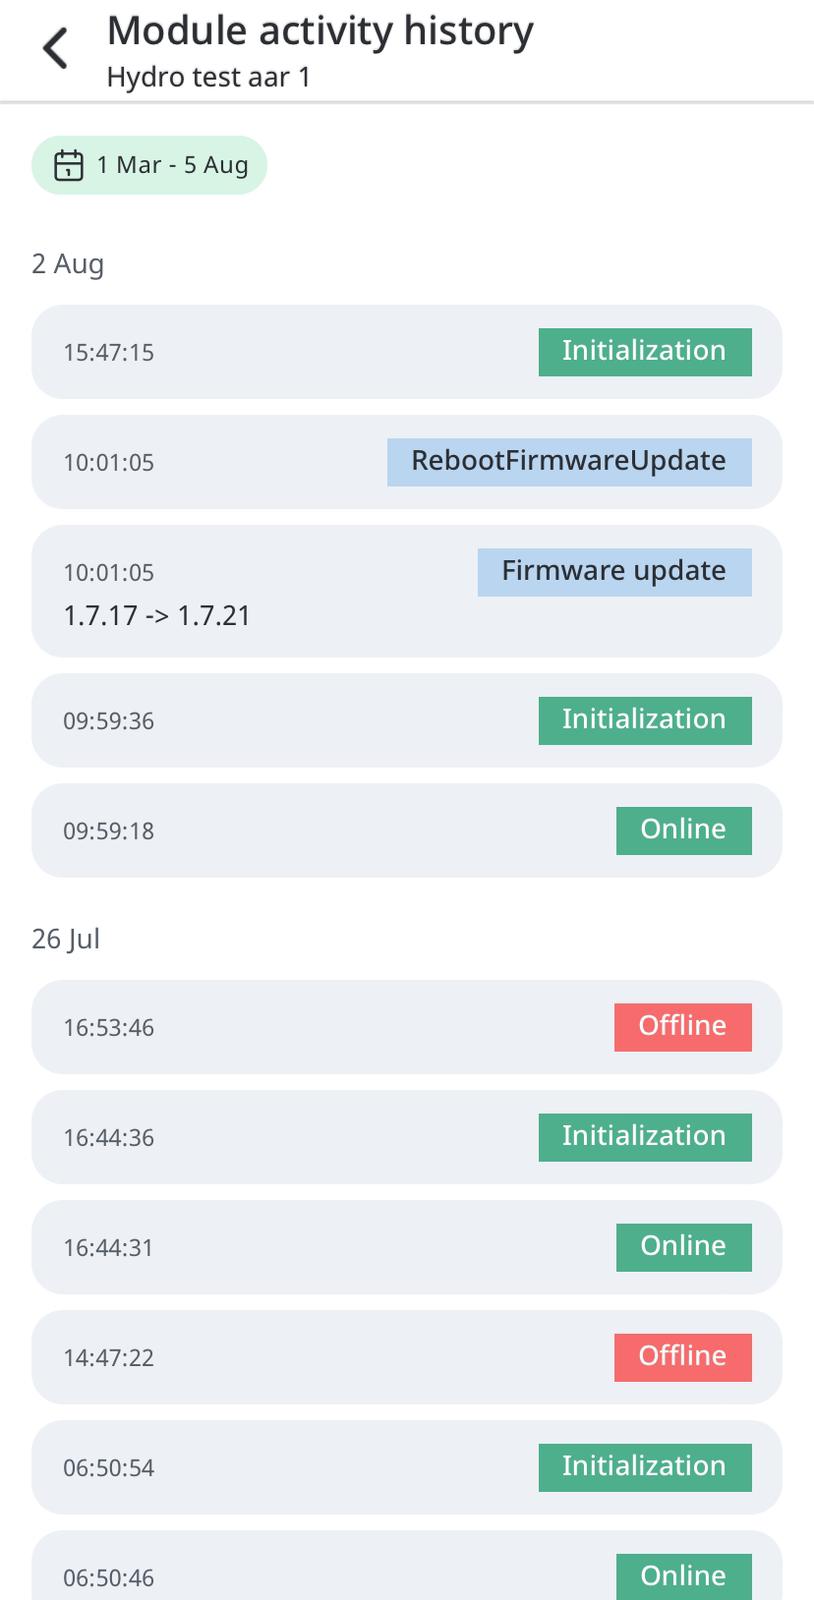
Activity history
- To see activity history tap the “Equipment” button on the main screen and then press “Modules” section.
- Then on the modules screen you will see your modules list, choose one of your modules and tap on it.
- Next in the opened screen you need to tap on the “Modul`s info” button.

- Then on the “Module`s info” screen you need to tap the “Activity history” button.

- On the opened screen you can choose the needed date and see your module activity history.
Changing the Wi-Fi ssid and password in the module (without resetting it)
Options for changing WiFi by button in module settings (one button):
-
Module is online: WiFi will be changed by sending a command to the module, and a new WiFi is added, the module will have 2 WiFi, if you add it again, then it will be 3, etc.;
-
Module is offline: the module will raise the access point and will wait for a command on the local network, the phone must be connected to the WiFi module as when connecting. On the application, you press the add WiFi button, if the module is offline, then the application sends a connection to the module access point.
Conditions:
-
All previous wifi will also be remembered and will connect first to the main one, then to the others;
-
The main wifi is considered the one to which it was possible to connect last time;
-
Connection attempts will occur from the strongest wifi, if the names of the networks are the same, then they will always connect to the strongest with this name;
-
A list of wifi that the module remembers will be sent in the structure (send a list of available and the current one to which it is connected);
-
When resetting the module to factory settings, all wifi are deleted
Work with sensors
Adding a new sensor
To add a new Sensor in the System, plug in it to the turned-on Module. After a new
Sensor has been connected to the Module; it is necessary to disconnect the Module
from the power supply and turn it back on.
Note: The pH, EC and Water Temperature Sensors are plugged into HydroDirector.
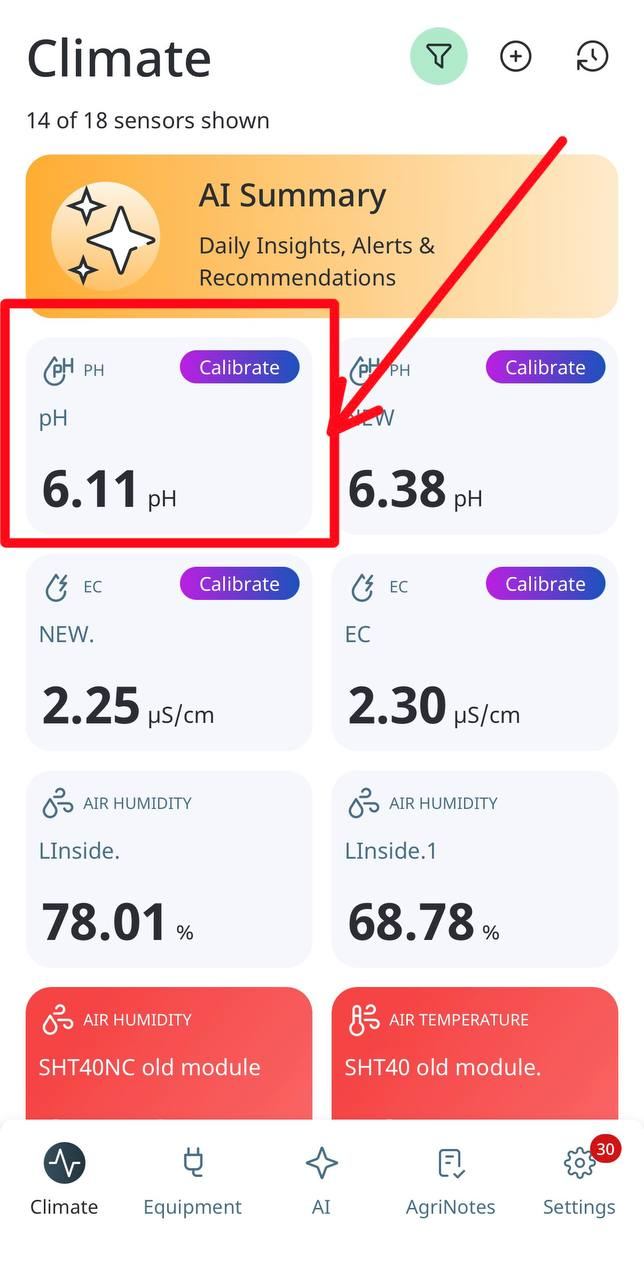
Newly added Sensors are shown on the top of the list:
● If the added Sensor requires calibration, the Sensor tile displays Need calibration.
● If the added Sensor does not require calibration, the Sensor tile appears in the Regular view. After a Sensor appears in the list, you can check its details by opening the Sensor page.
- Tap the button on the Climate screen to proceed. The following screen appears
with the following message:
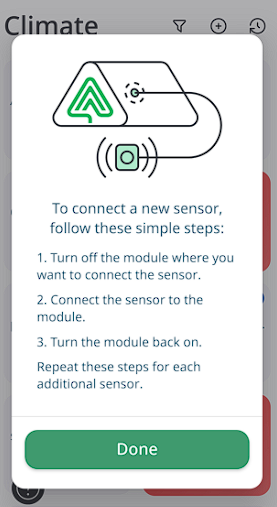
- Tap the Done button. You will be redirected back to the Climate screen.
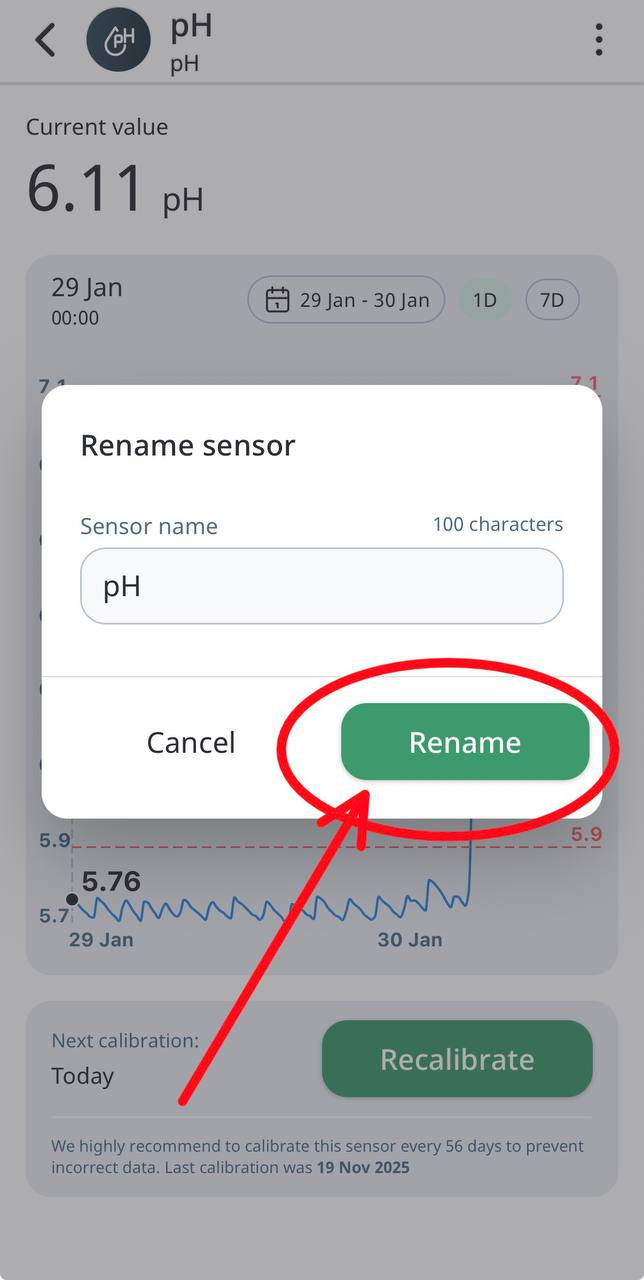
Renaming sensor
- In the Climate tab, select the sensor you want to rename.
- In the sensor menu, click the three dots in the top-right corner.

- Select Rename sensor.
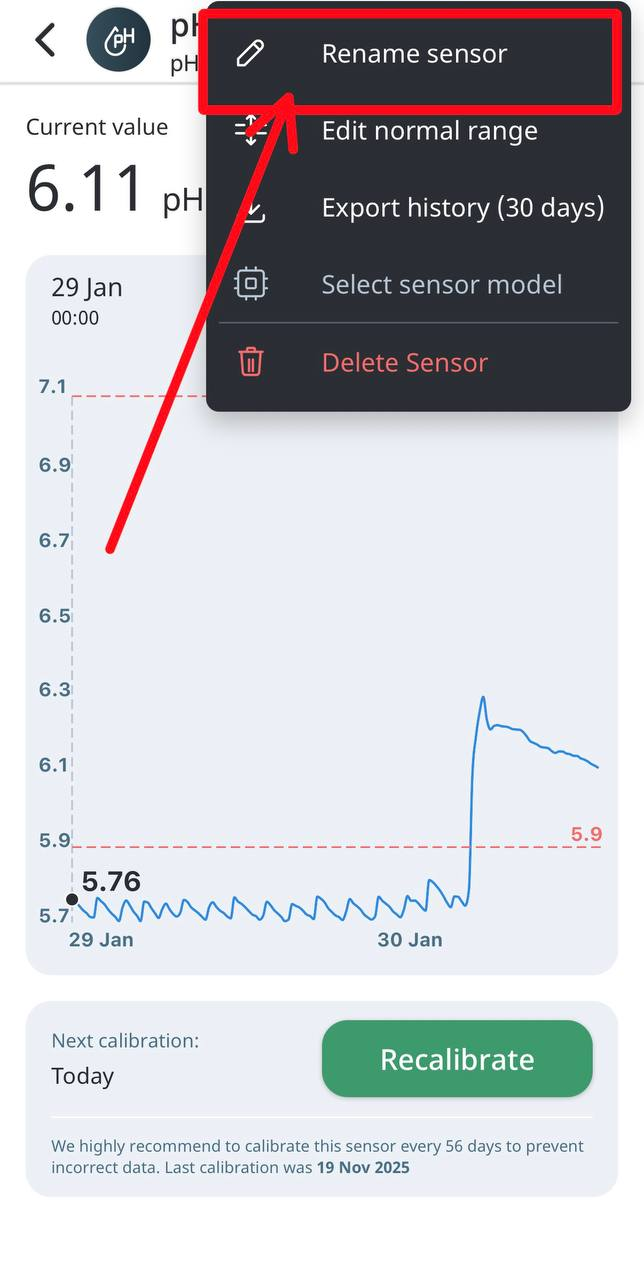
- Enter the new sensor name and click Rename.
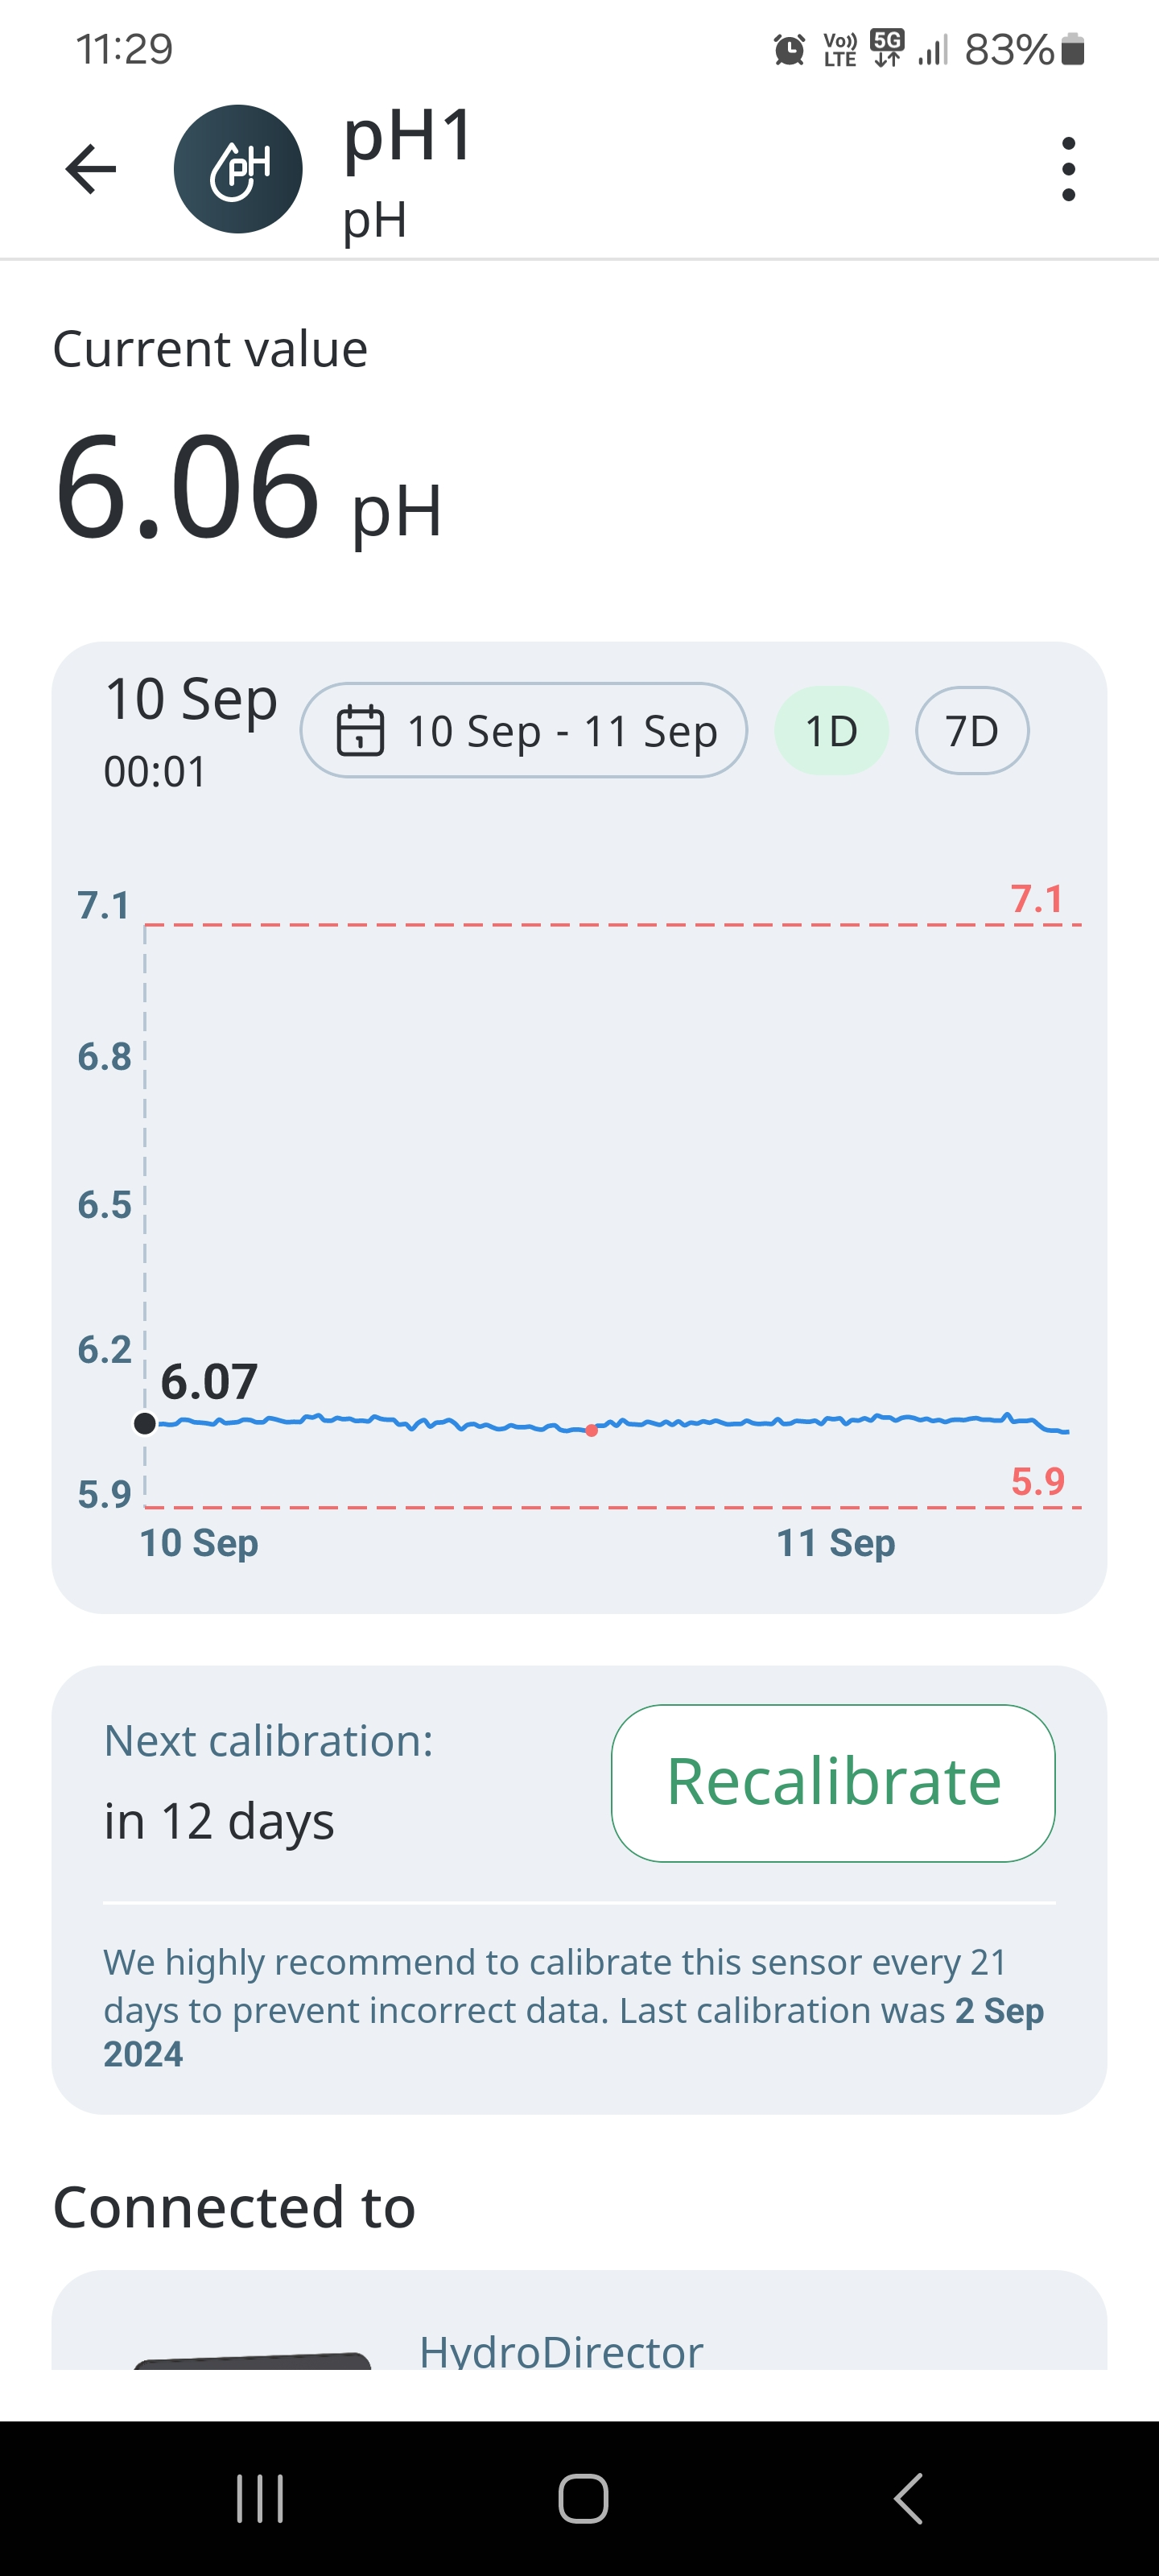
Understanding sensor page
The Sensor screen displays the detailed information that it receives from the connected Sensors. The section at the bottom shows the data in a graphical and tabular format. You can check the readings for a particular day, week, or make a custom selection of the dates:
Deleting sensor from the sensor page
If a Sensor was plugged out, it will not be removed from the main Climate screen. It is marked as Disconnected. To delete a Sensor from the Climate screen, please, follow these steps:
- Tap the Sensor tile. The detailed Sensor screen appears:
- Tap the Manage and then Delete button on the top-right corner of the screen. The Delete sensor page appears:
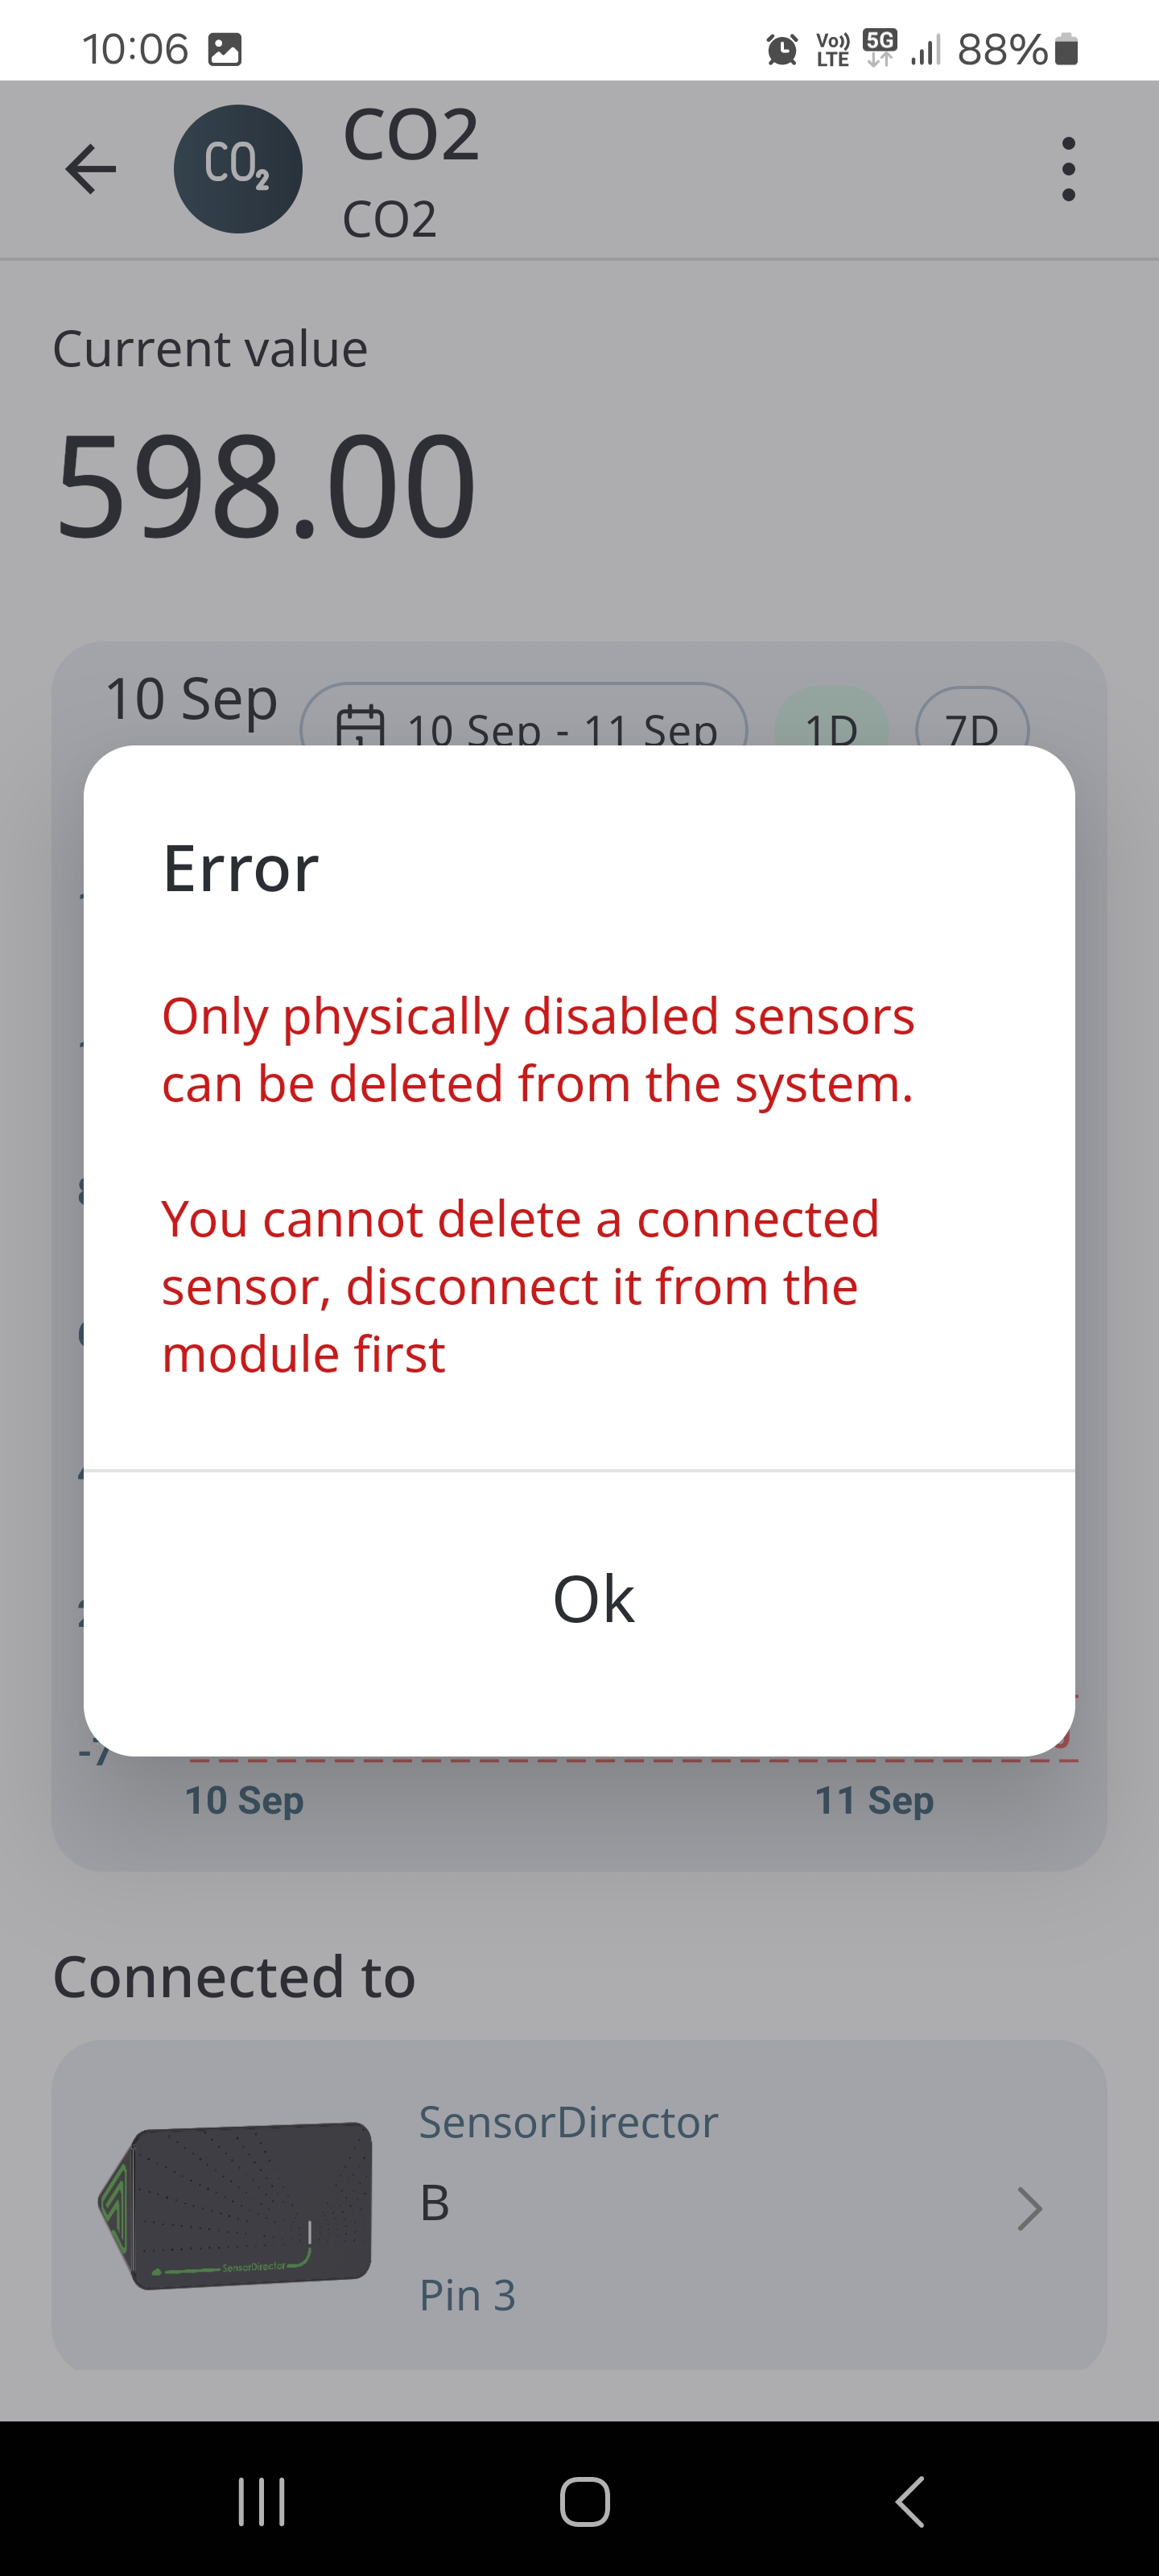
- You will see message that sensor can be deleted only phisically.
Note: Deleted Sensors can be re-added to the System again, but no history will be restored, and the Sensor is treated as a new one.
Viewing sensor page status
The Sensor page might show different statuses at different times:
● Online - sensor is working
● Offline – Offline state is shown for the Modules that have been connected but are plugged off now.
Viewing sensor history
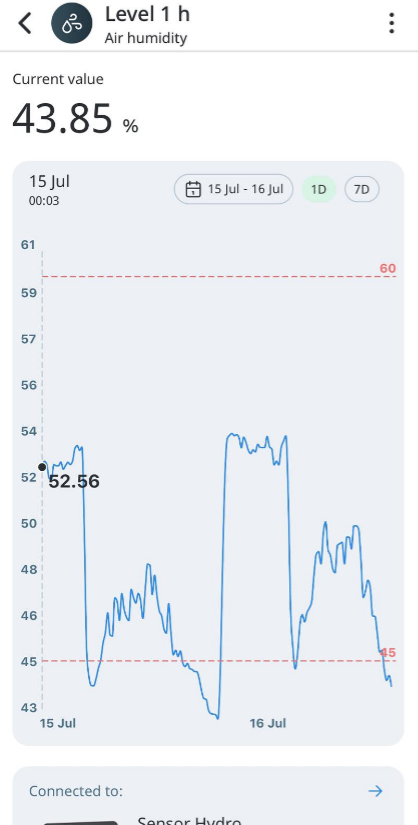
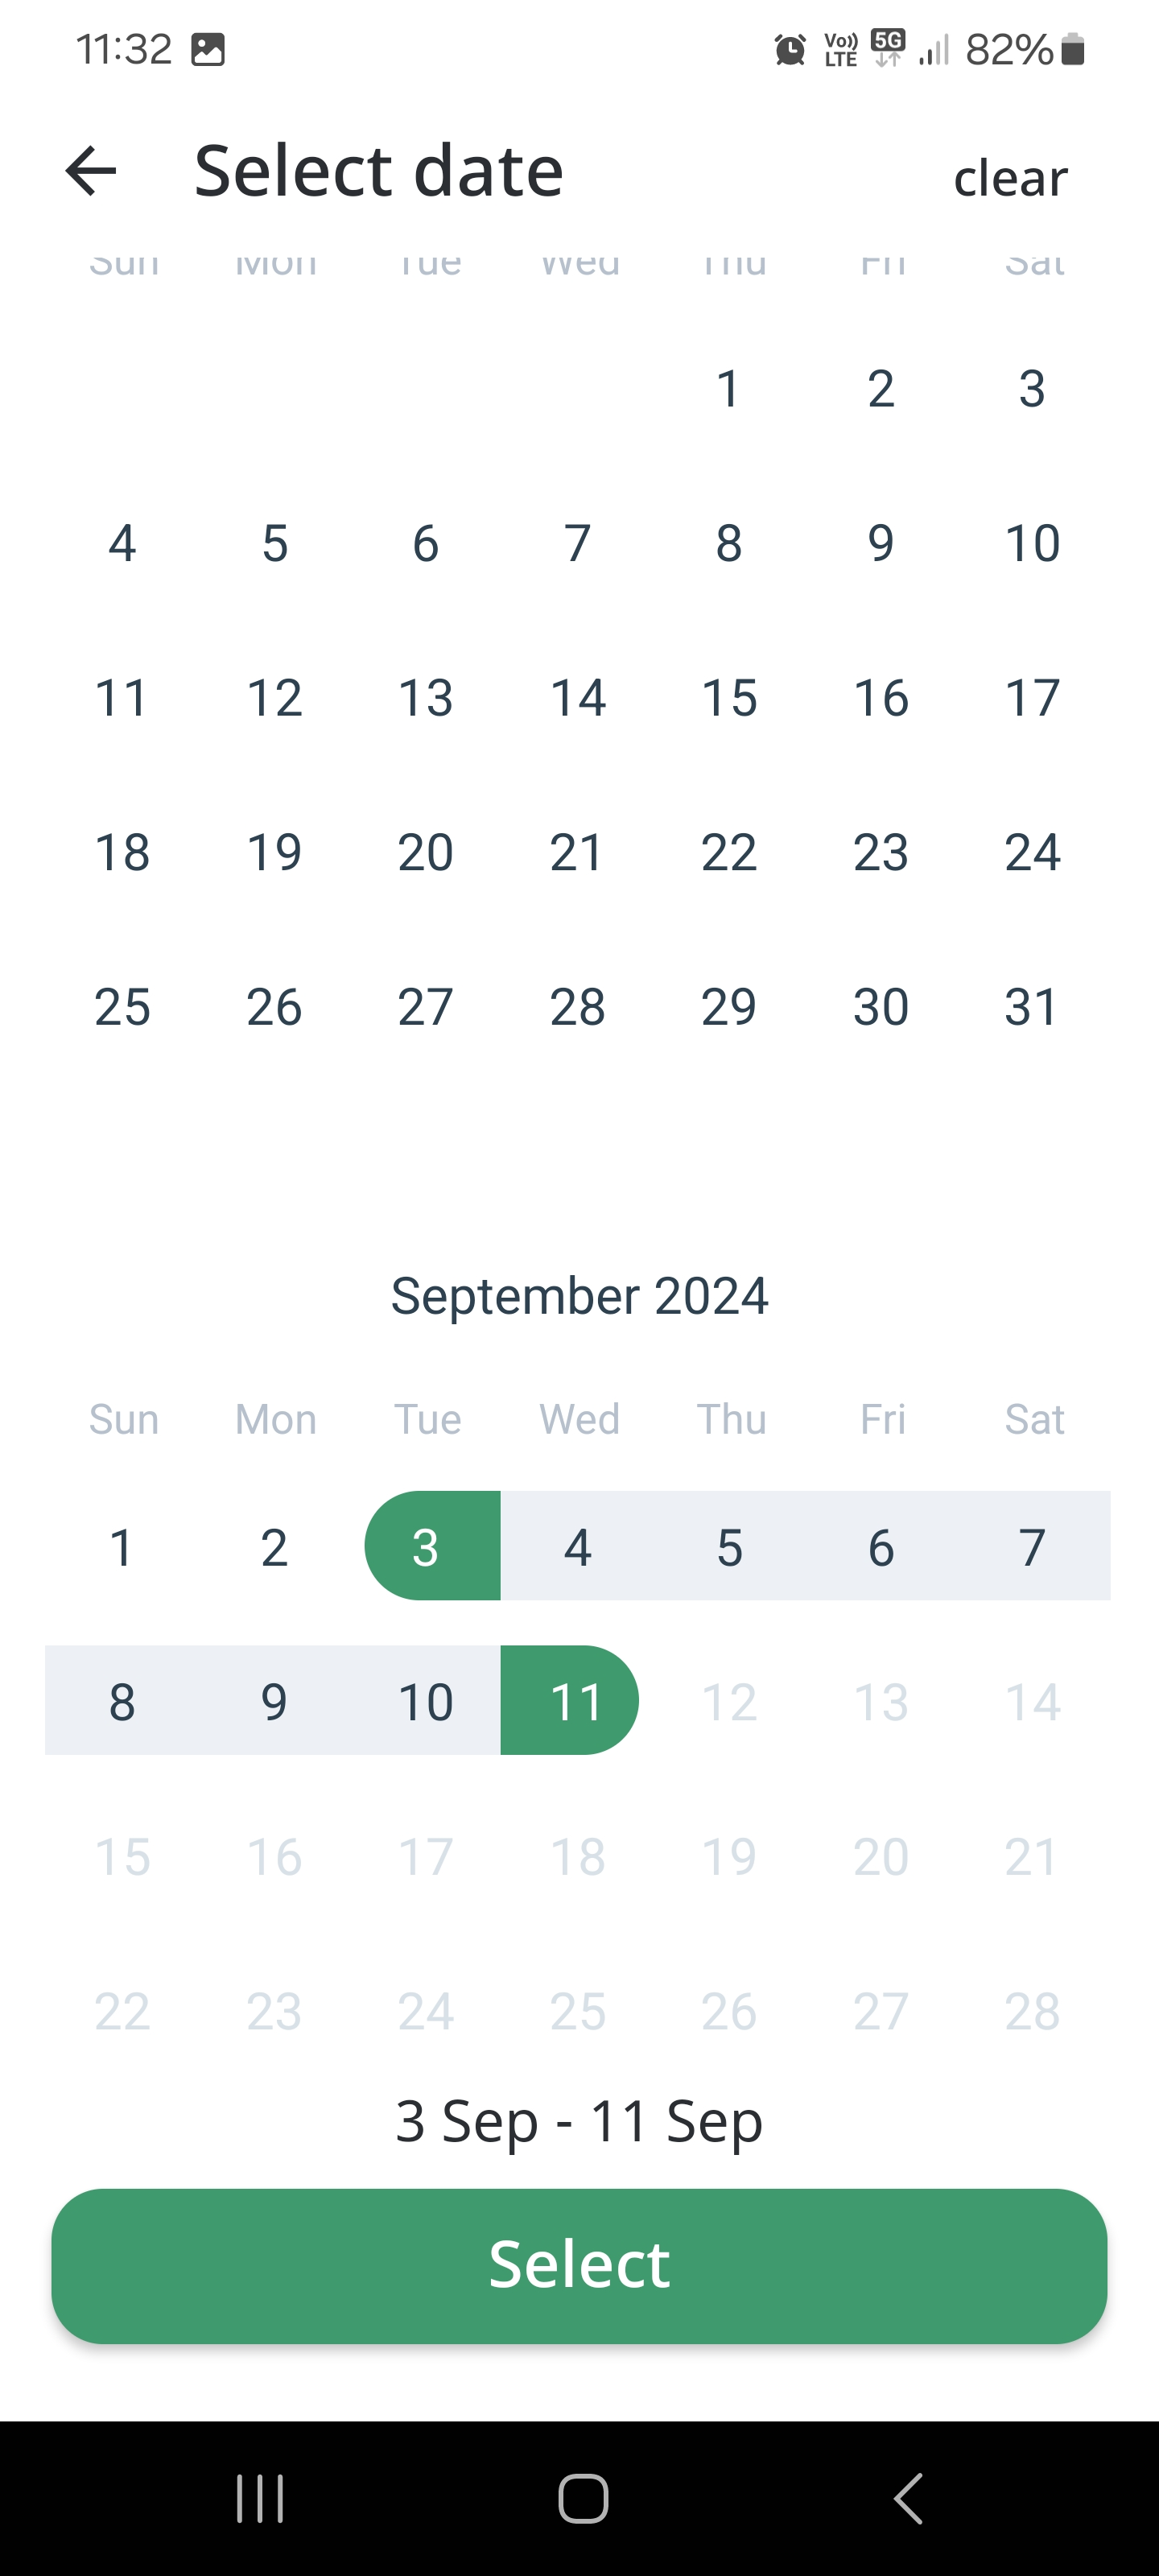
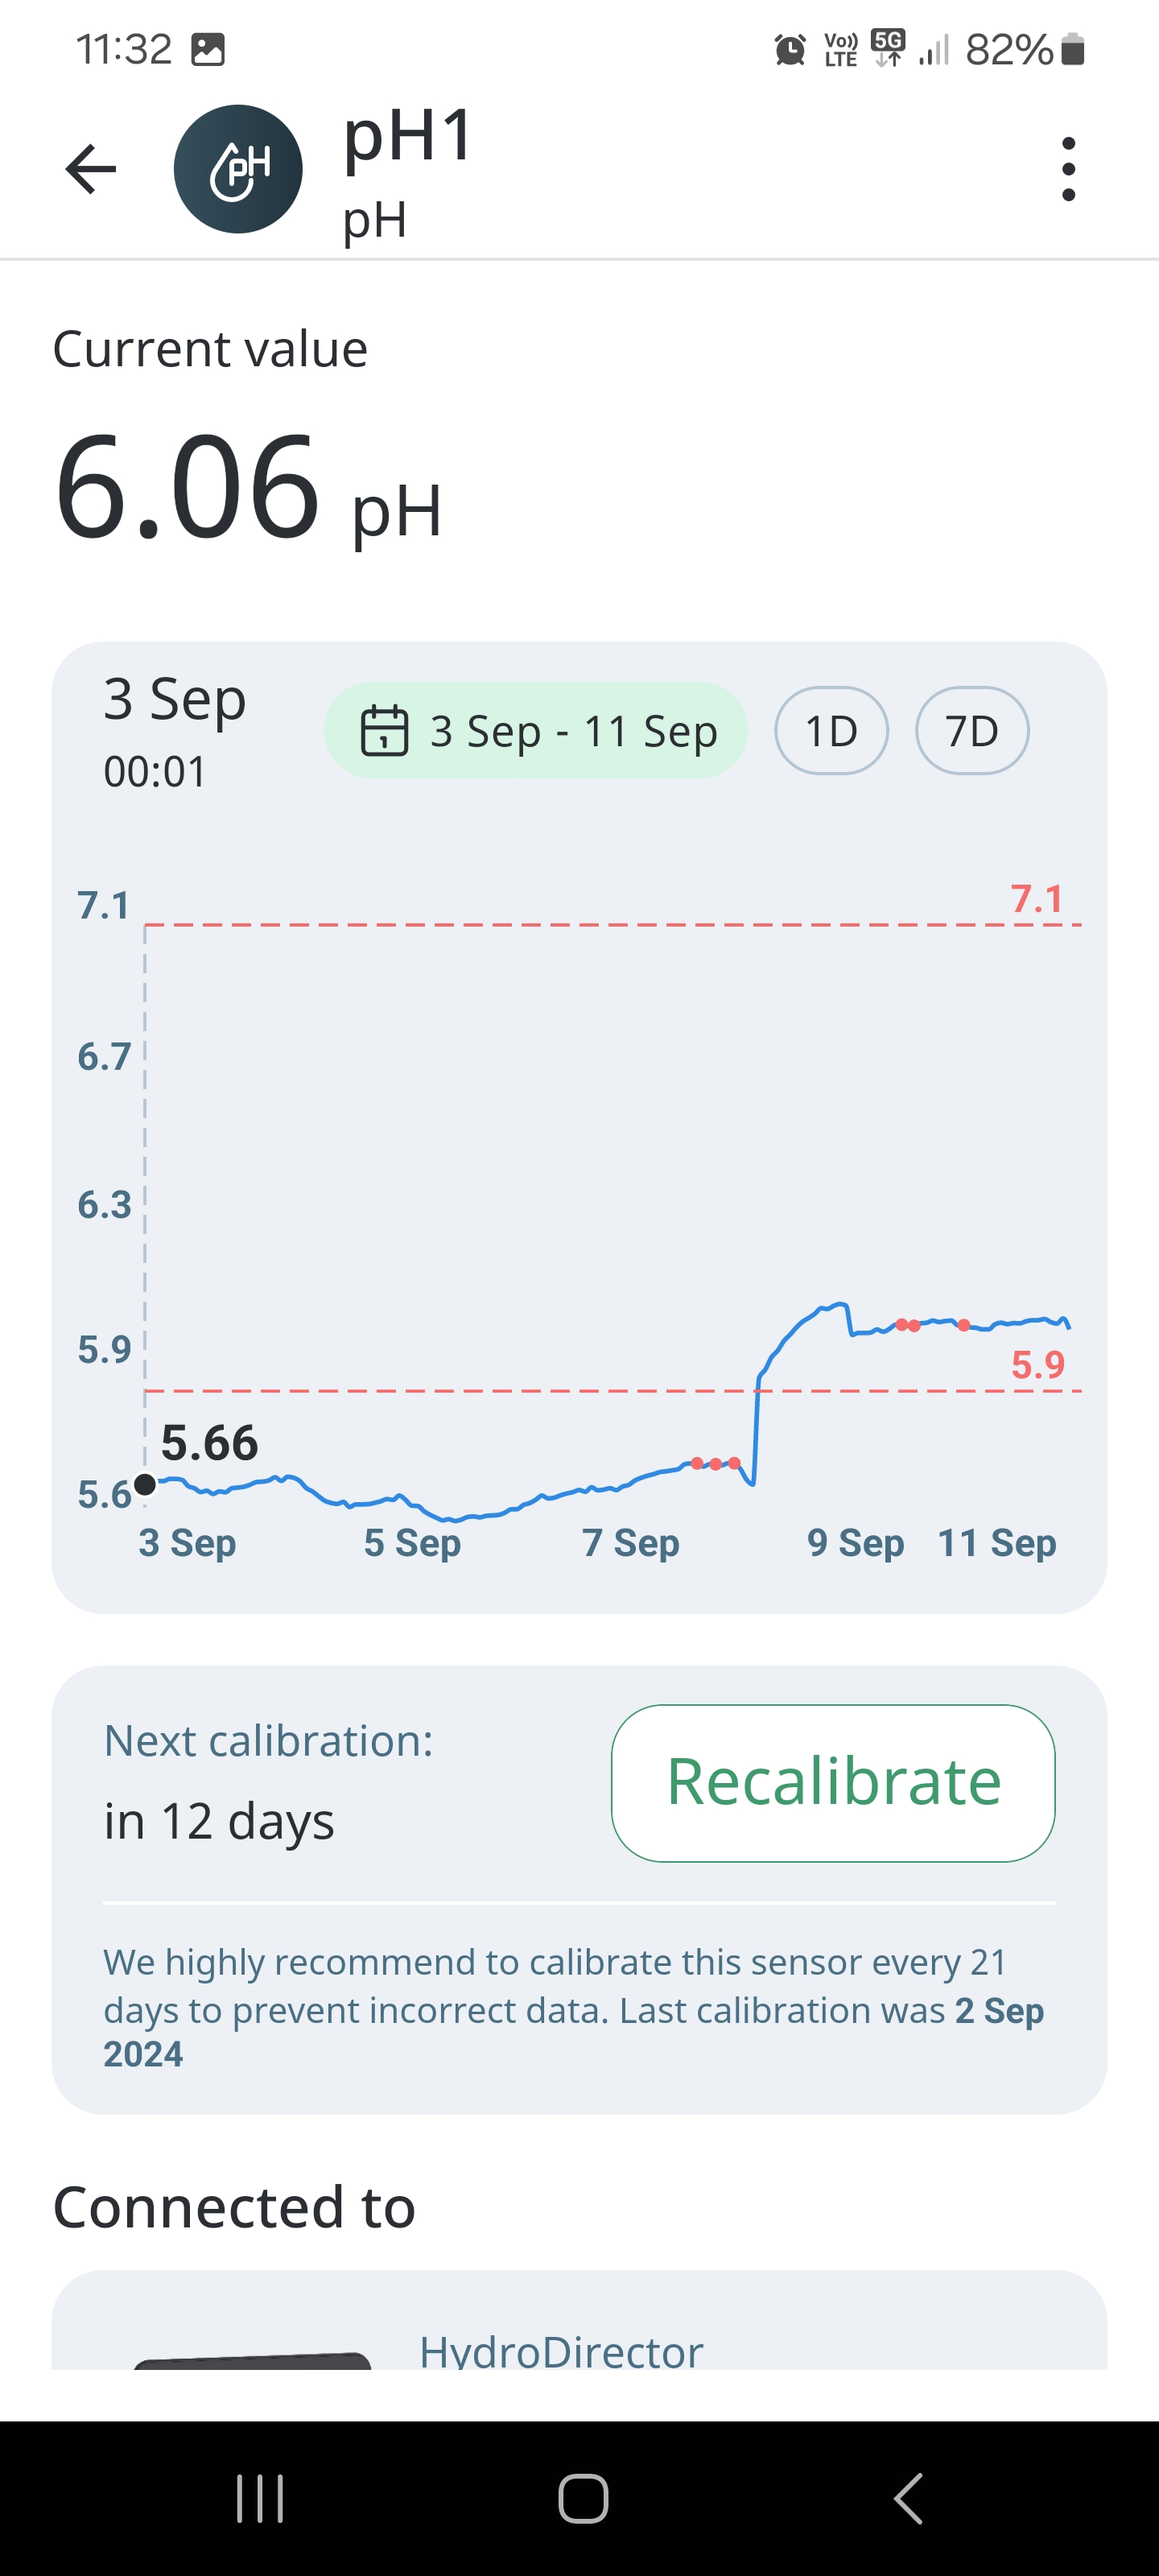
Climate history shows Sensor’s daily, weekly, and custom data for all the connected Sensors. Tap the Graph to view the exact value at the chosen period:
User can see information on the sensors grafic for one day, 7 days or selected by user period.

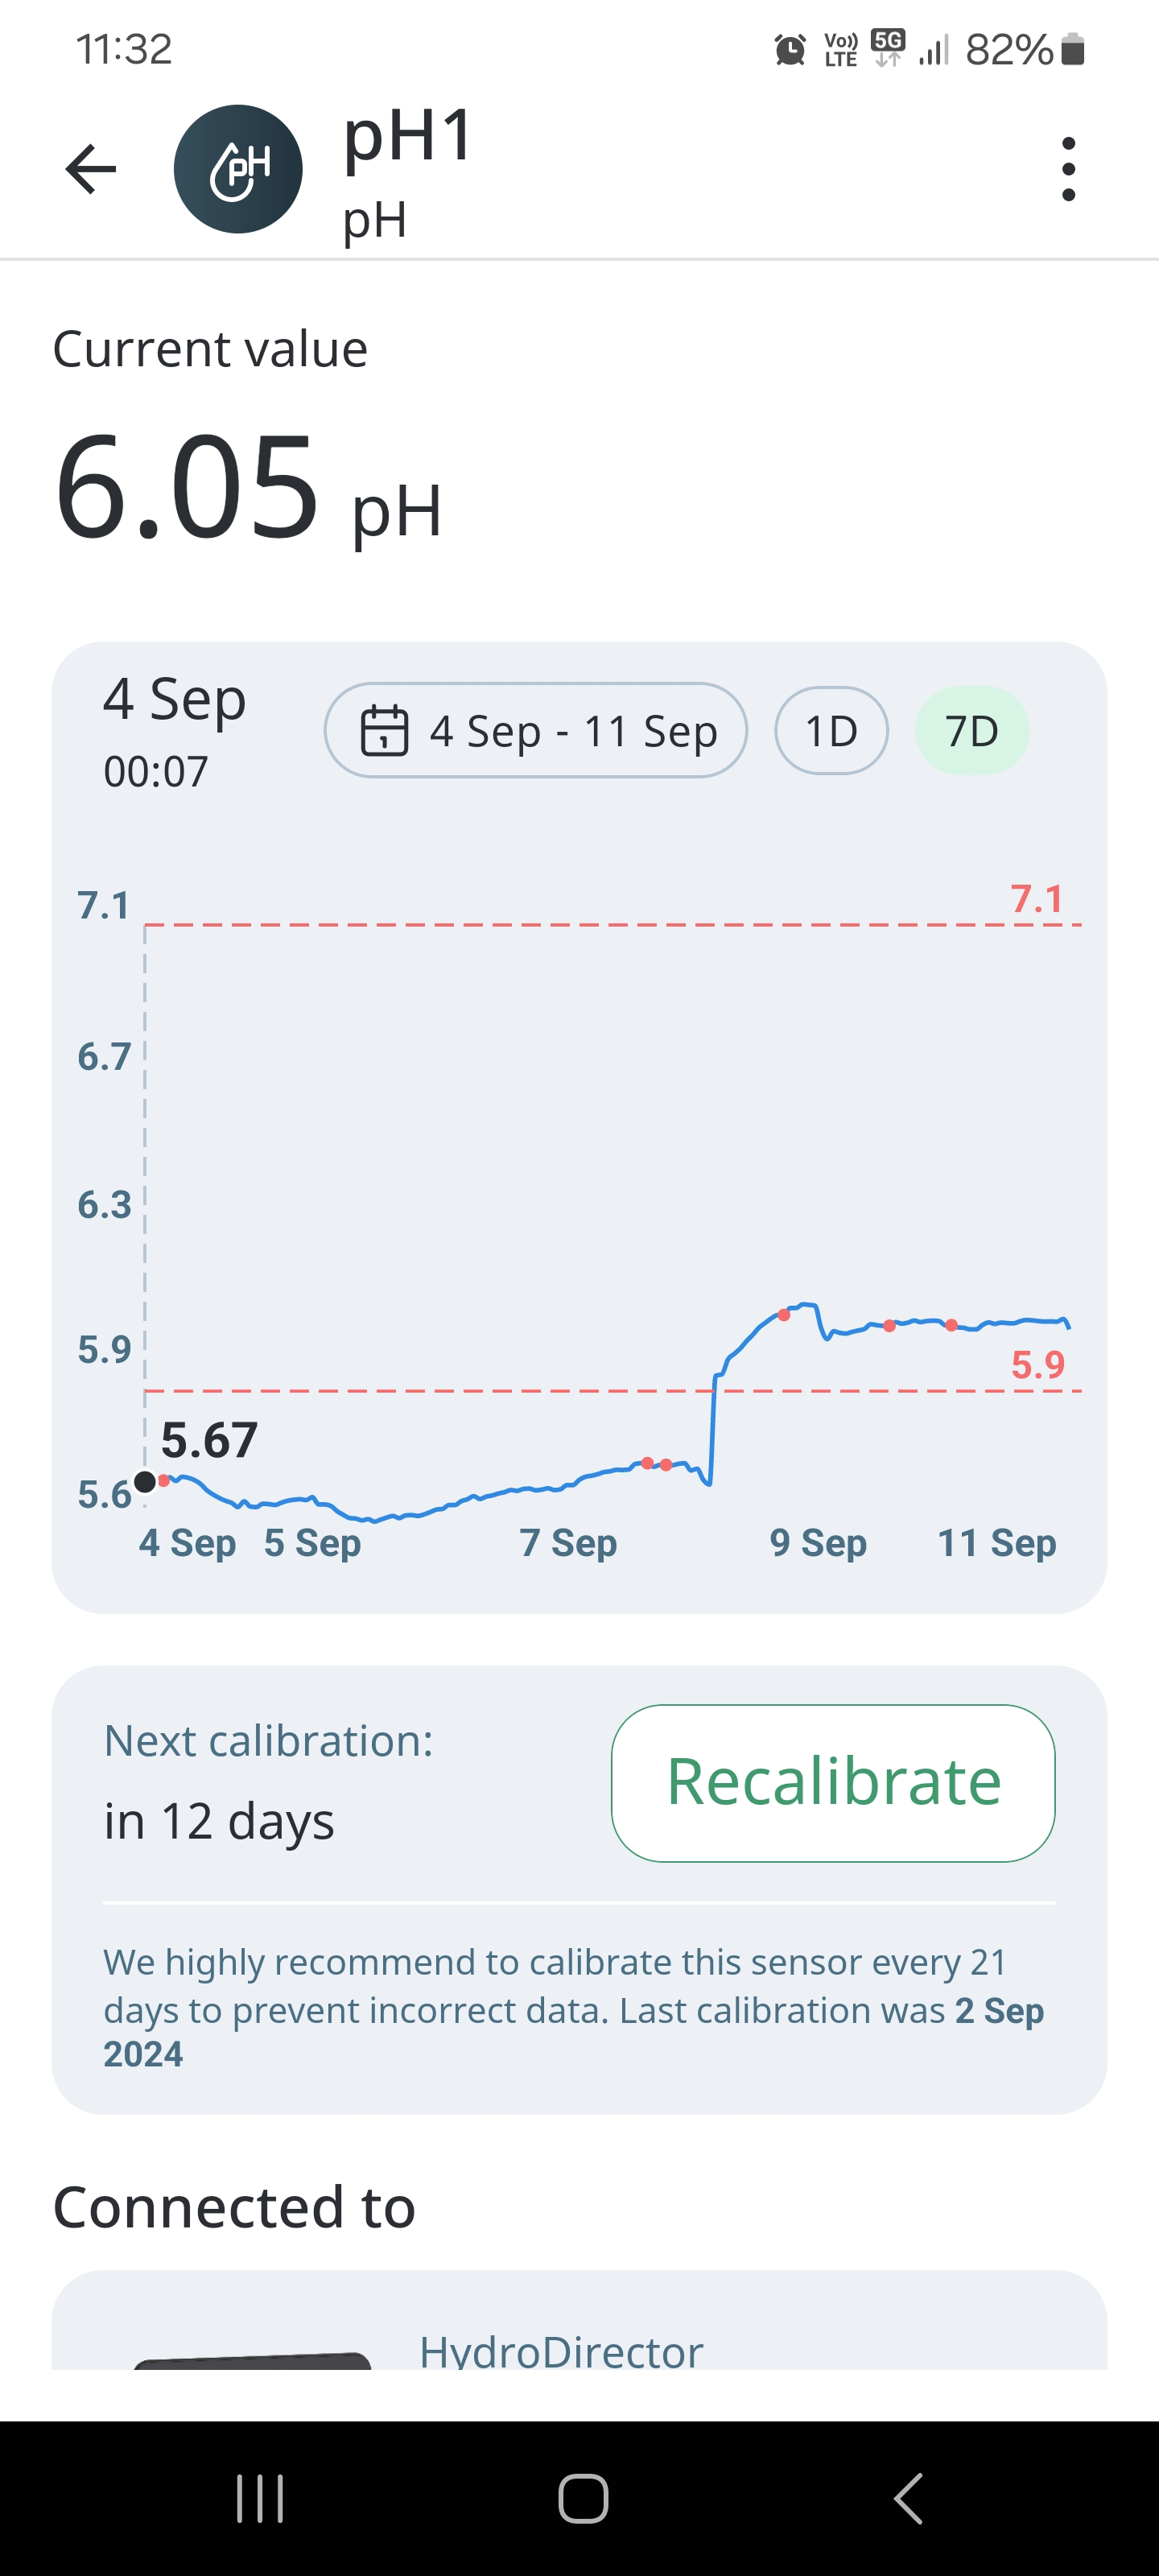
To see sensors information in selected period users need to tap on the calendar button, choose period and then press “select”.
Sensor states
There are several states of Sensor as well, depending on which, the Sensor tiles will display different elements on it. The Sensor states are shown on the following Sensor tiles:
● Regular,
● Offline,
● Need calibration,
● Need scheduled calibration (recalibration),
● Invalid (critical) value (highlighted in red).
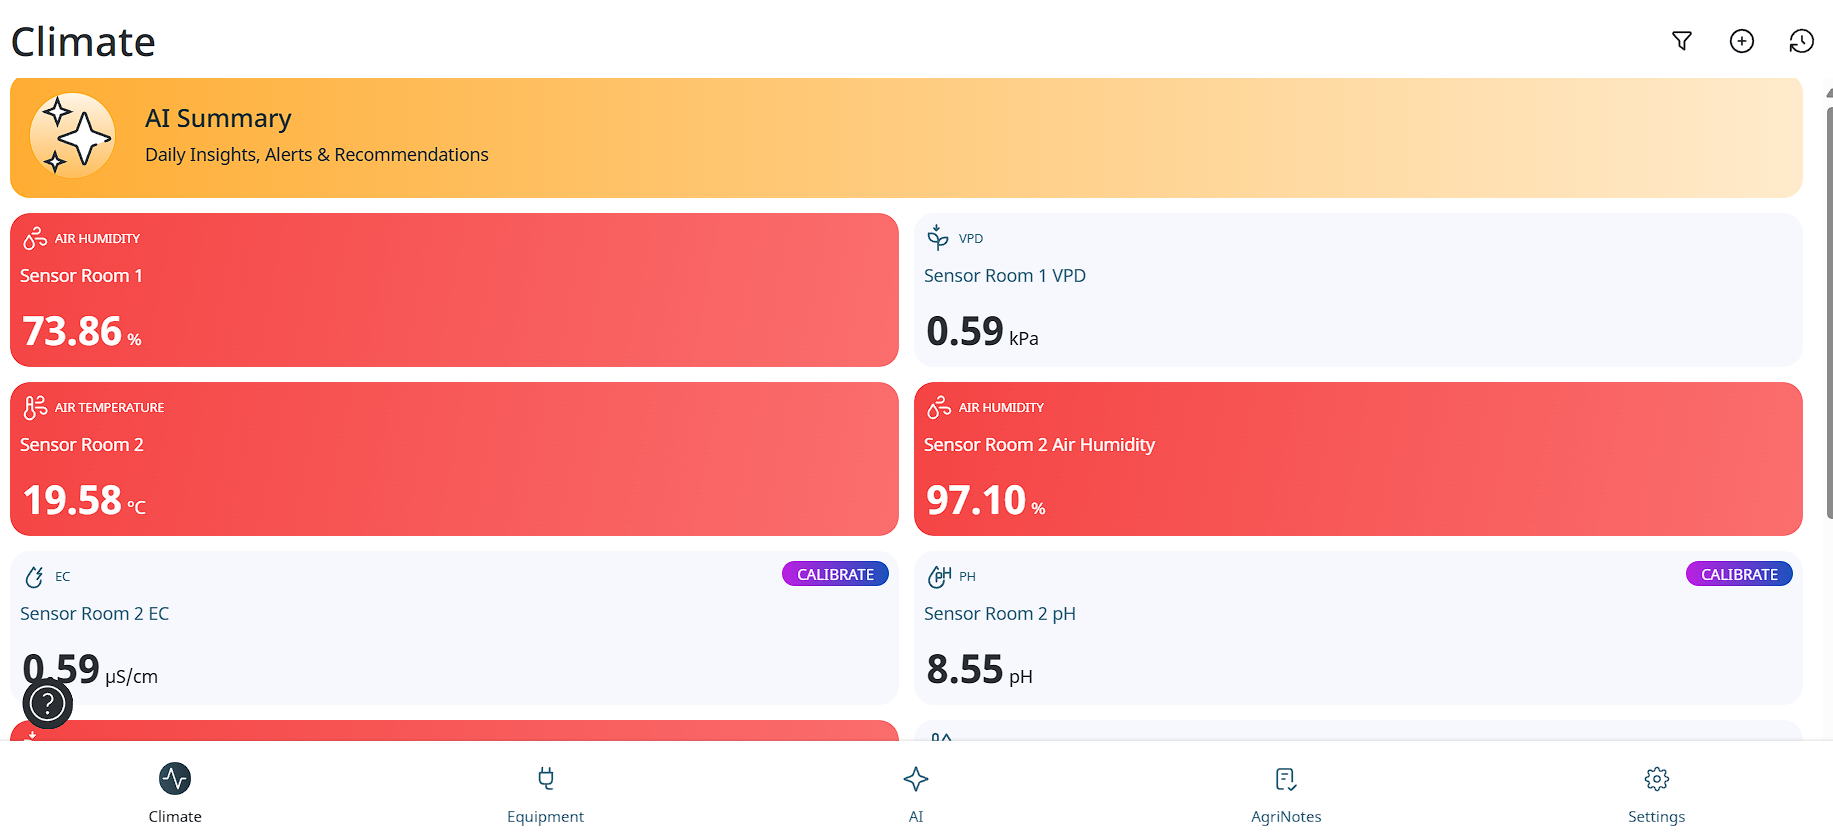
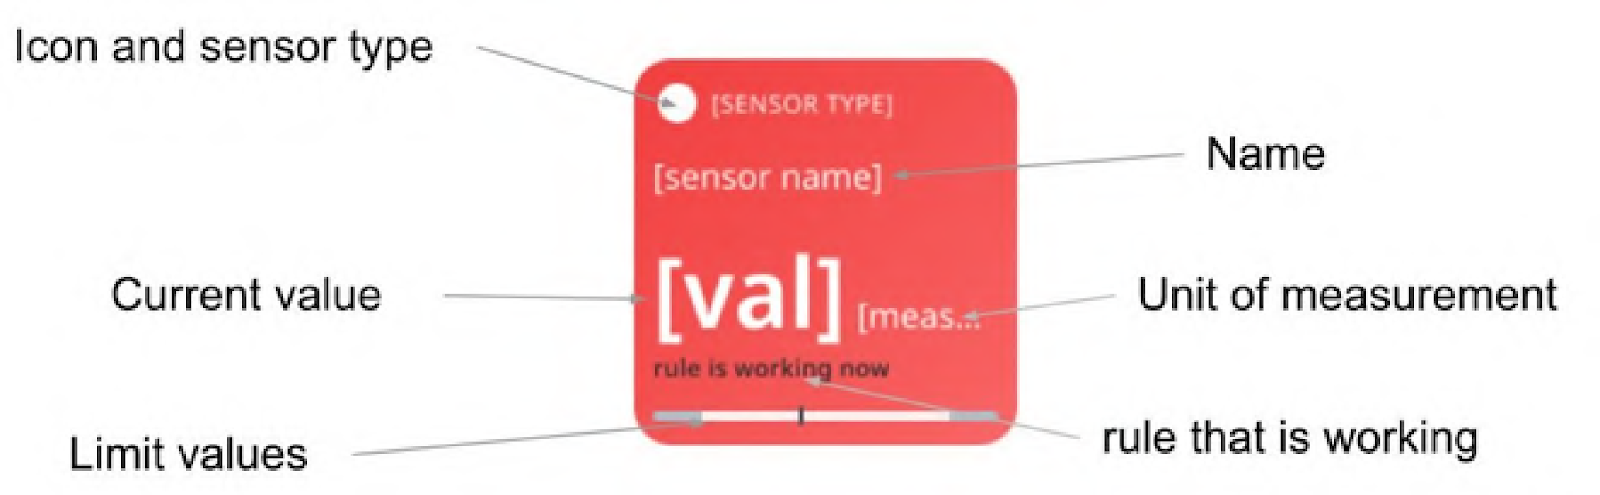
Regular sensor tile
A regular Sensor tile contains the following information:
● Sensor icon,
● Sensor type,
● Sensor name,
● Current value,
● Units of measurement,
● Limit values,
● Work of the rule.
Note: Work of the rule will appear onlyf linked Devices that have defined rules, based on Sensor data, are currently running. These impacts are predefined according to the types of Devices.
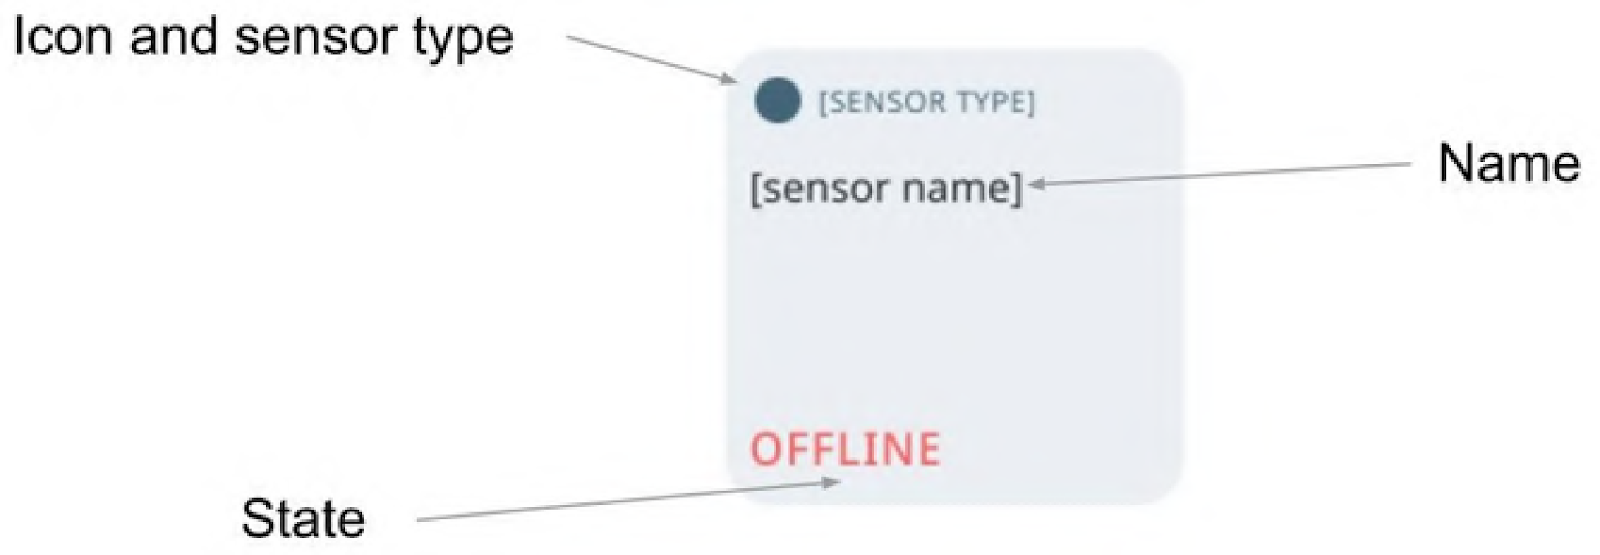
Offline sensor tile
Offline state is shown for a Module that was connected, but is now plugged off. Offline Sensor tile contains the following information:
● Sensor icon,
● Sensor type,
● Sensor name,
● Current state.
Note: There are some Sensors that need calibration, and some do not.
After the calibration is completed, this tile changes to the Regular Sensor Tile.
Example:
Some Sensors need to be calibrated to show correct data. Also, such Sensors have
calibration frequencies that can be from 1 month to 1 year. System will notify the user
about the Sensor calibration routine and how many days left till the next calibration.
Need scheduled calibration sensor tile
Need Scheduled Calibration Sensor tile contains the following information:
● Icon,
● Sensor type,
● Sensor name,
● Current value,
● Units of measurement,
● Impact of the rule,
● Calibration action.
This tile is shown when the Sensor needs calibration based on schedule to provide accurate measurements.
Note: There are some Sensors that need calibration, and some do not. After the calibration is completed, this tile changes to the Regular Sensor Tile.
Invalid sensor tile
Critical Value Sensor tile contains the following information:
● Icon,
● Sensor type,
● Sensor name,
● Current value,
● Units of measurement,
● Limit values,
● Impact of the rule.
This tile is displayed when limits are breached:
● Current value is less than the minimum limit,
● Current value is more than the maximum limit.
In this case, regular section tiles are highlighted with red color, that is changes to Critical value sensor tile. As soon as Sensor measurement returns to the required limits, the Sensor tile changes to the Regular Sensor Tile.
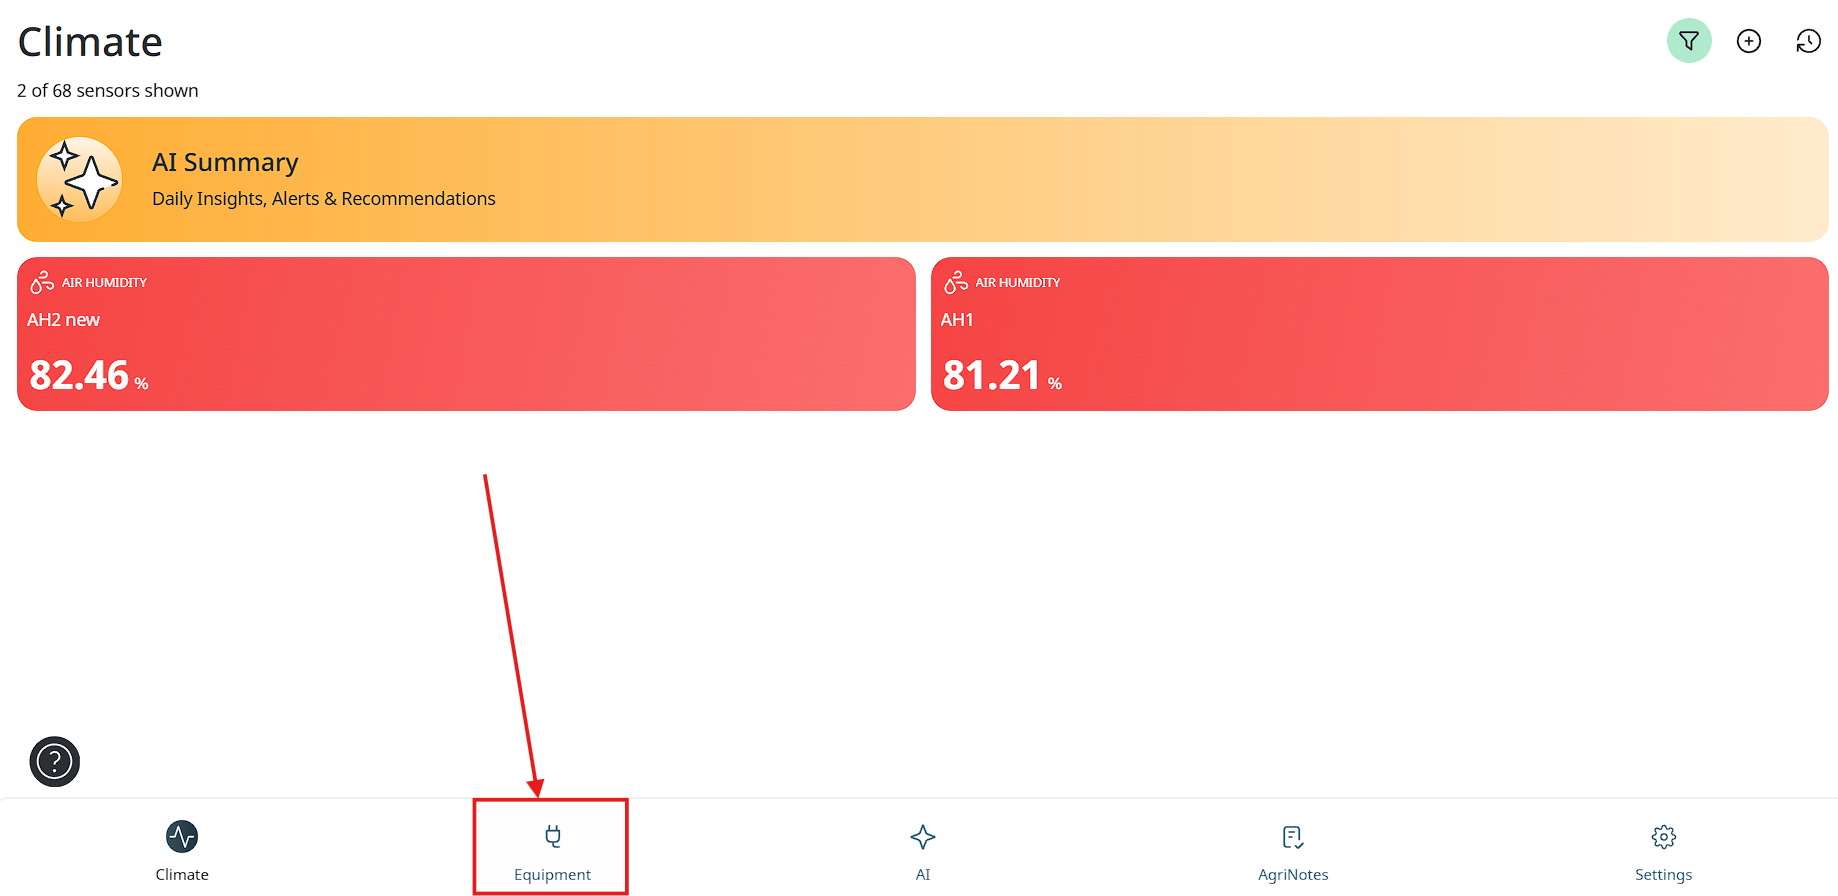
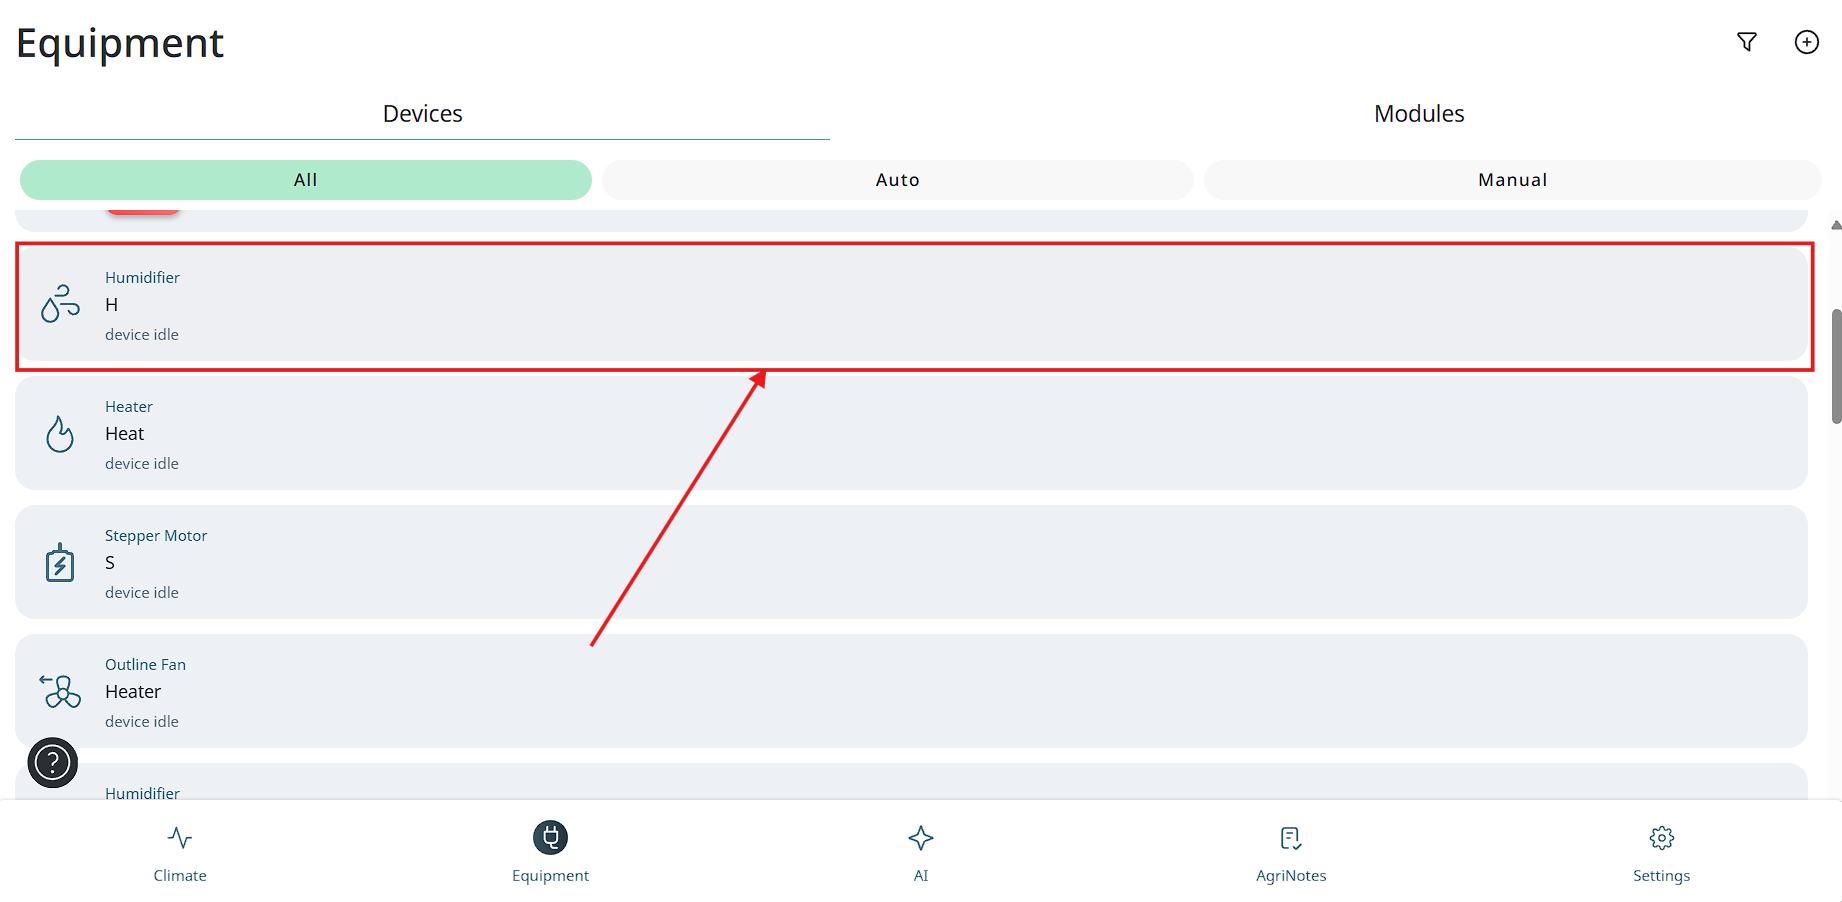
Work with devices
Types and viewing
Types
You can add the following types of Devices:
● Irrigation Pumps - supply water or nutrient solution to the irrigation system under controlled pressure and flow.
● Water Pumps - transfer water between tanks, reservoirs, or system components.
● Circulation Fans - provide internal air movement to ensure uniform temperature, humidity, and gas distribution.
● Inline Fans - move air through ducts for ventilation, intake, or exhaust.
● Outline Fans - exhaust air directly from the space without ducting, typically wall- or roof-mounted.
● Lights - provide artificial illumination for plant growth or operational lighting according to set schedules.
● Heaters - increase air or water temperature to maintain target environmental conditions.
● CO2 Valves - control the injection of CO₂ into the environment to maintain required concentration levels.
● Humidifiers - increase air humidity to reach or maintain target relative humidity.
● Dehumidifiers - remove excess moisture from the air to reduce humidity levels.
● Dosing Pumps - accurately deliver small volumes of nutrients, chemicals, or additives into liquids.
● Irrigation Valves - control the on/off flow of water within irrigation zones.
● Air Conditioners - regulate air temperature and, in some cases, humidity by cooling the environment.
● Chillers - cool water or nutrient solutions to a controlled temperature.
● Stepper motors - provide precise, step-based rotational movement for controlled mechanical positioning.
● MIST system - generate fine water droplets for humidification, cooling, or foliar application.
Viewing
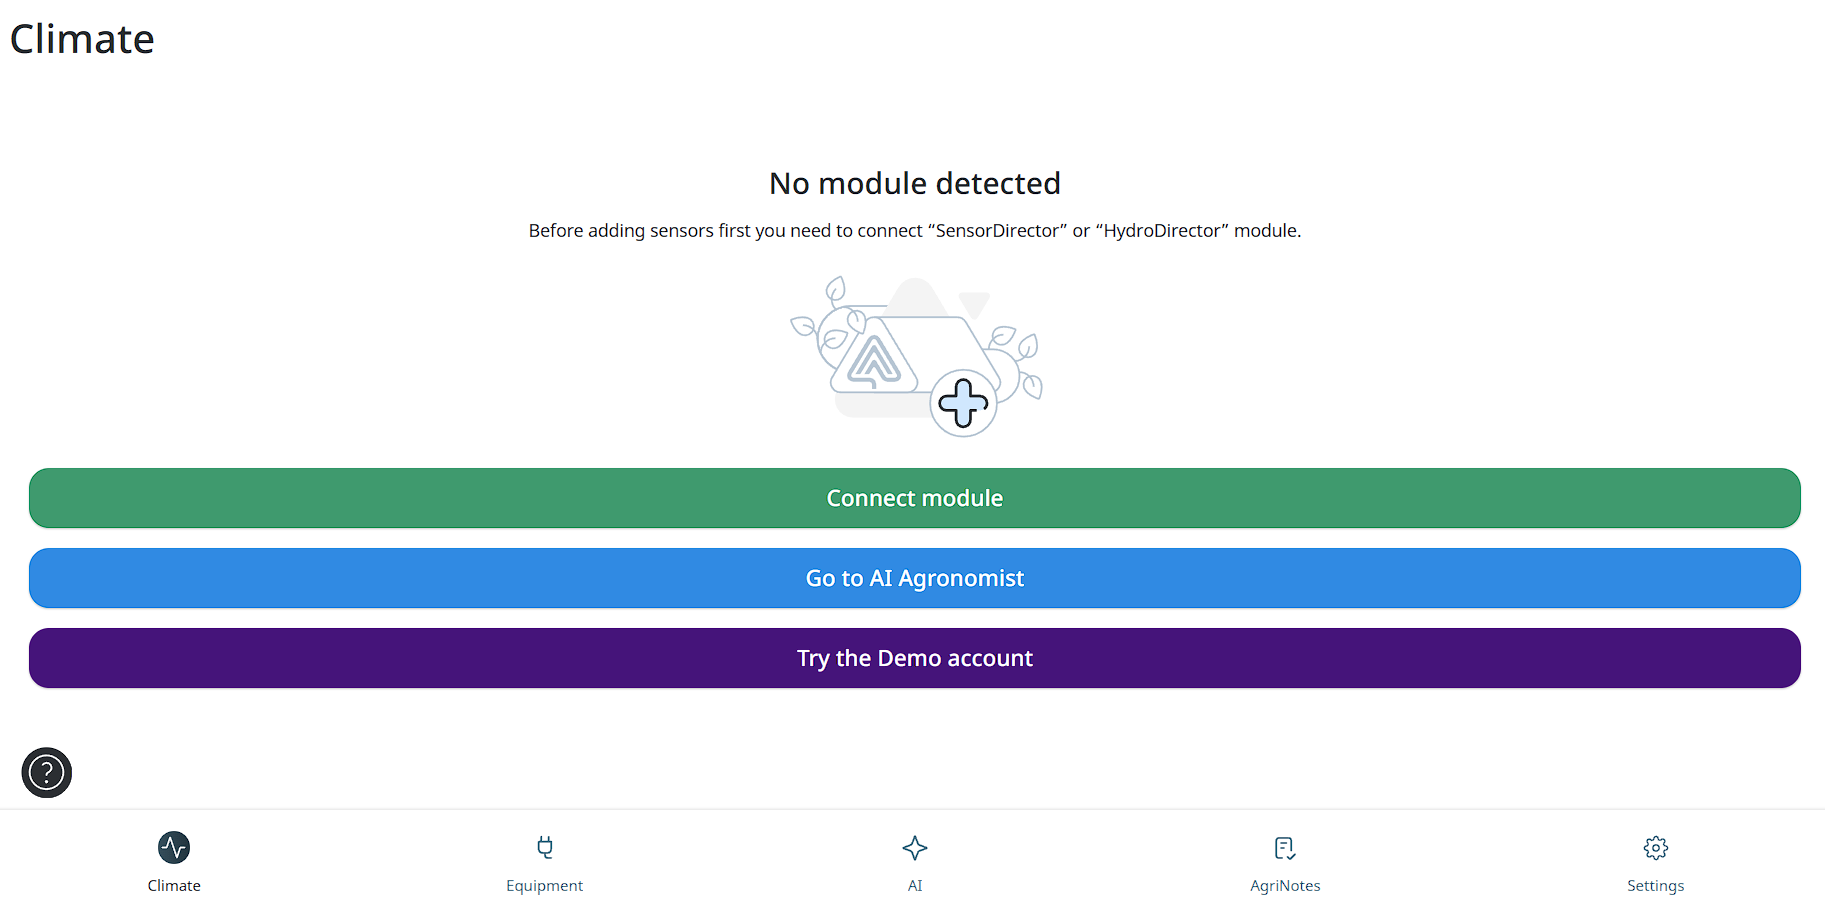
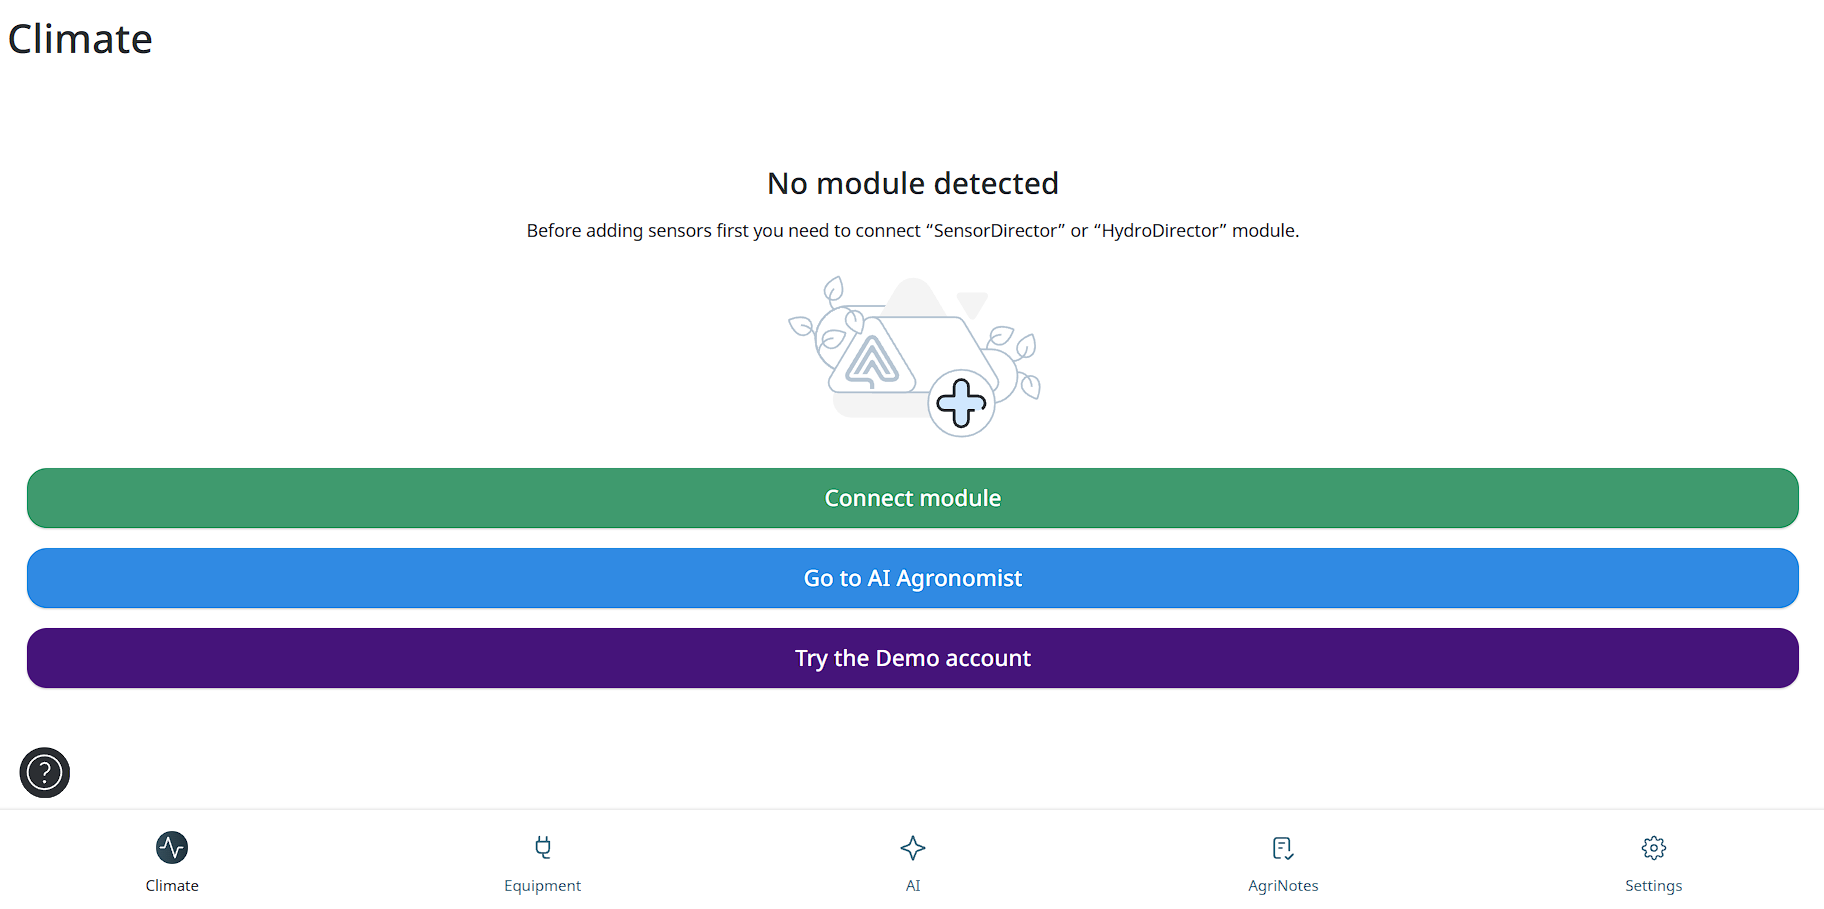
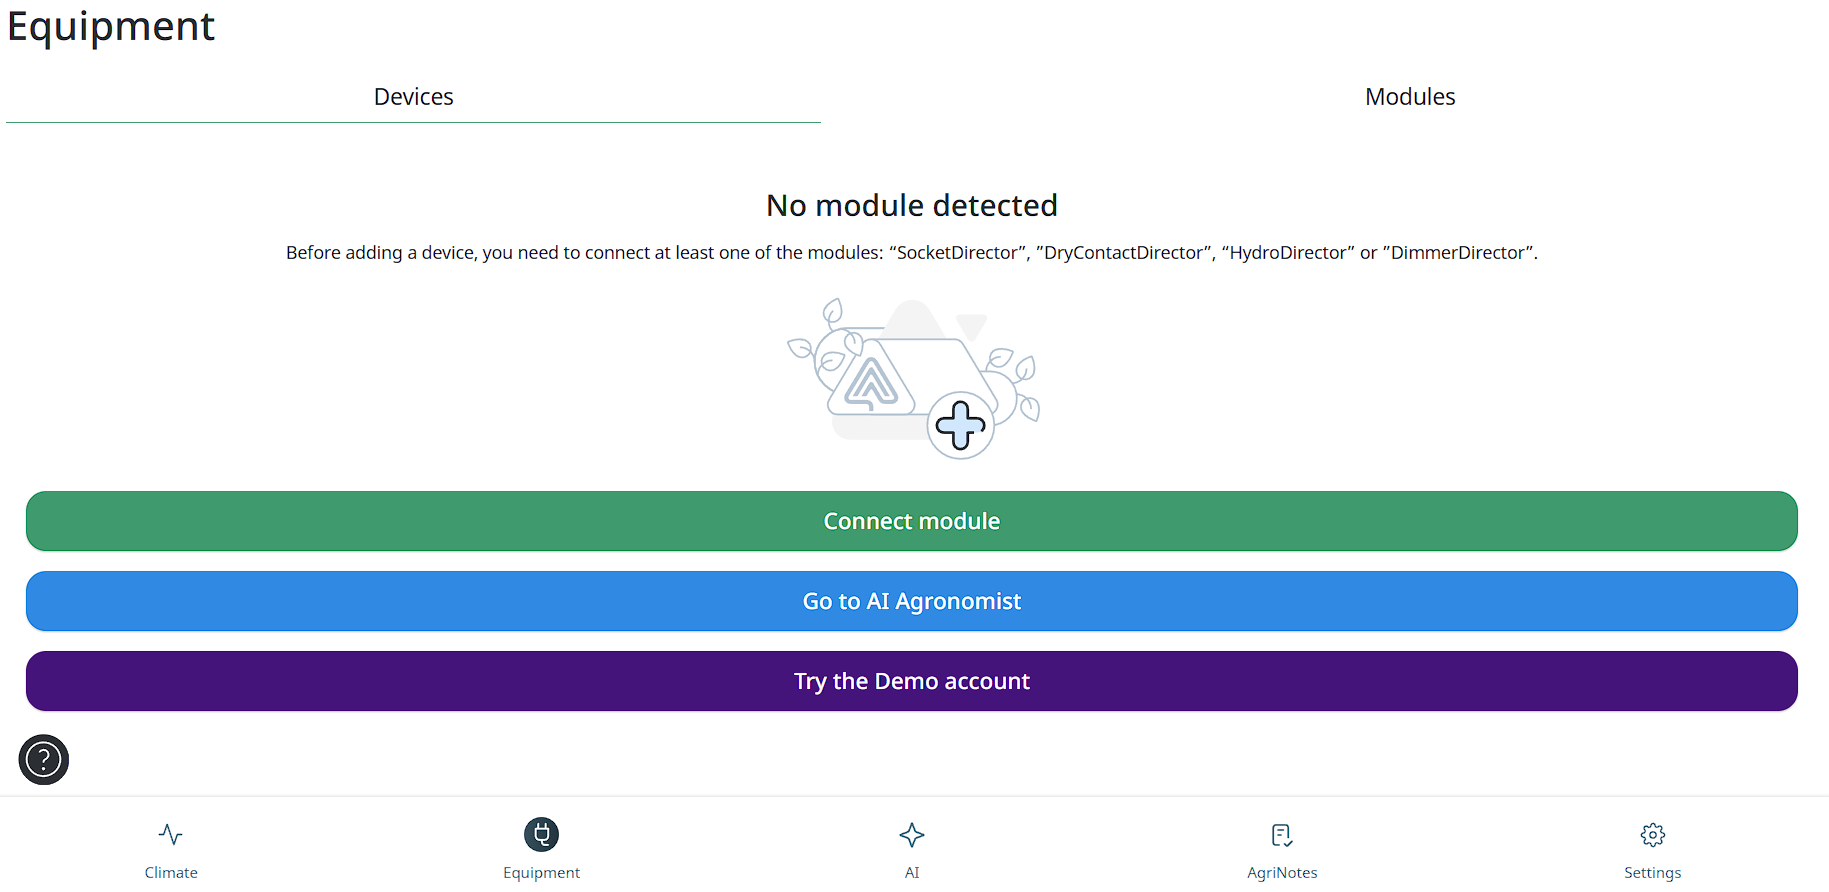
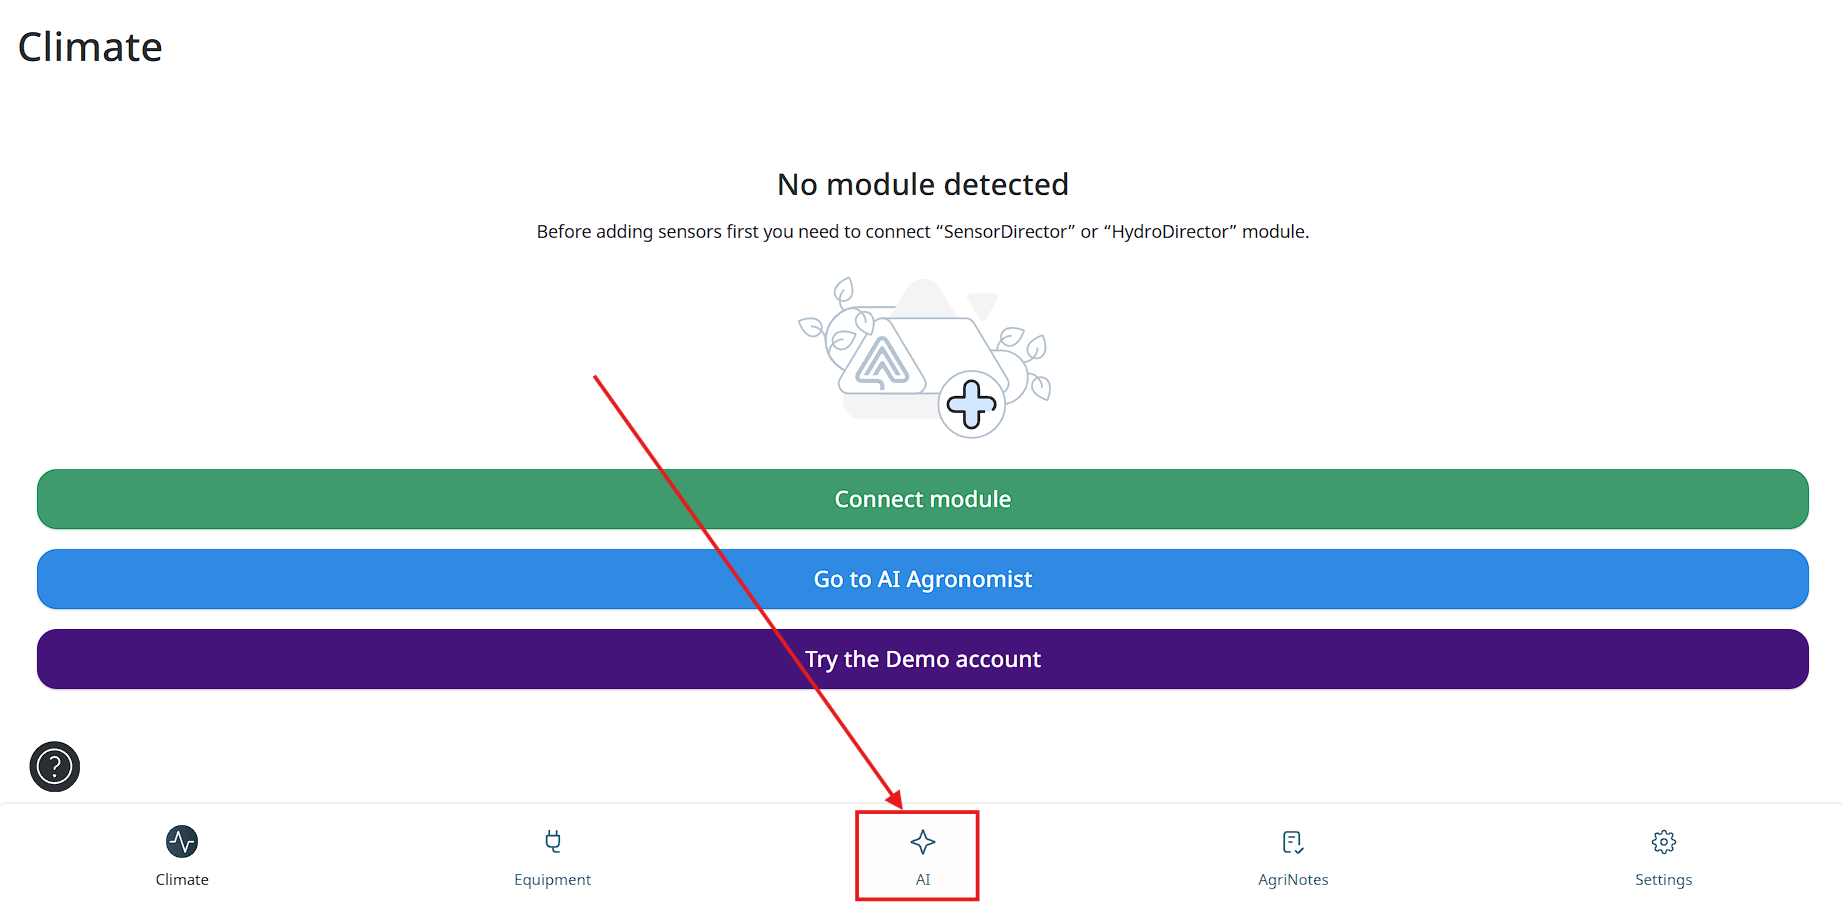
When users open the GrowDirector App for the very first time, there are no Modules and Devices in the System yet. Therefore, users must first add (connect) the required specific Modules, and to connect to the Modules Devices to proceed. There can be 2 scenarios on the Devices screen:
● No Module detected – When the Modules have not been connected yet,
● No Device detected – When the Modules are connected, but the Devices have
not been connected.
It is possible to connect Devices only to the required specific Modules. Devices cannot be present in the System without being connected to the required specific Modules. Message No Module detected is shown if the required specific Modules have not been connected for this account yet.
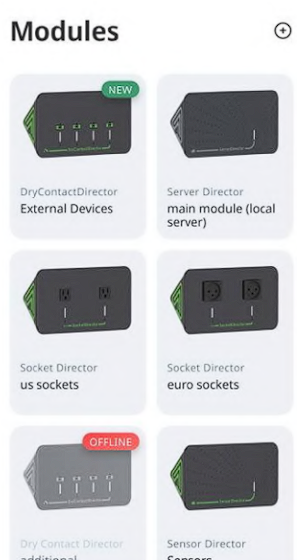
The following Modules allow connection of Devices:
● SocketDirector,
● DryContactDirector,
● DimmerDirector,
On the Devices screen, tap the Connect module button. You will see a screen with an option to make a connection:
Message You haven’t added Devices yet is shown if the Modules are connected, however, no Devices have been connected yet. To connect a new Device, tap the Plus button on the top-right corner of the Devices screen:
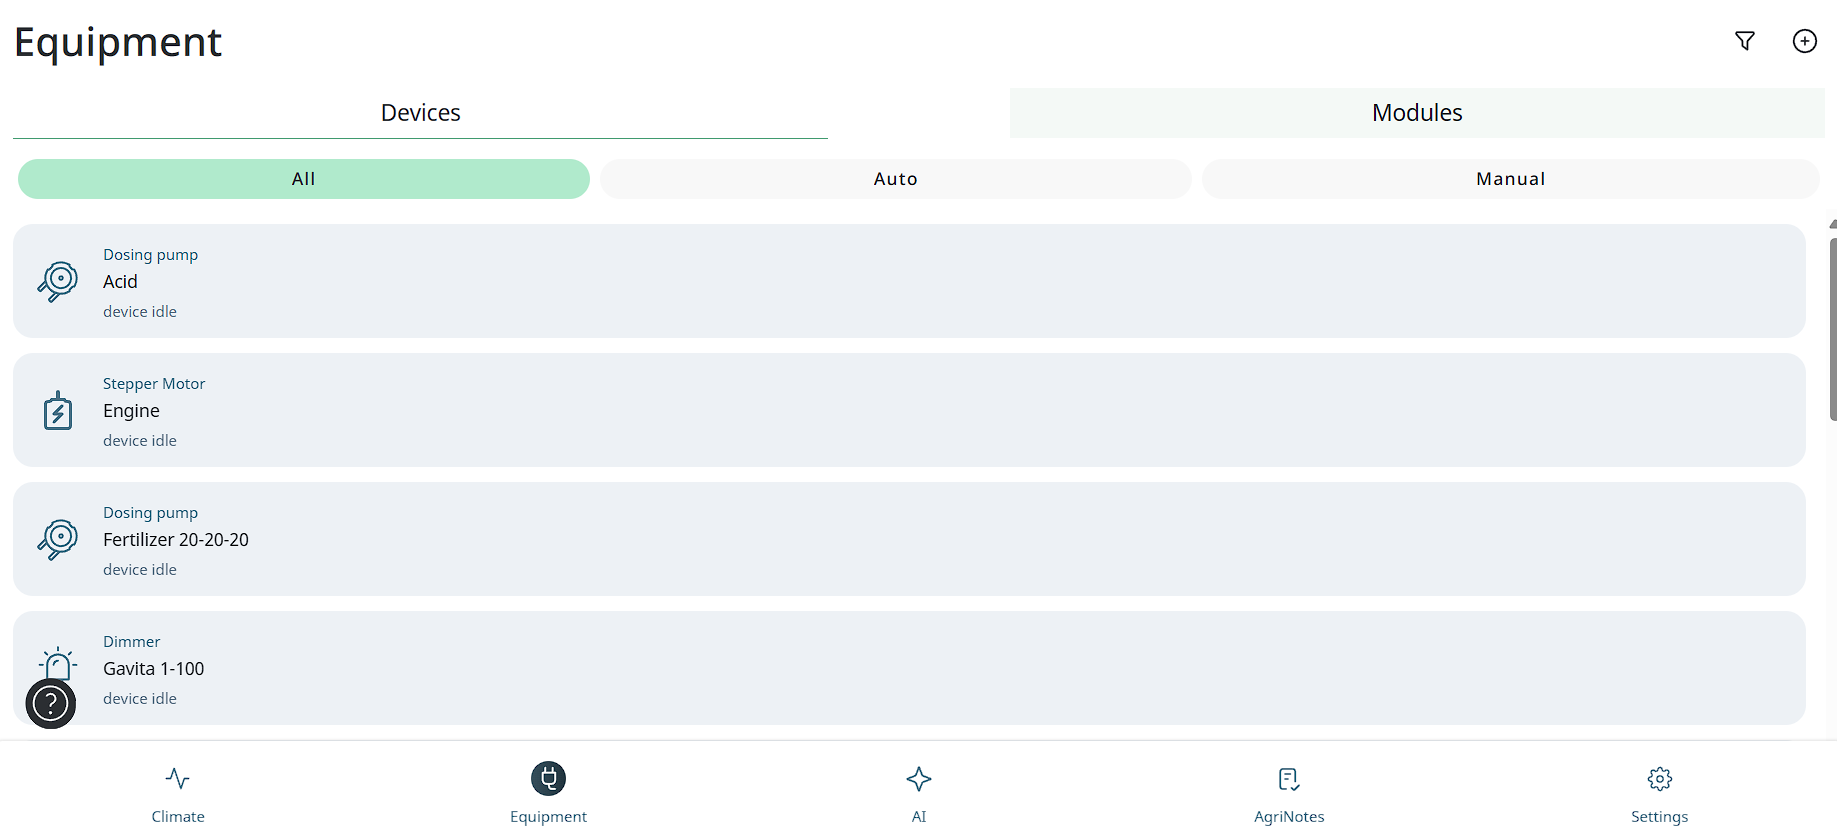
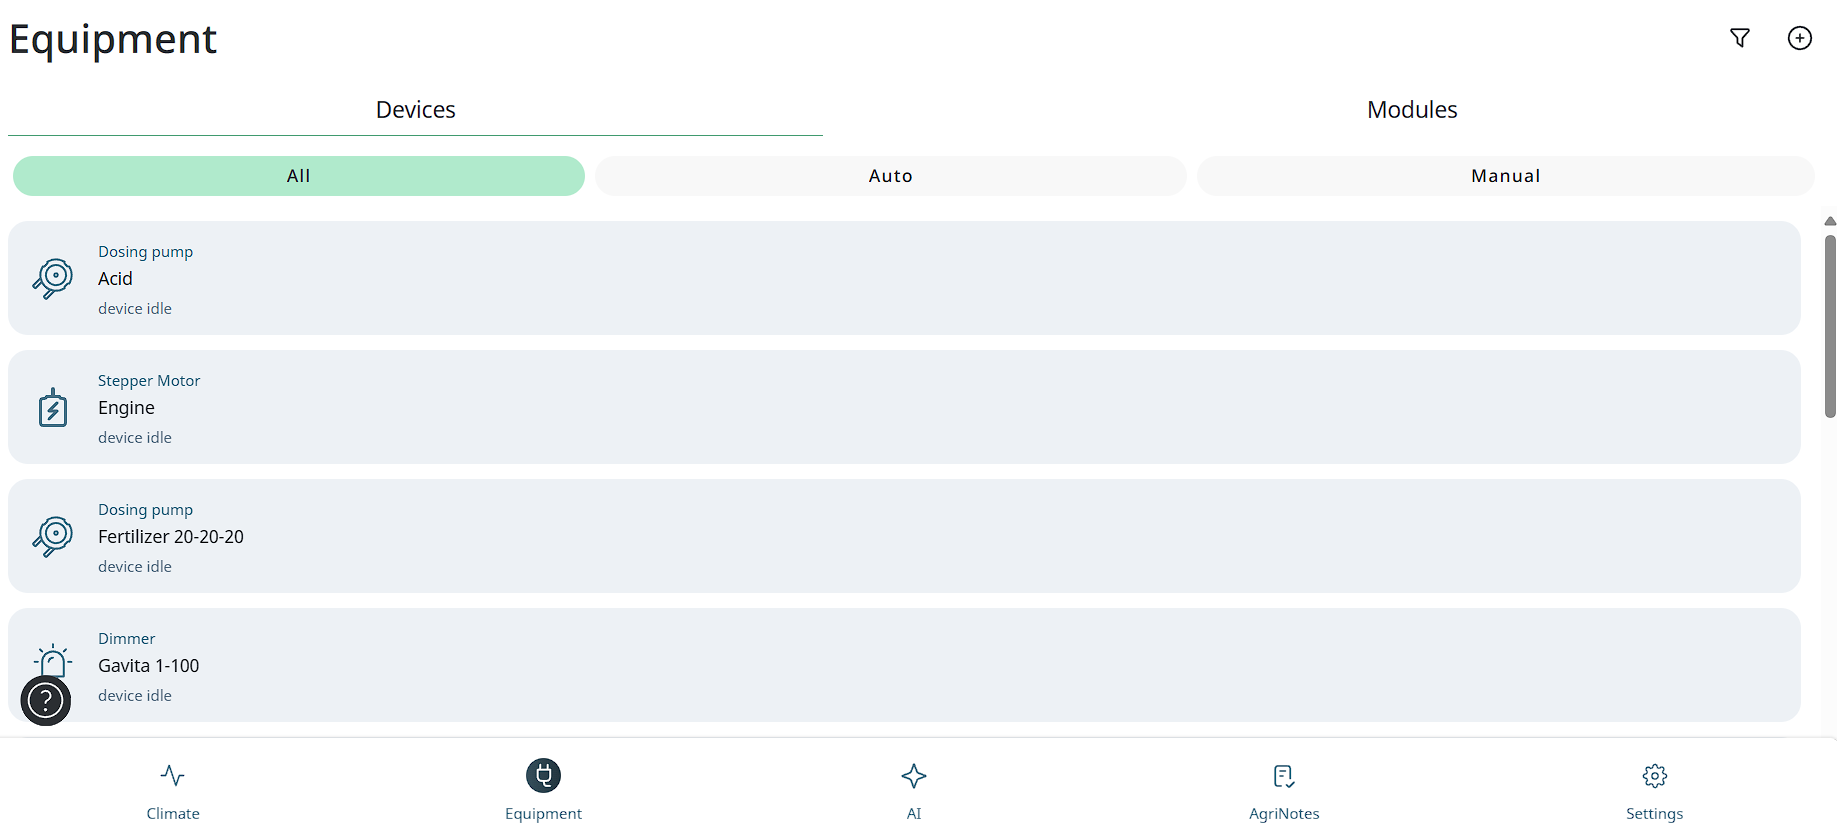
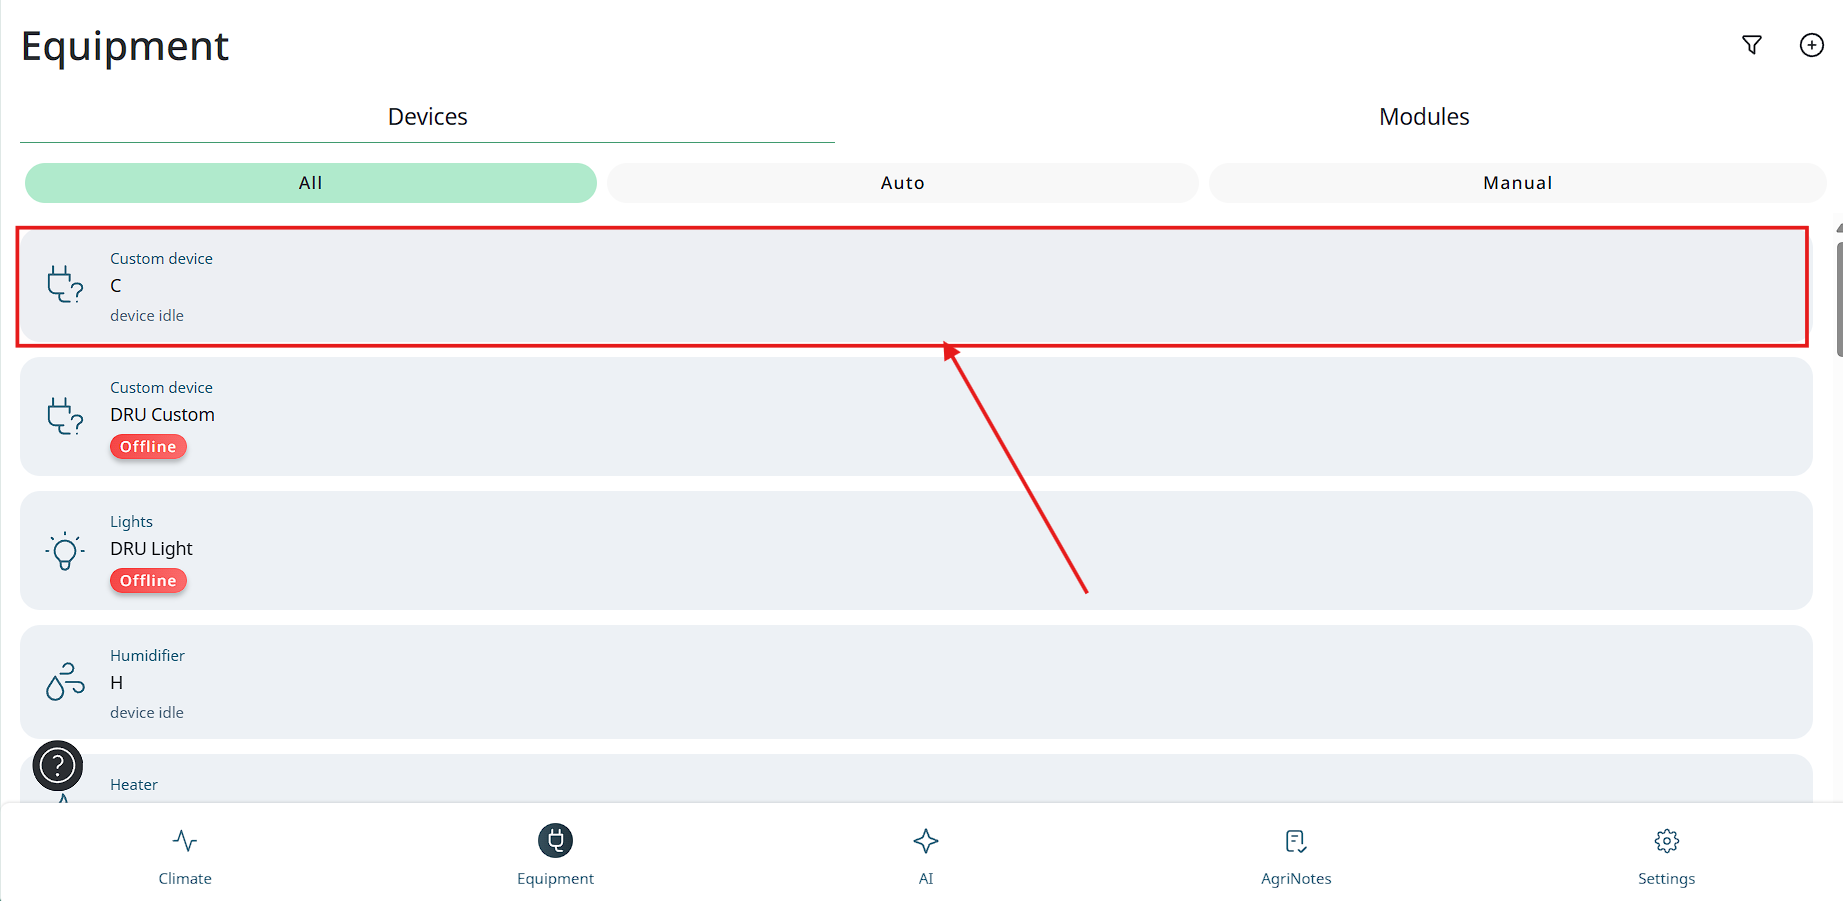
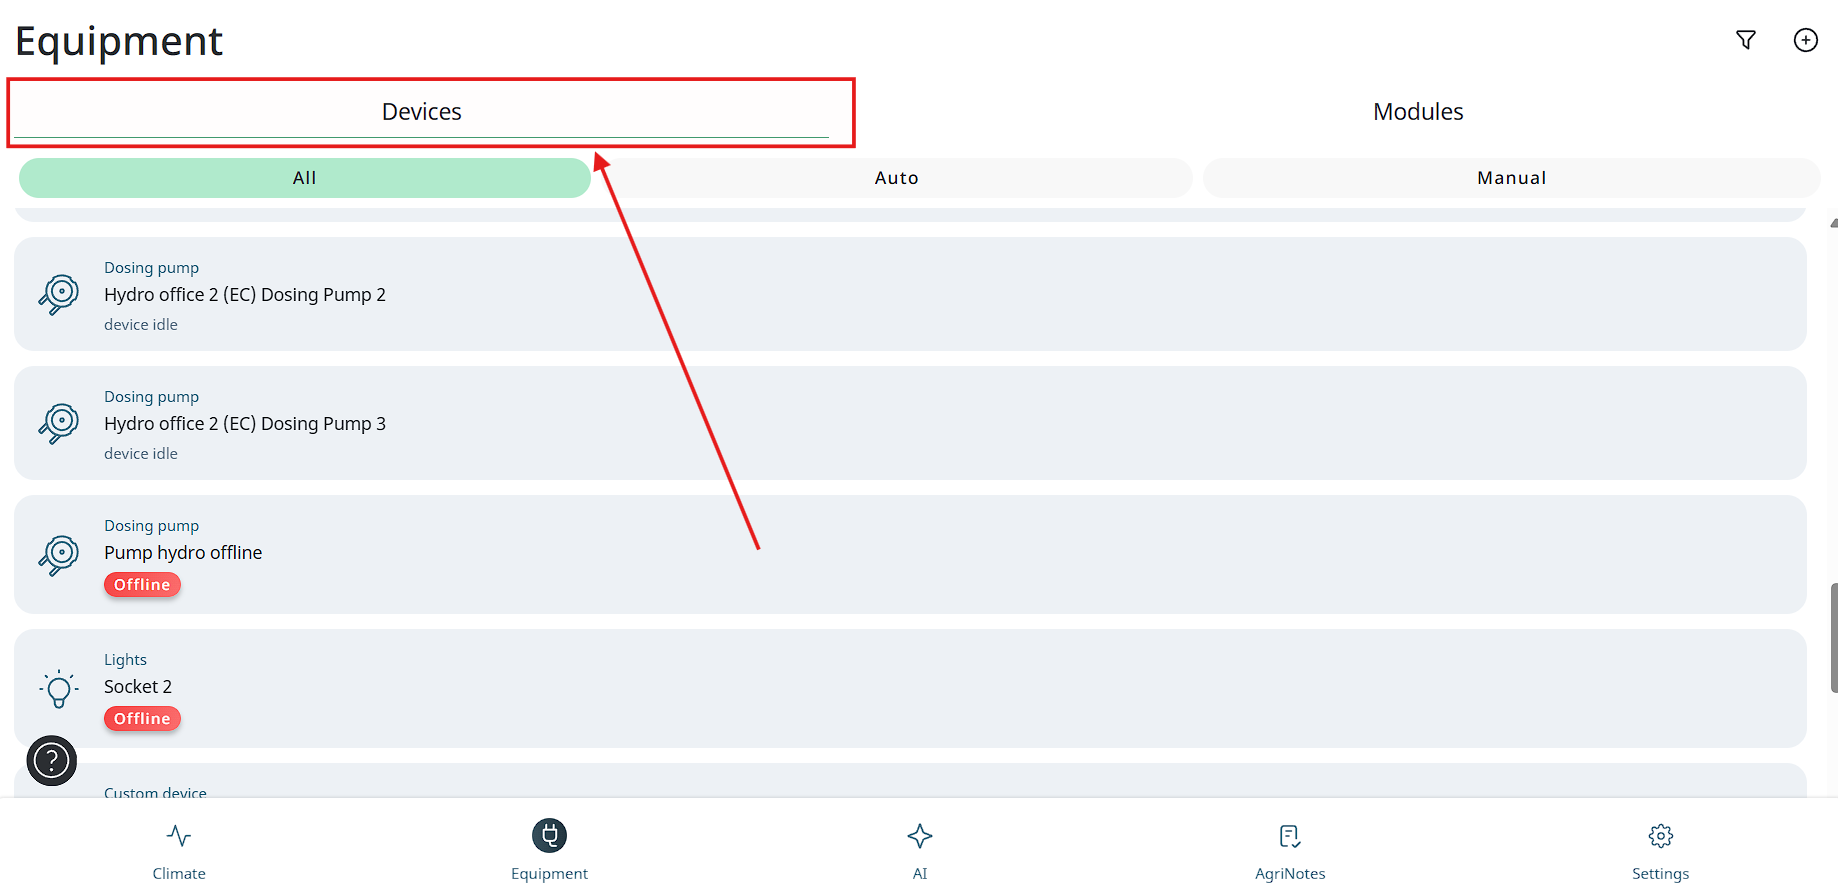
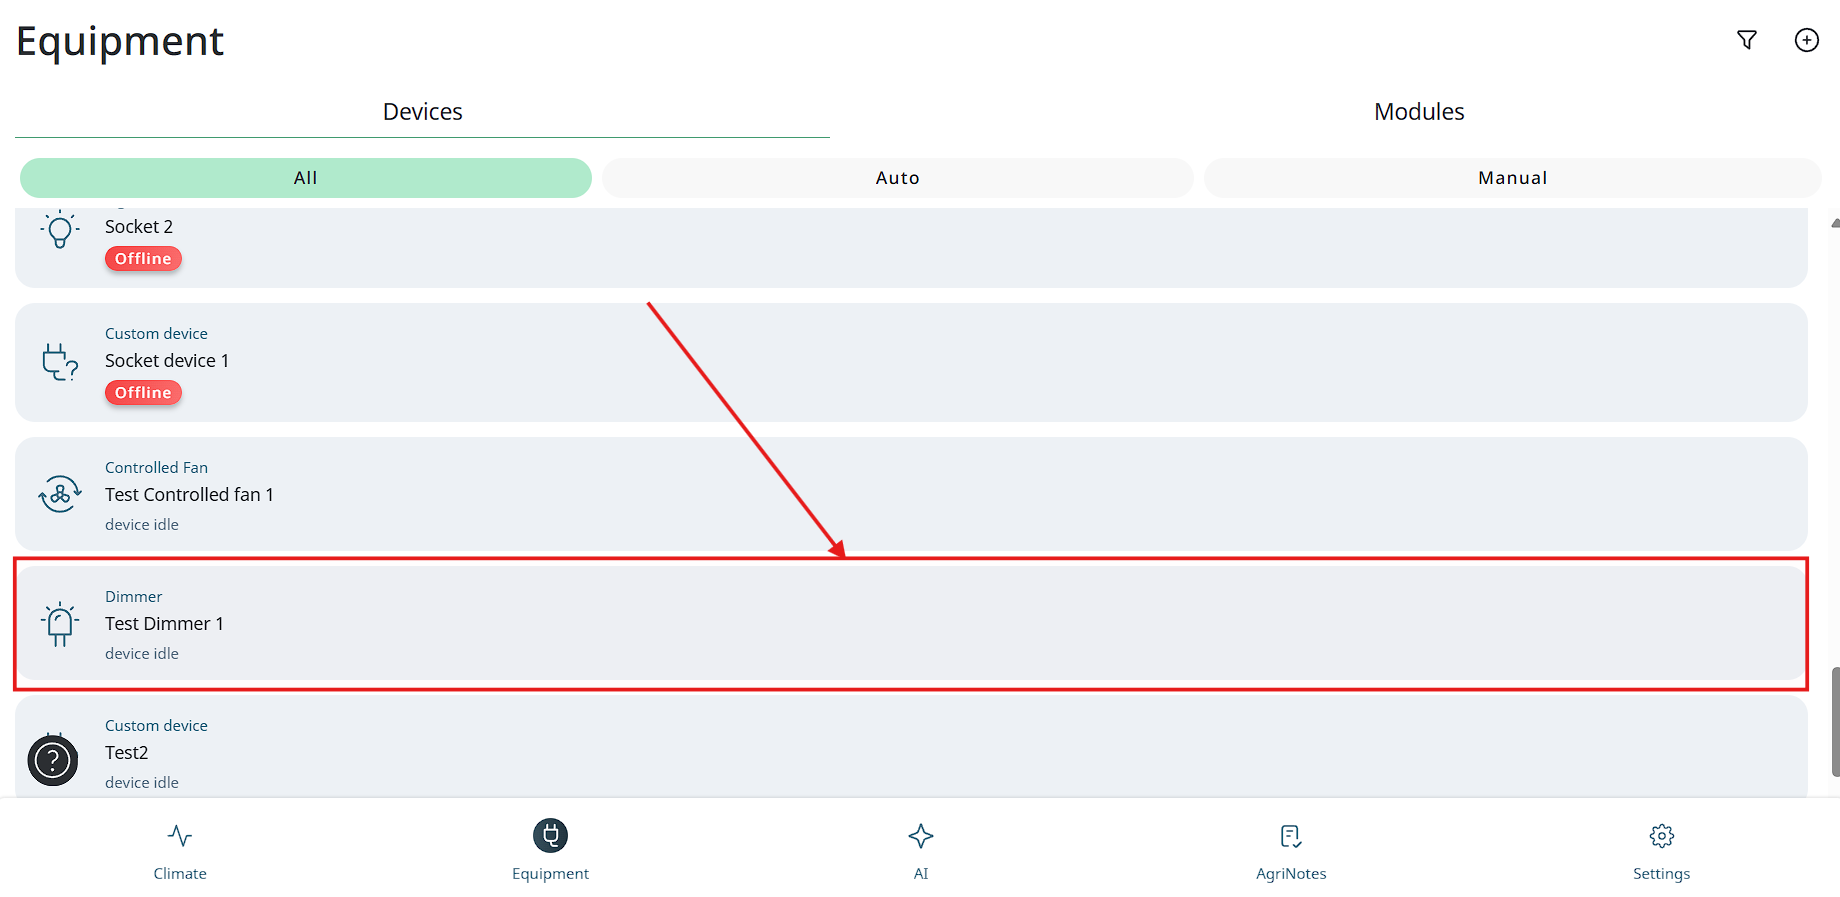
Devices screen contains main information about all connected Devices available for the user:
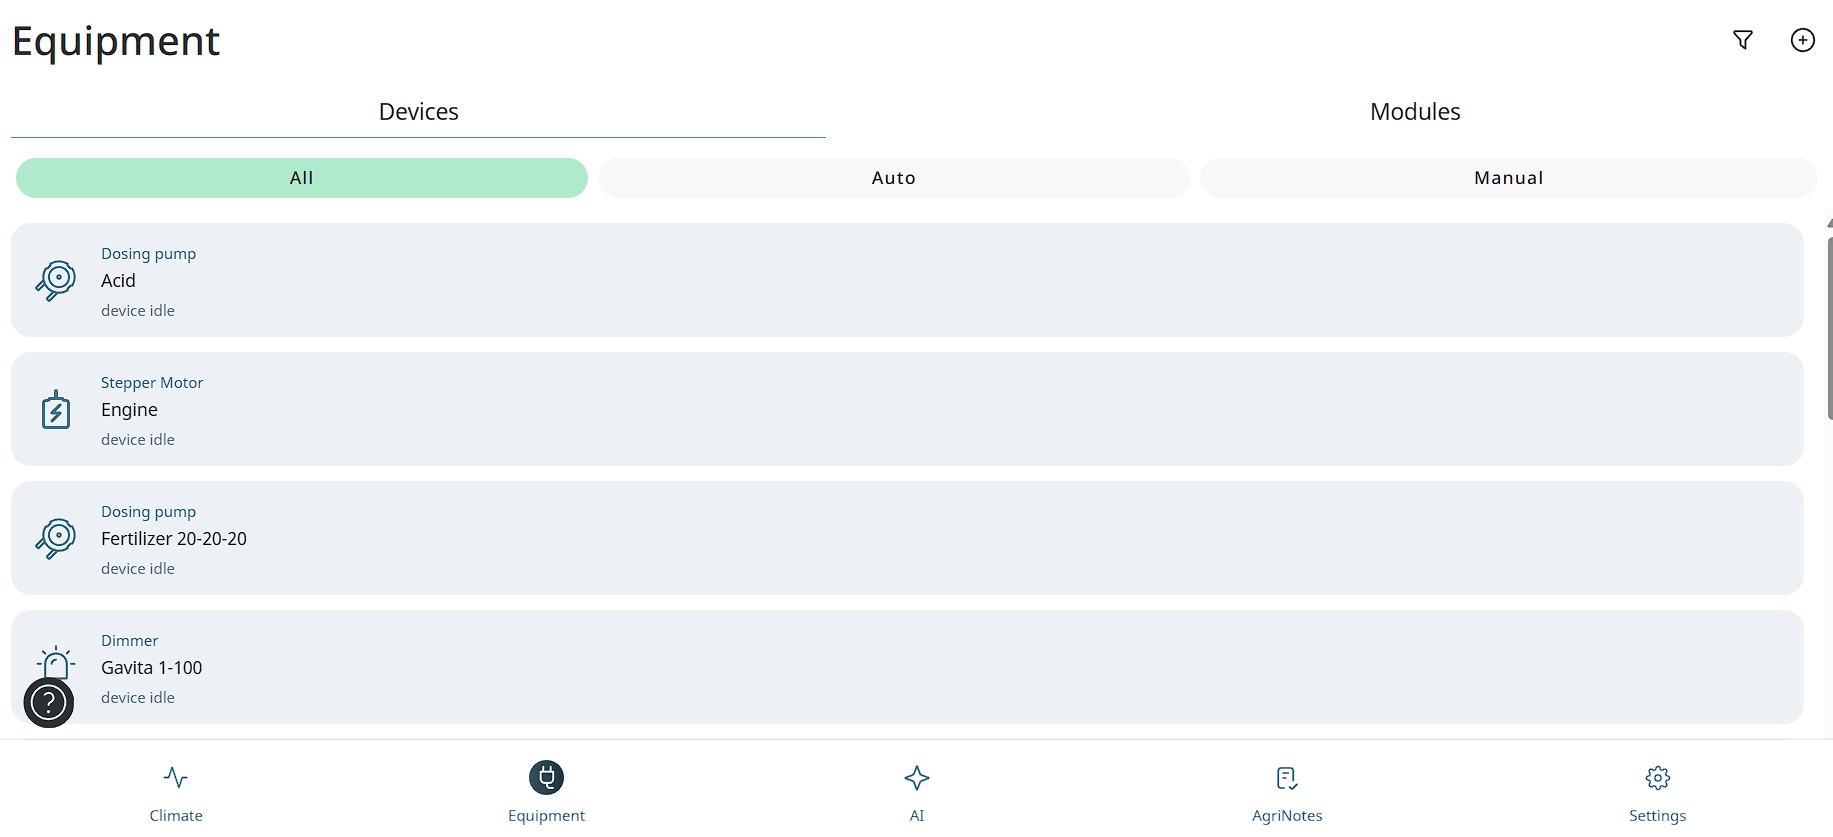
The Devices on this screen are displayed as tiles with their key information and are sorted according to the date when they were connected. The most recently connected Devices are displayed first.
Users can see the following on the Device screen:
-
Name of the screen on the top-left corner,
-
Action to connect new Device on the top-right corner,
-
Filter to see All Devices or based on the Auto / Manual mode:
-
All – displays all Devices currently configured in the System regardless type, working mode, etc.,
-
Auto – displays all Devices that are running in automatic mode based on the rules configured,
-
Manual – displays all Devices that are running in manual mode based on the rules configured.
-
-
List of all available devices,
-
TabBar or the main menu of the App.
There are several states of the Device, depending on which Device card will have
different elements on it:
● Auto (mode) – working (turned on now),
● Auto (mode) – idle (turned off now, waiting for the rule),
● Auto (mode) – offline (turned off now or broken),
● Manual (mode) – working (turned on now),
● Manual (mode) – idle (turned off now),
● Manual (mode) – offline (turned off now or broken).
Tap any of the Device tiles and you will be redirected to the screen with this specific Device where you can view detailed information.
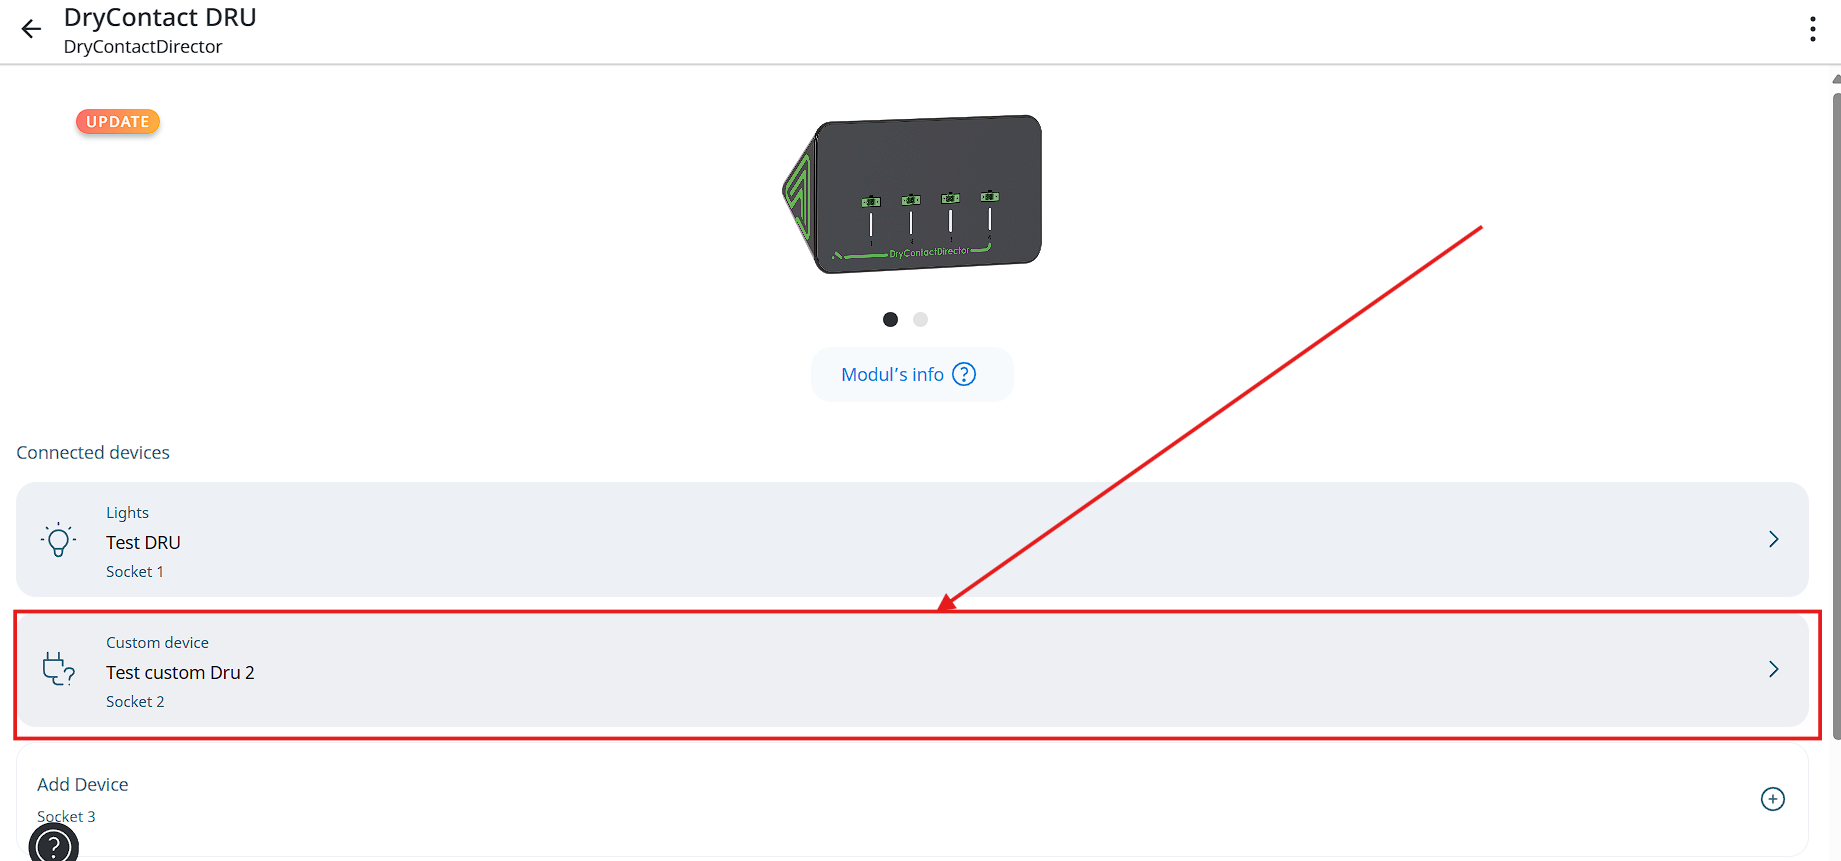
Adding new device
To add a new Device, please, follow these steps:
-
Tap on the device icon at the bottom of the screen to go to the device settings.
-
Tap the Plus button on the top-right corner of the Devices screen. The following screen appears:
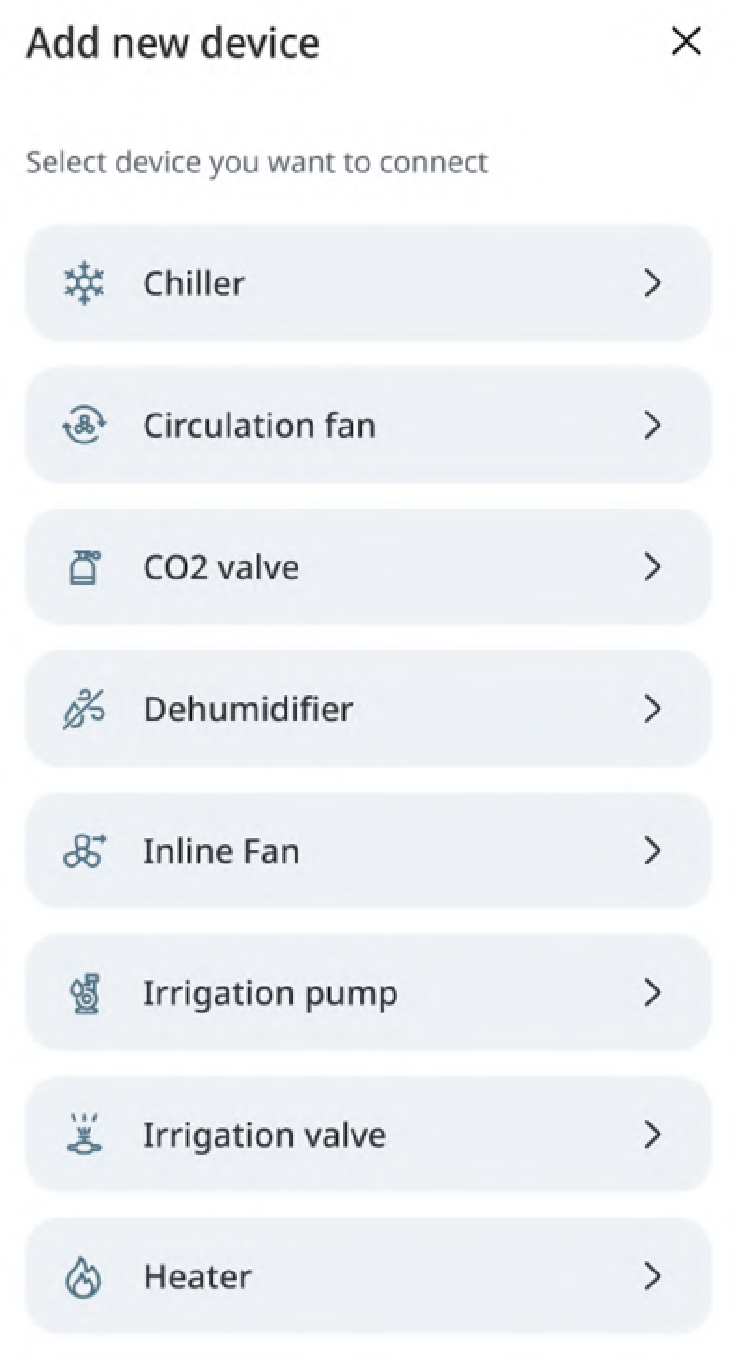
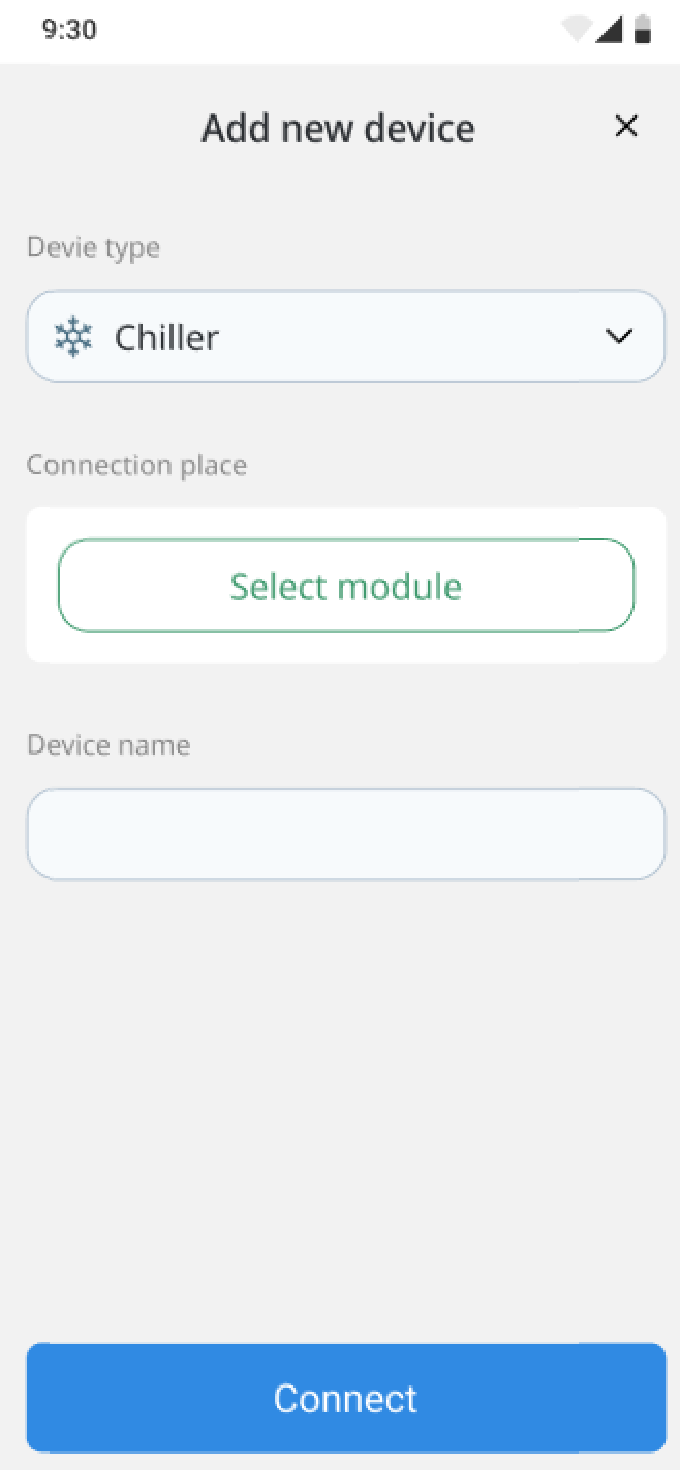
- The system will offer you a connection to the specific Modules that handle the Devices chosen. Tap the Type of Device you want to add. The following screen appears:
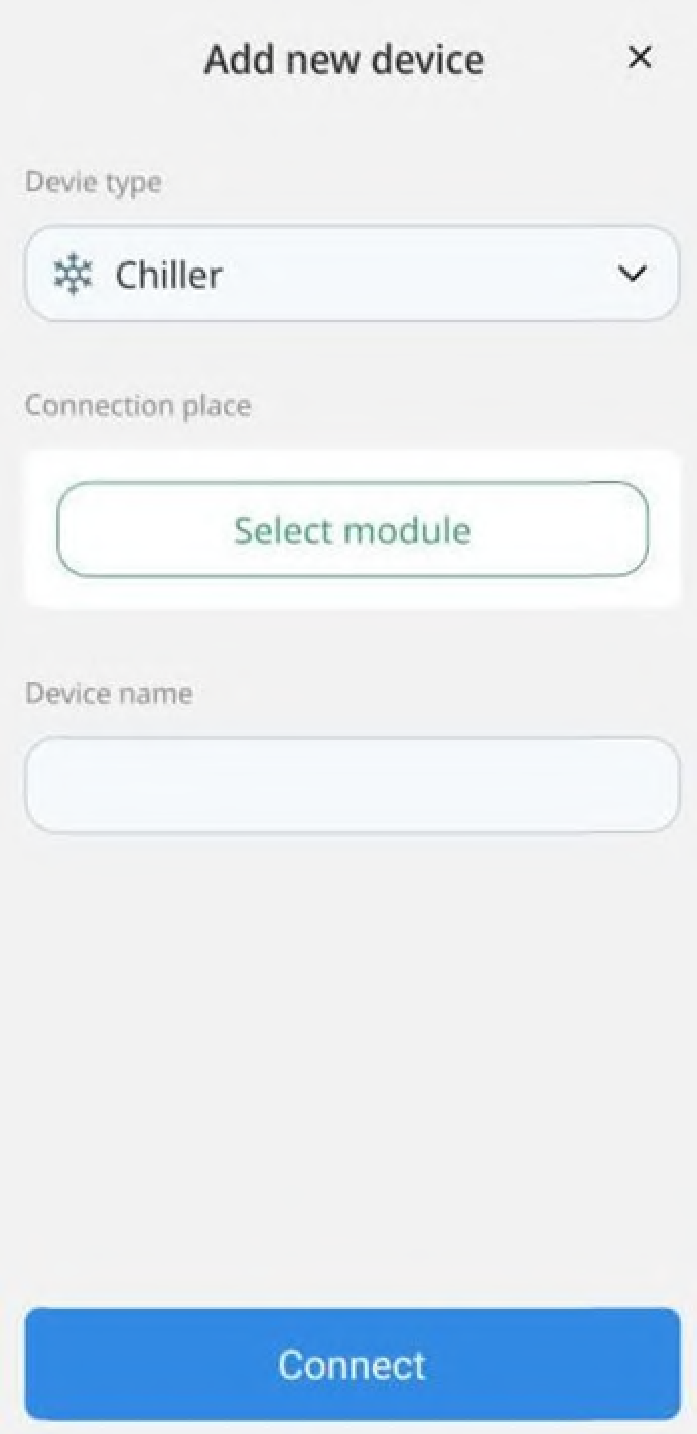
-
Enter the name of the Device in the Device name field.
-
Tap the Select module button. The following screen appears:
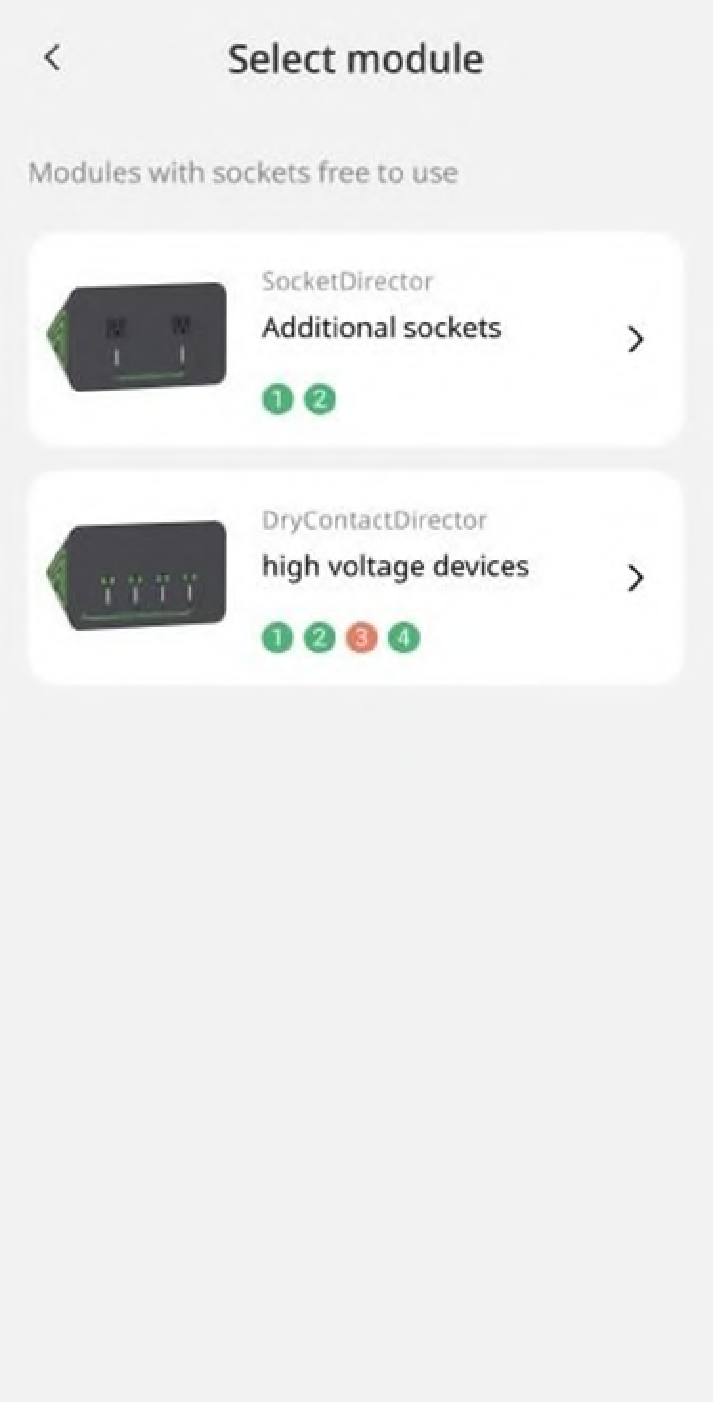
- Tap a Module to which you want to add a Device. The following screen appears:
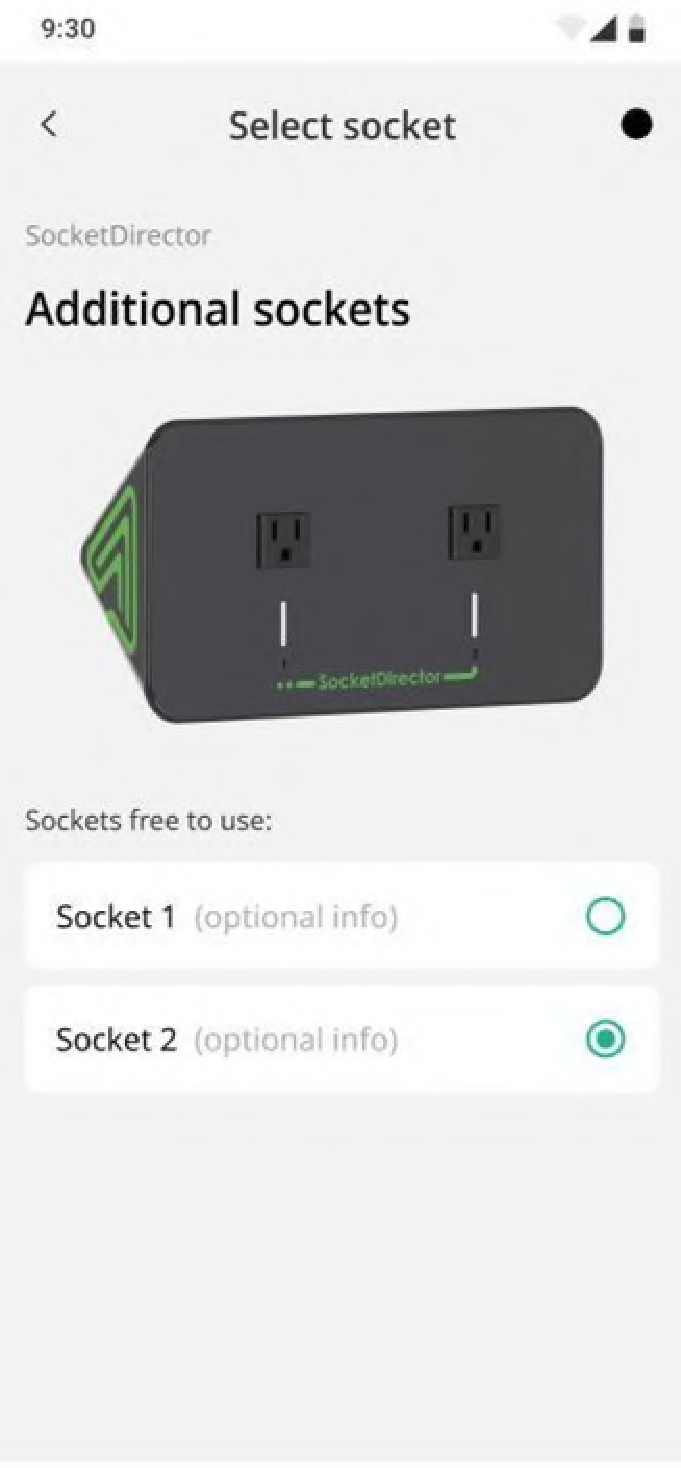
- Select the Socket to which you want to connect your Device. Then, return to the first screen and tap the Connect button:
Note: When there are no Modules left for connecting additional Devices, you can reach out to us to purchase additional Modules.
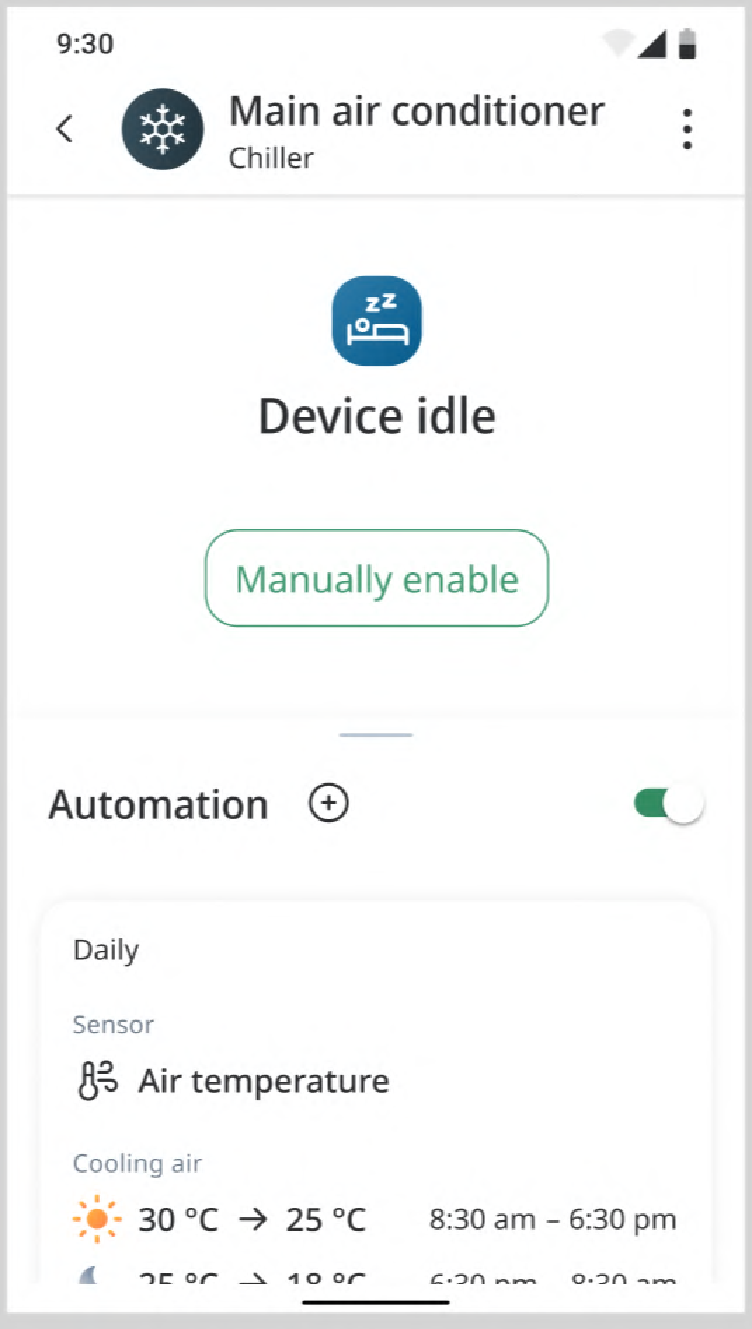
Switching on device
After adding a Device, you need to switch it on physically so that it can start functioning. You can enable the Device to run continuously or specify a duration for the Device to run:
To switch on a Device, please, follow these steps:
-
Tap on the device icon at the bottom of the screen to go to the device settings.
-
On the Devices screen, tap the On button corresponding to the Device you want to switch on. The following screen appears:
● To run the Device continuously, tap the Run continuously button.
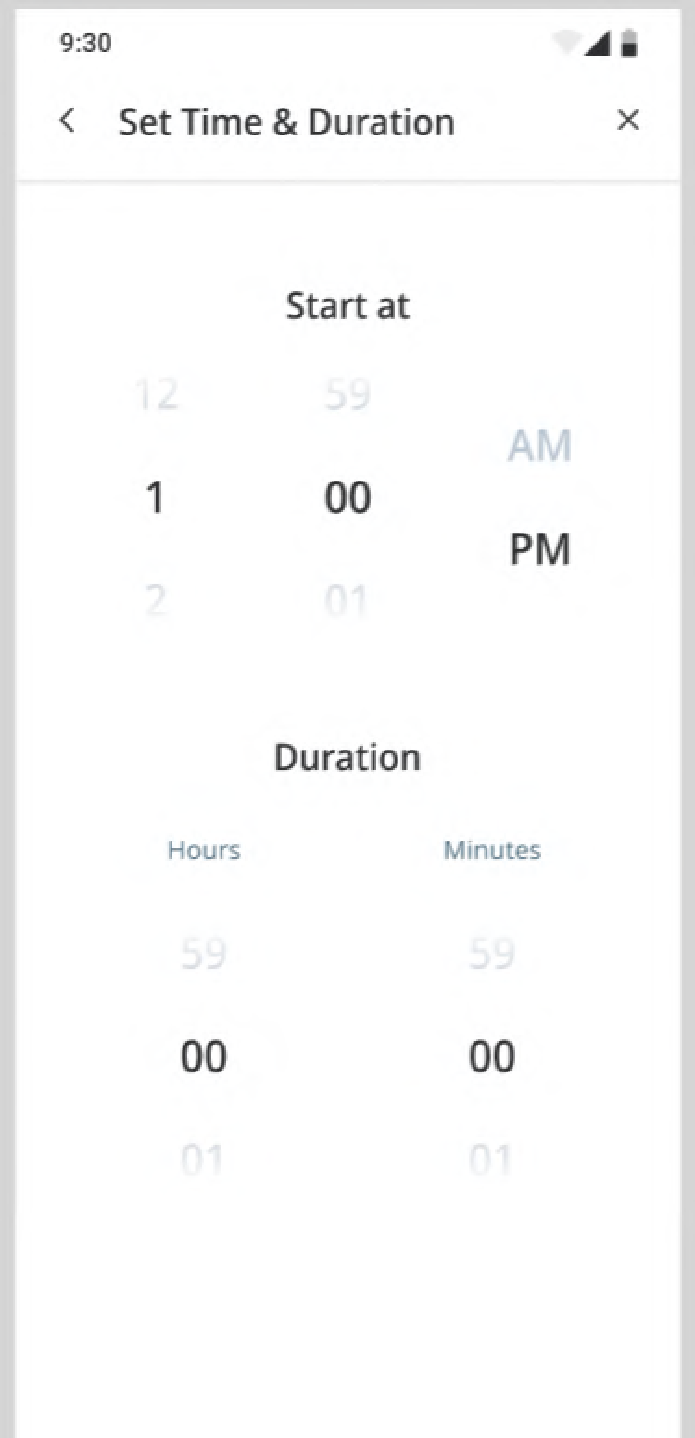
● To specify how long the Device should run, select the hours, minutes, and seconds. Then, tap the Run device button.
Switching off device
To switch on a Device, please, follow these steps:
-
Tap on the device icon at the bottom of the screen to go to the device settings.
-
To switch off a Device, tap the Off button corresponding to the Device you want to switch off:
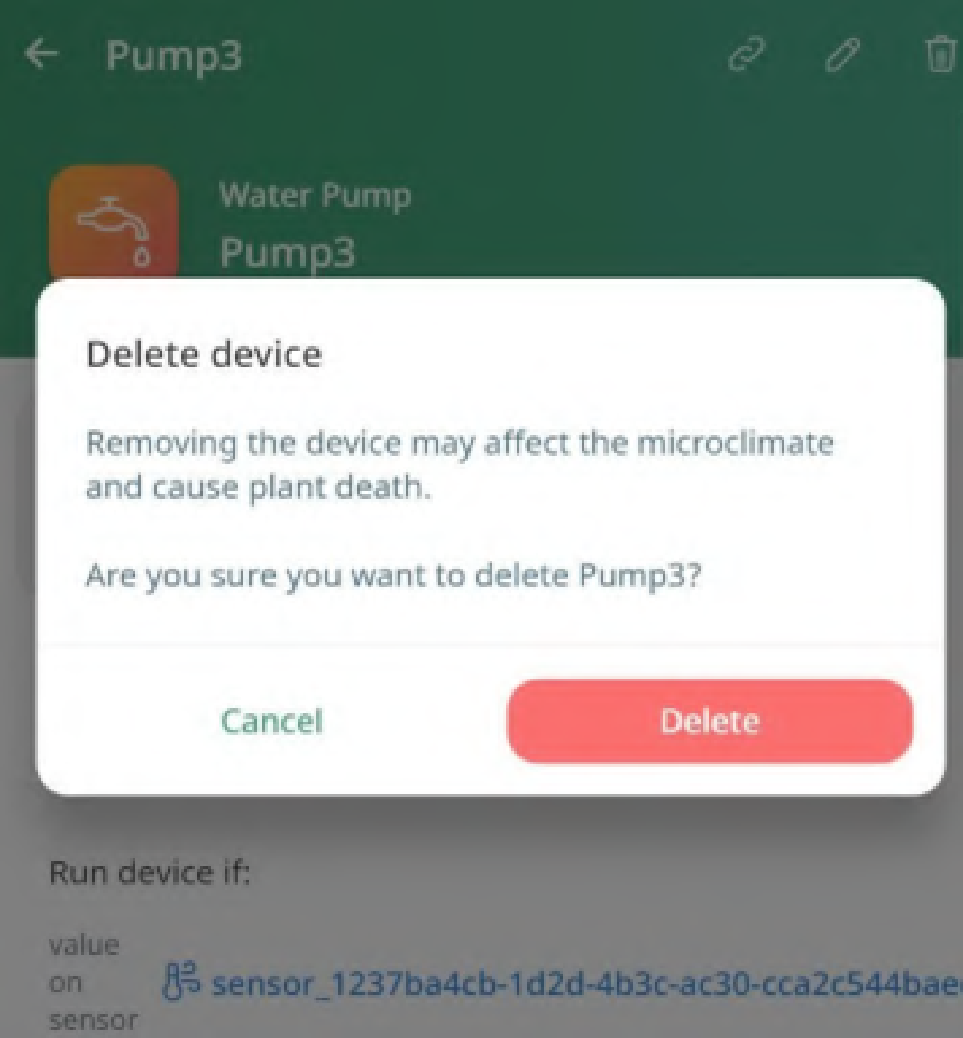
Deleting device
To delete a Device that you added, please, follow these steps:
-
Tap on the device icon at the bottom of the screen to go to the device settings.
-
On the Device list screen, you need to select the required device. Click on it, and the Device page opens. You need to delete all the rules (if any), and in order to delete the rules, you need to deactivate them, and tap the Delete button on the top-right corner of the screen. The following screen appears:
- Tap the Manage and then Delete button:

Rules
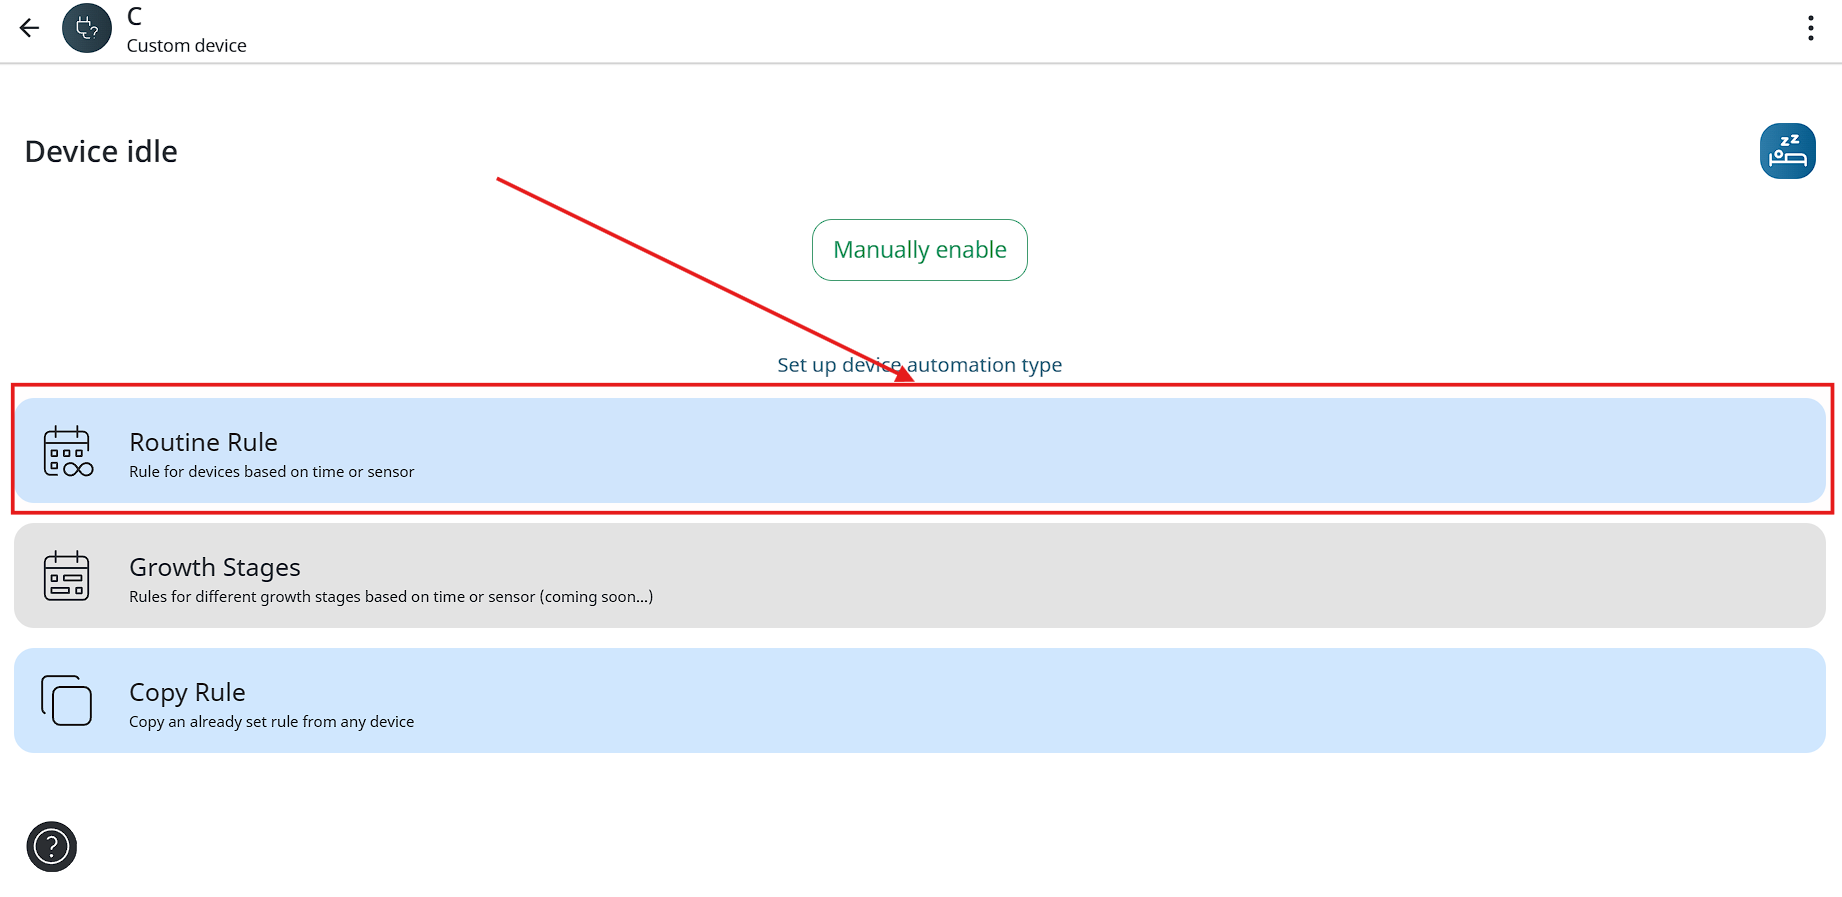
You can also set custom rules based on which you want to manage your Device
operations. You can set rules to make your Devices run based on the following:
● Daily rules;
● Loop rules;
● Step rules.
Set daily rules
To set a Device rules you need to follow steps:
Note: If you need to set up a rule that is based on sensor data metrics, make sure that you have SensorDirector, Temperature sensors and control module connected.
-
Tap on the device icon at the bottom of the screen to go to the device settings.
-
Tap the Device tile for which you want to set a rule. The following screen
appears:
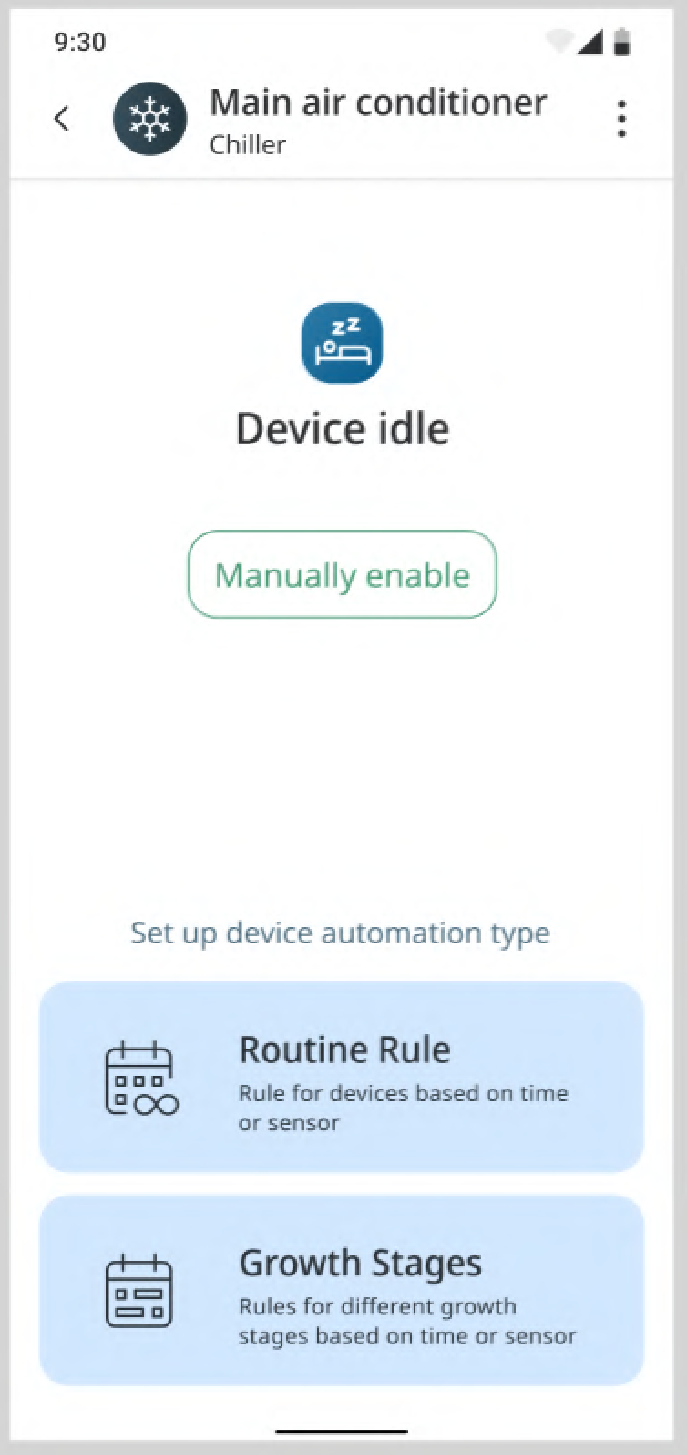
-
Tap the Routine Rule tile.
-
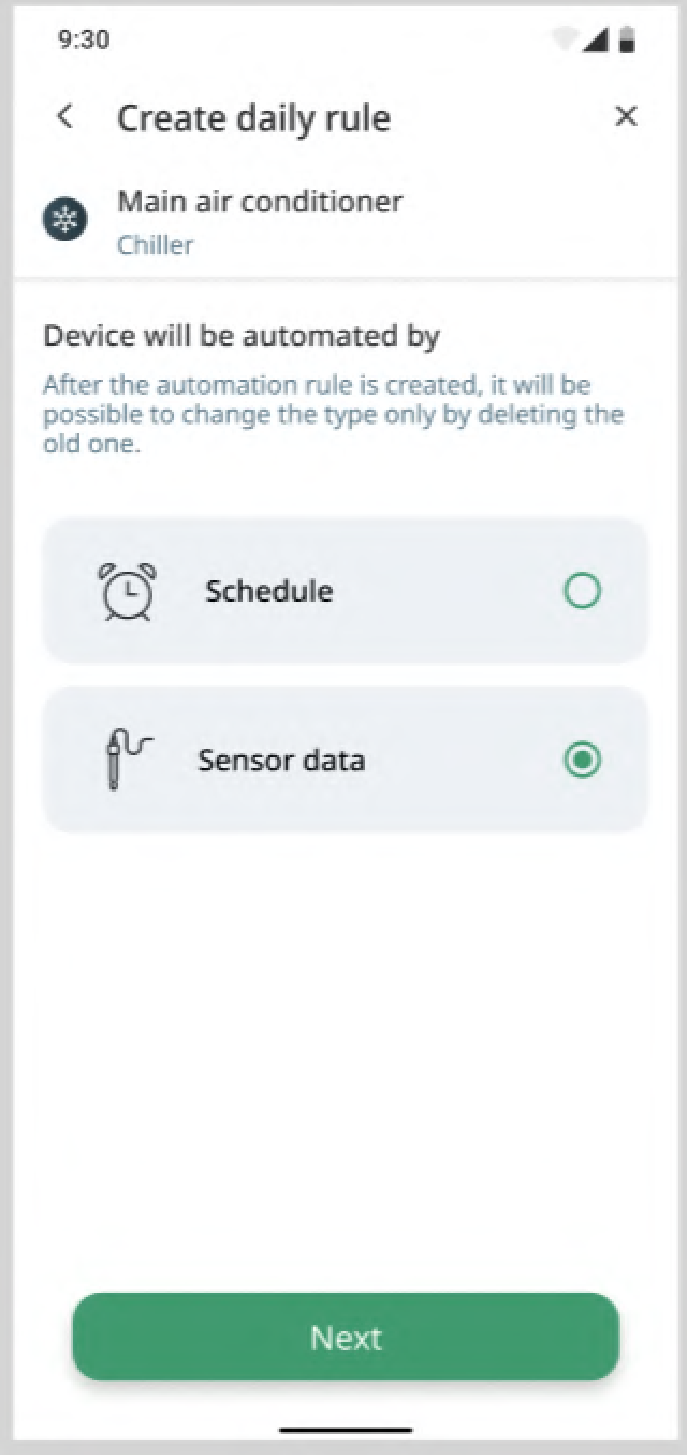
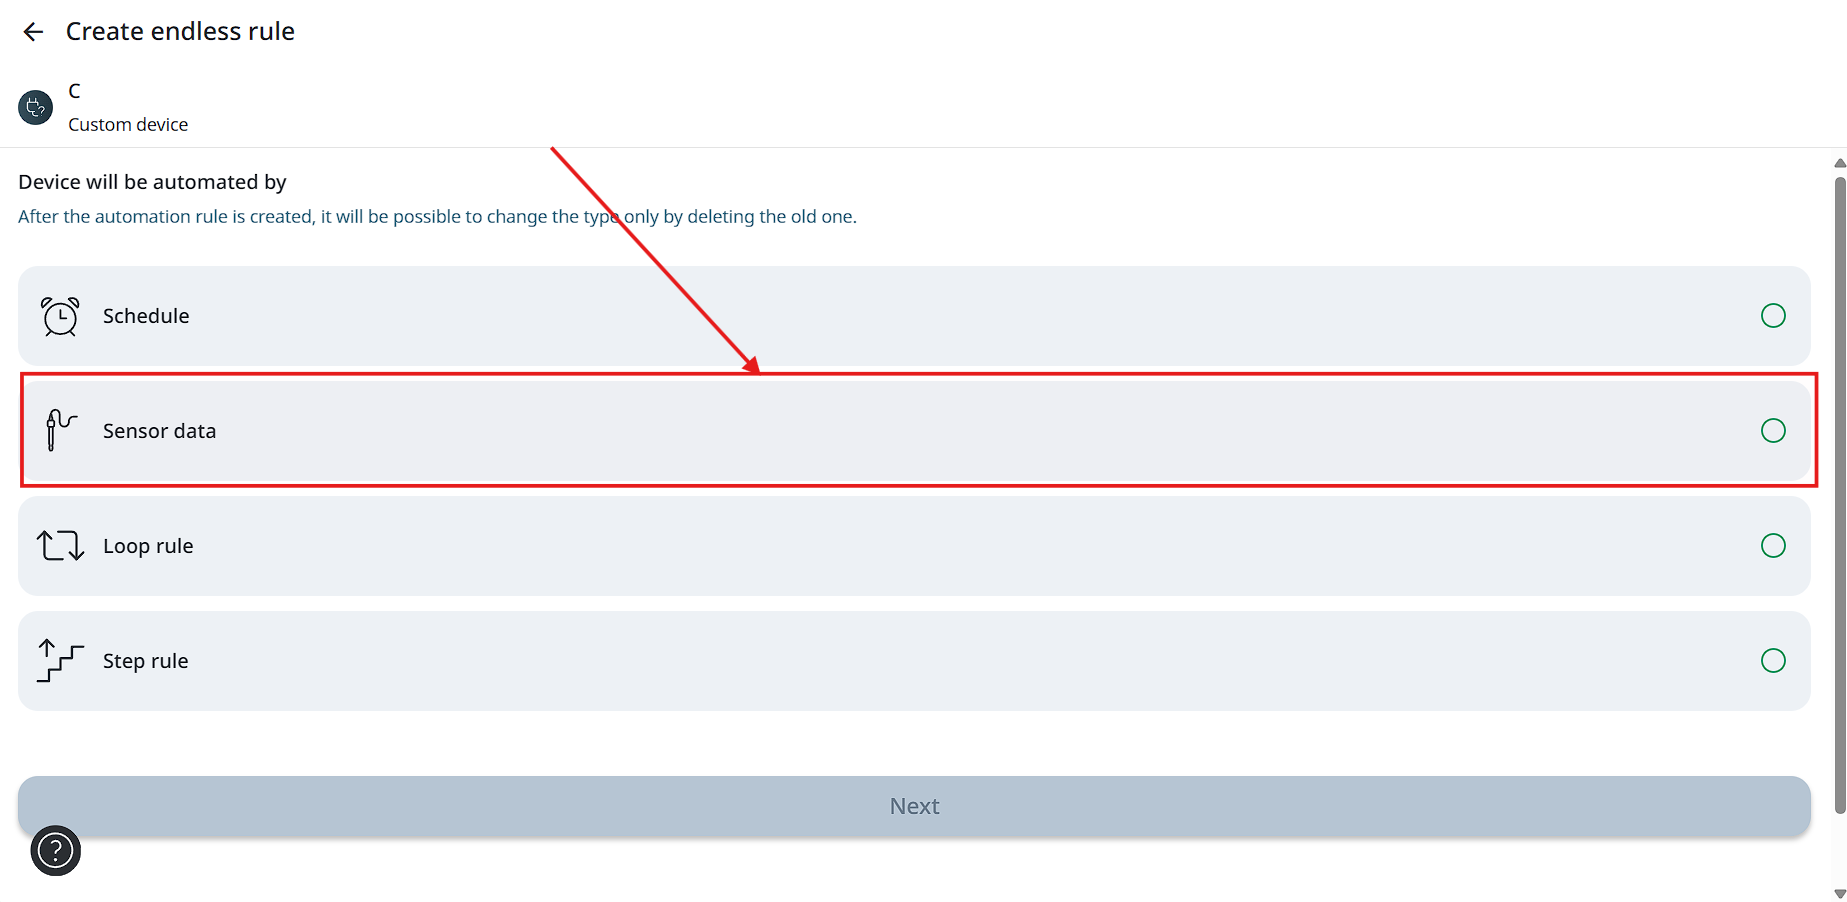
Choose rules by Schedule or Sensor data.
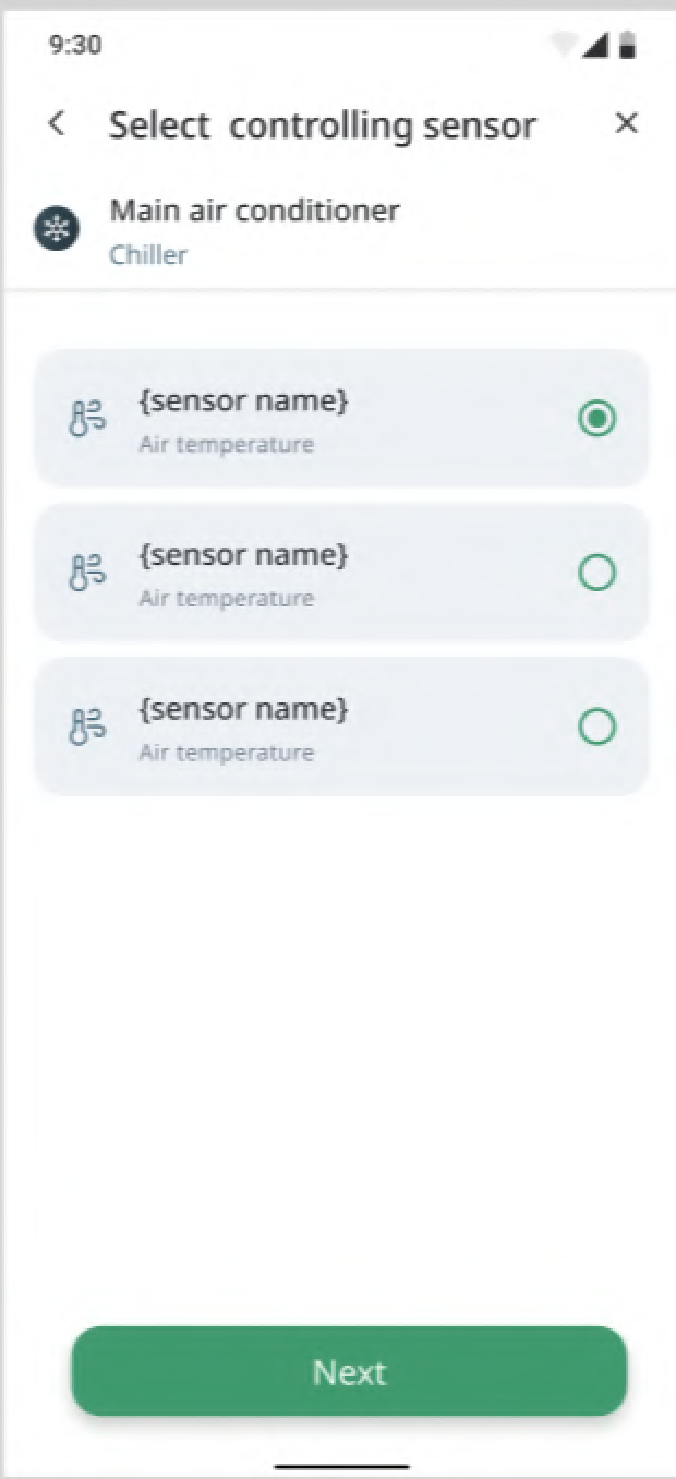
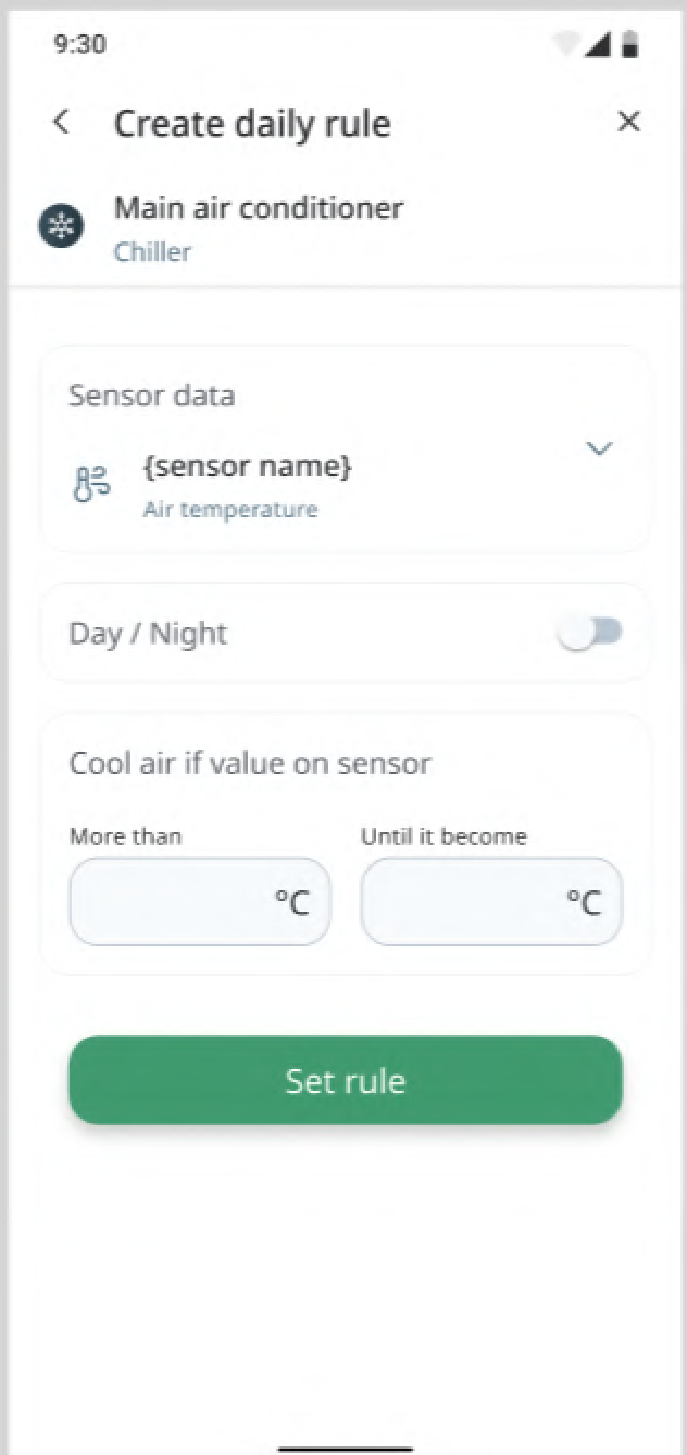
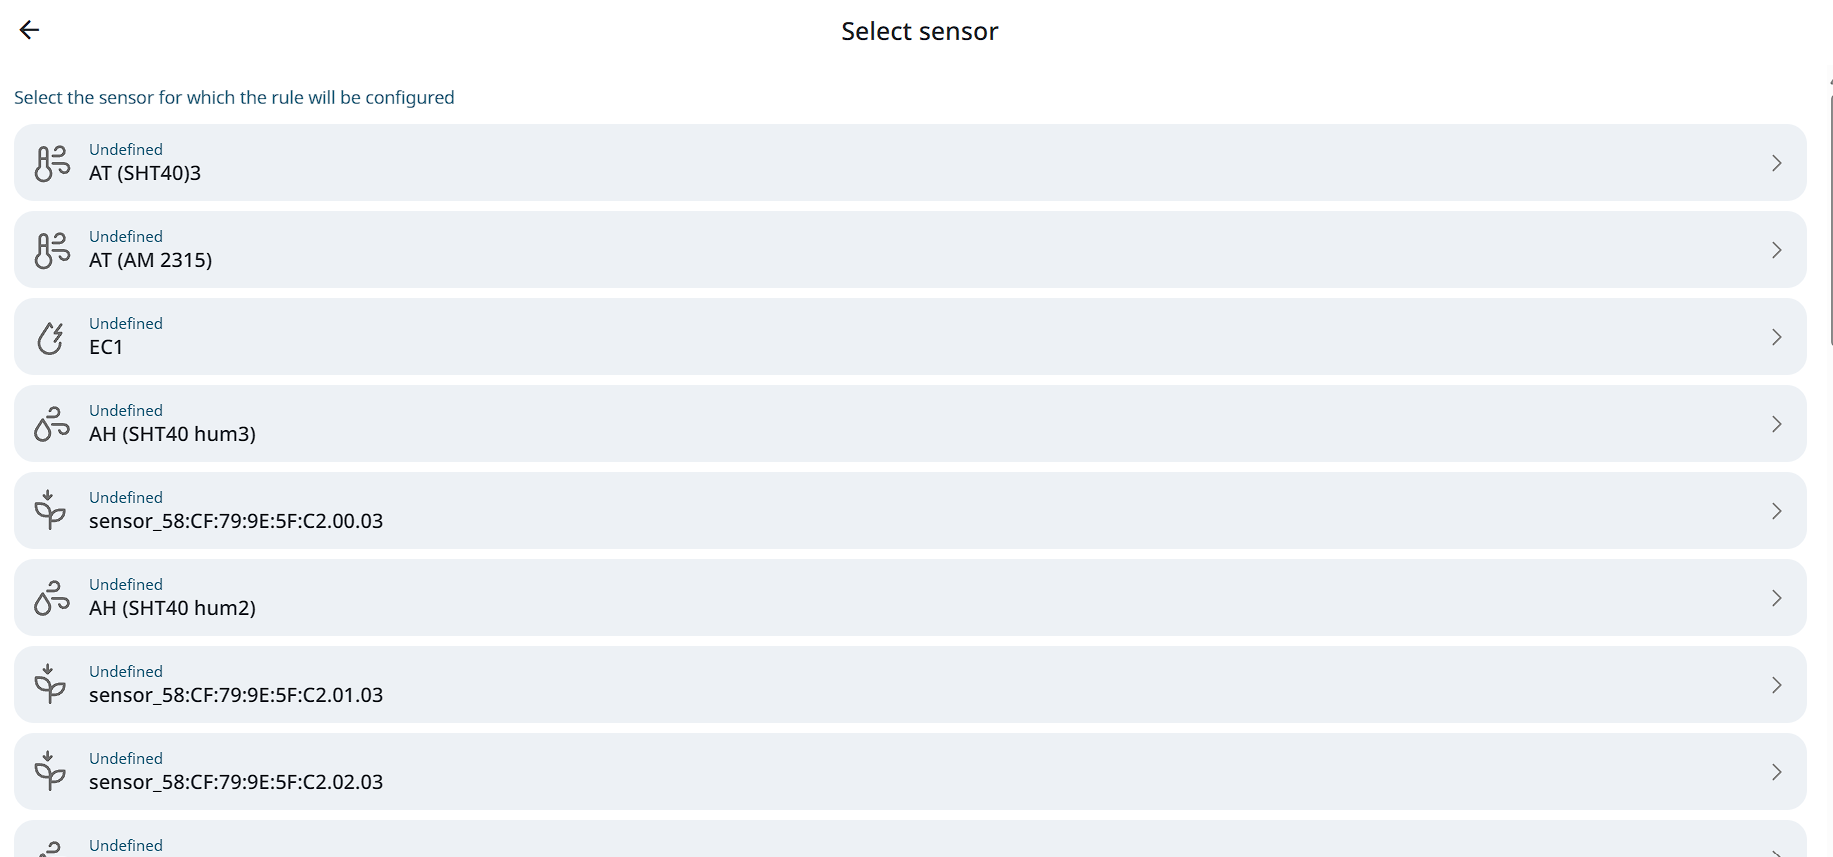
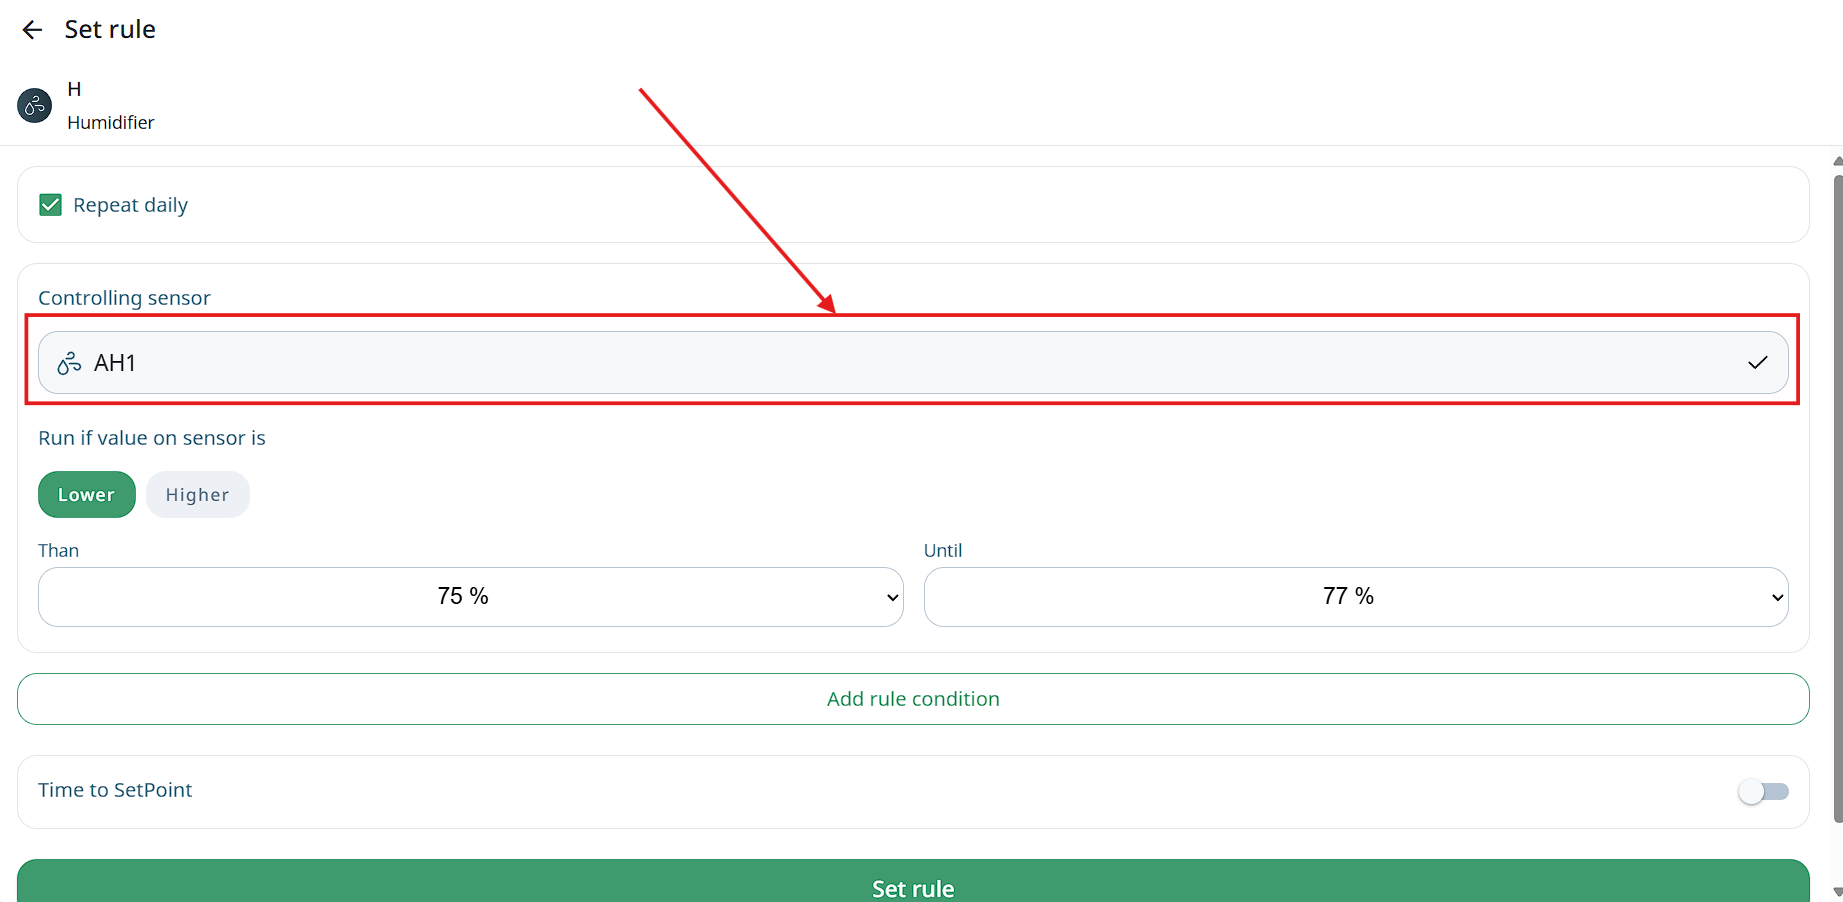
- Rules for sensor data are configured based on sensor values. System will show a list of available sensors for this device. Select one sensor to continue configurations.
- On the next step you may change the selected sensor, set up day and night min max values or just set up full day min max values.
- To set up the Schedule rule button you may click on the correspondent tile from the 2nd step. The system will open the Rule by schedule screen.
Note: Schedule rules may be created only based on time with duration. Schedule rules cannot be created based on specific week days or dates.
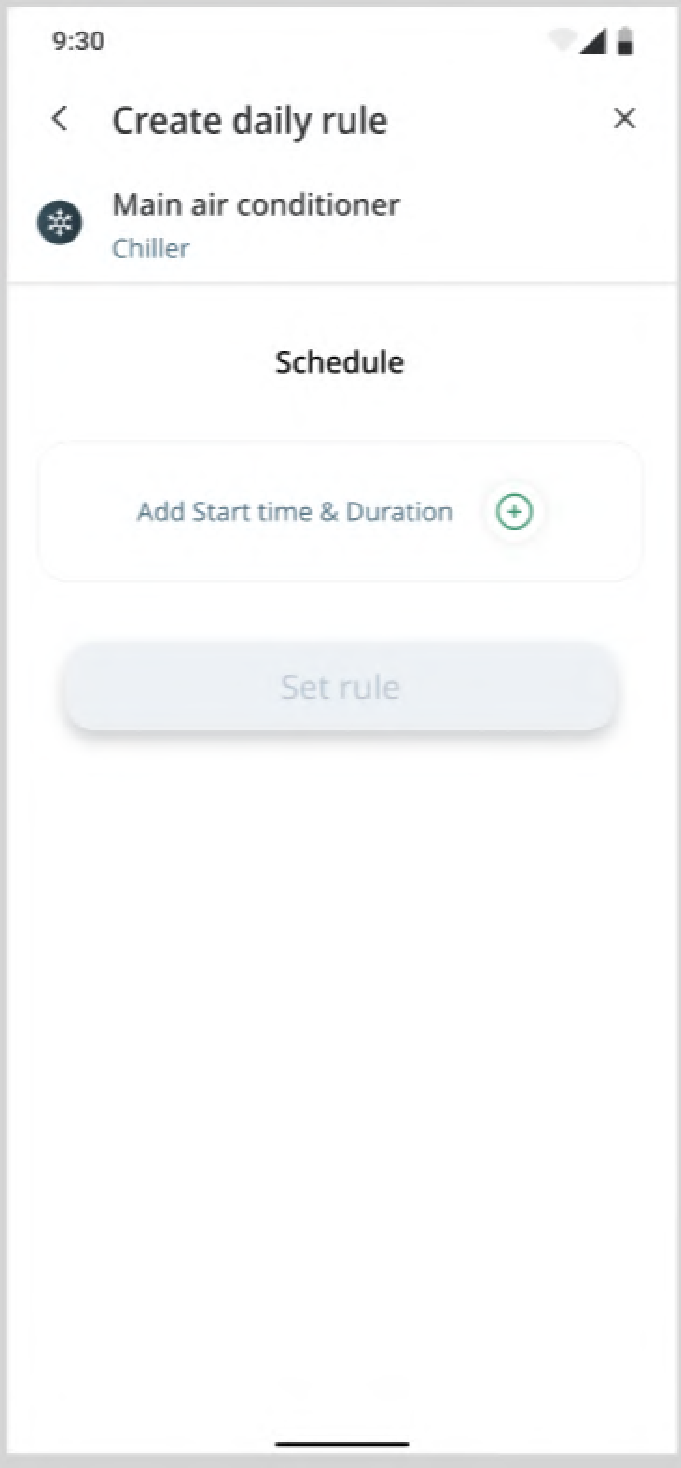
- Click on Add start time & Duration button to choose time when rule starts and
its duration.
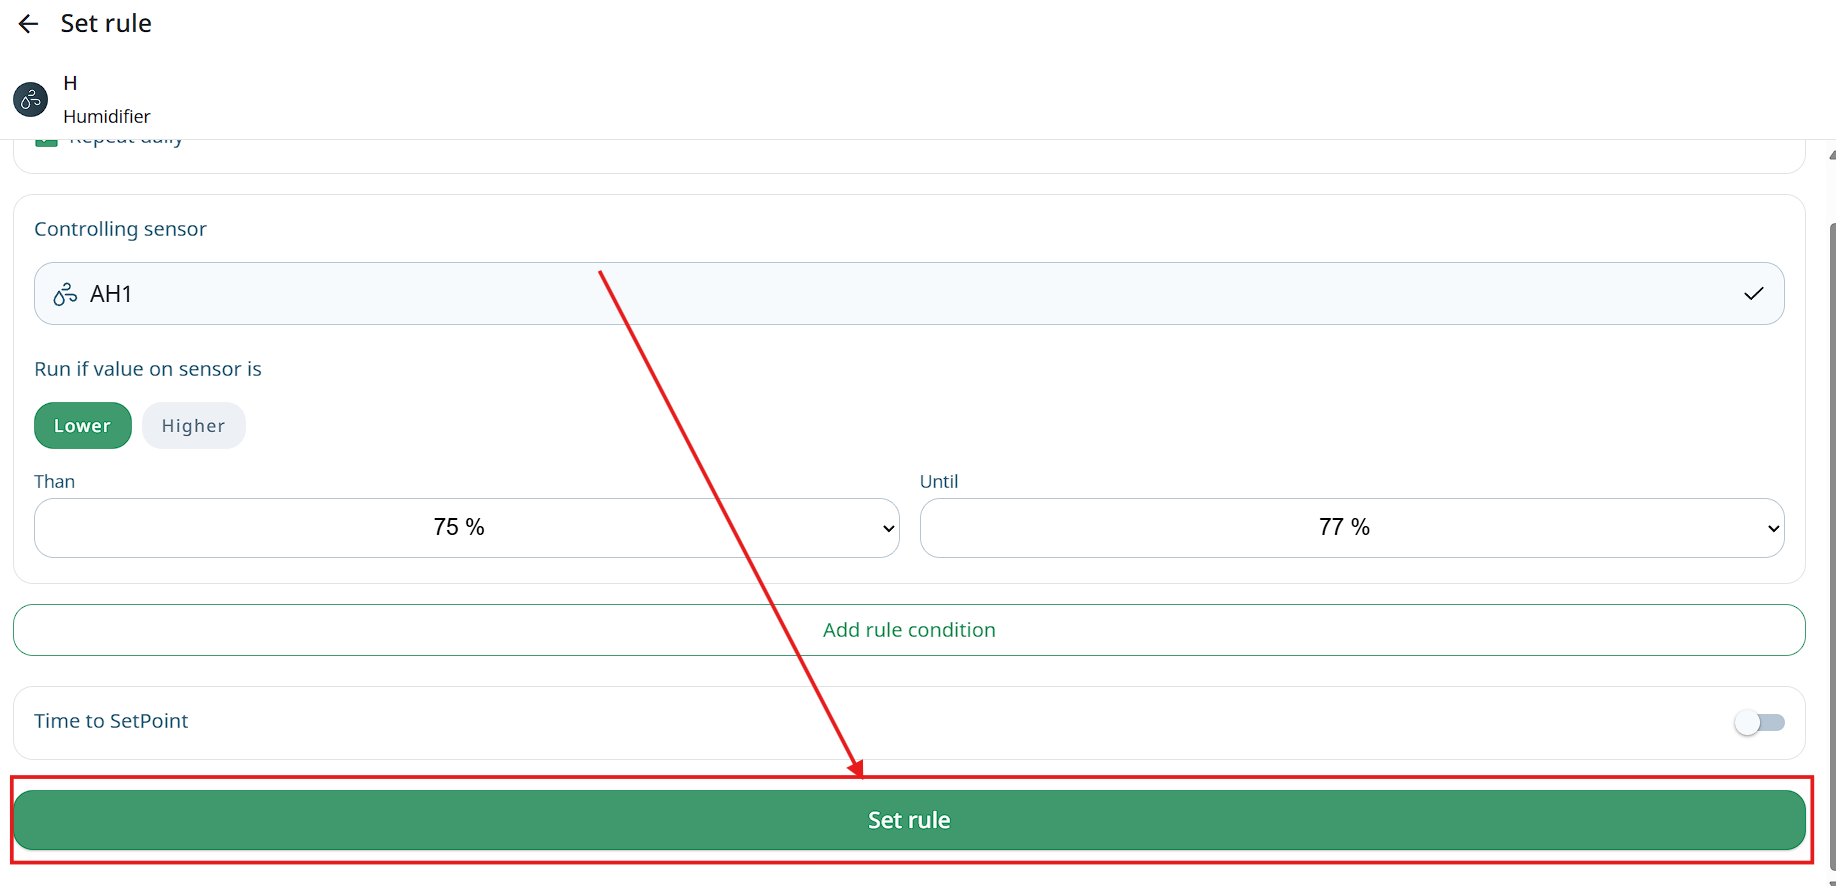
- After choosing at least one rule, the Set rule button becomes available. You can create more rules or save daily rules.
Example of setting rules:
User question: how do i make a rule for temperature from 30C to 40C?
Answer with instruction:
To create a rule for temperature ranging from 15°C to 30°C in the GrowDirector system, you can follow these steps:
-
Make sure that you have a SensorDirector, Temperature sensors and control module connected.
-
Tap on the device icon at the bottom of the screen to go to the device settings.
-
For rule setting tap on the device tile for which device you want to set the rule.
-
Next, select the Routine Rule tile.
-
Choose rules based on Sensor data.
-
Then you will see a list of available sensors on your screen.
-
Select the temperature sensor to continue with the configurations.
-
Go and get to the tile of "Run if value on sensor" and tap on More.
-
In tile "Than" choose 15C and in tile Until choose 30C.
-
Tap on "Set rule".
-
It will show you the next screen where the switch "Automation" is in green. If you want to stop automation, tap on the switcher again.
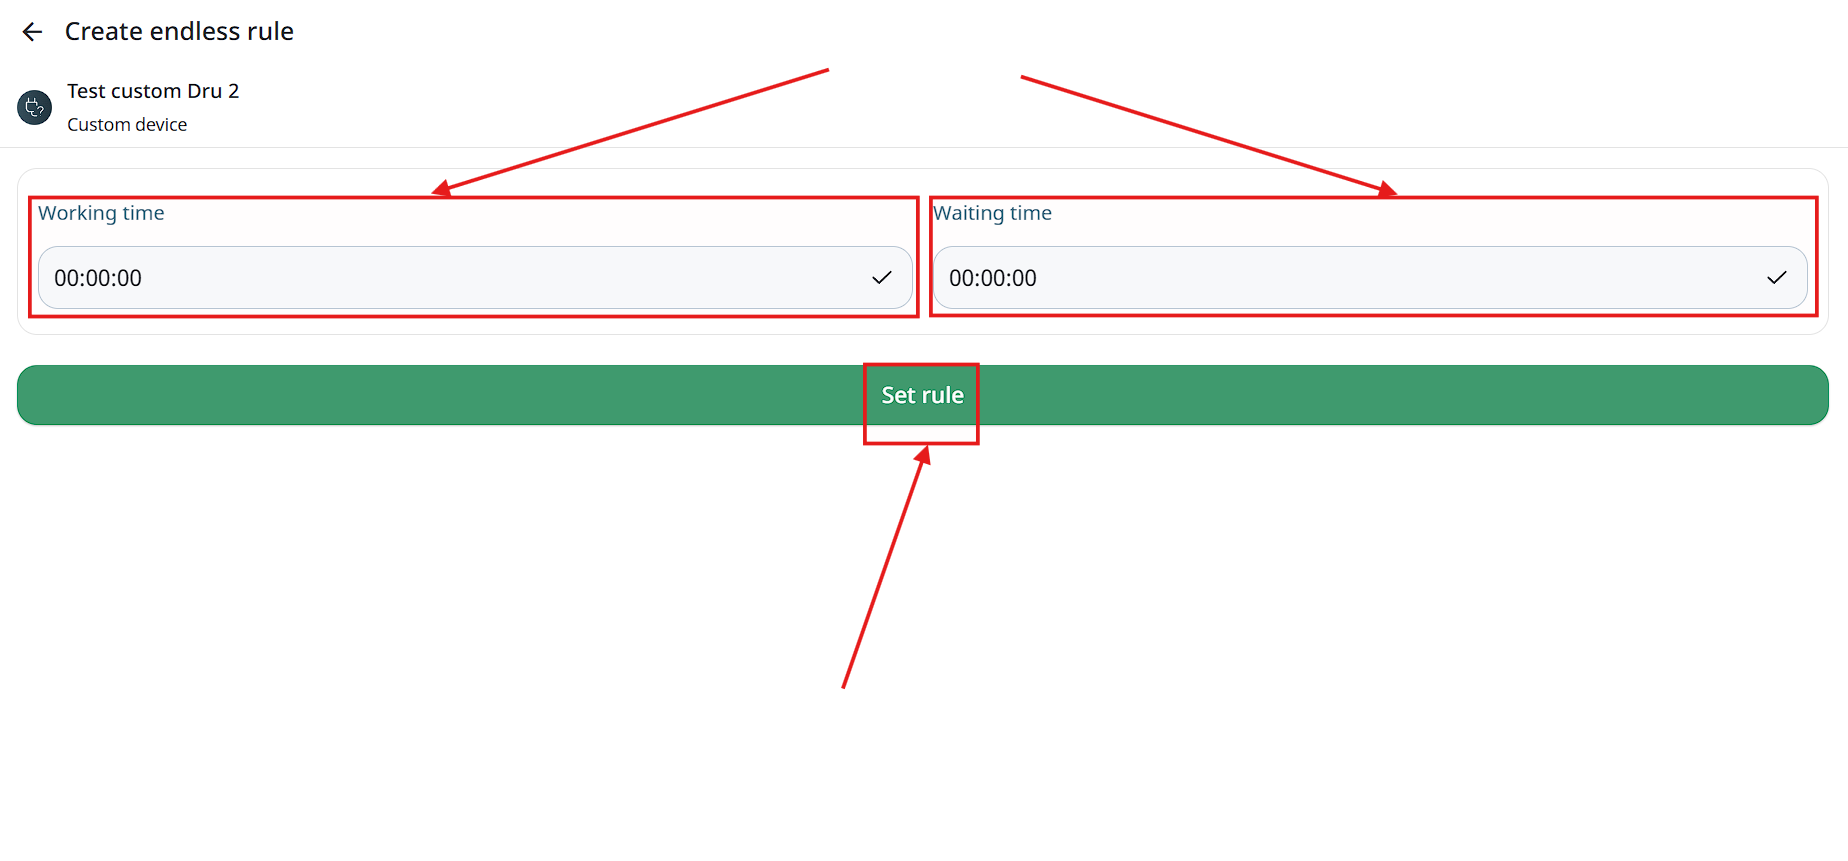
Loop rules
Loop rule allows the user to configure the operations of his devise using time intervals, setting the time of operation and the time when the device will be turned off. This type of rules supports all types of devices.
Setting loop rule:
- For creating loop rule you need to tap on your device in the module menu.
- Then you need to tap on the “Routine rule” button.
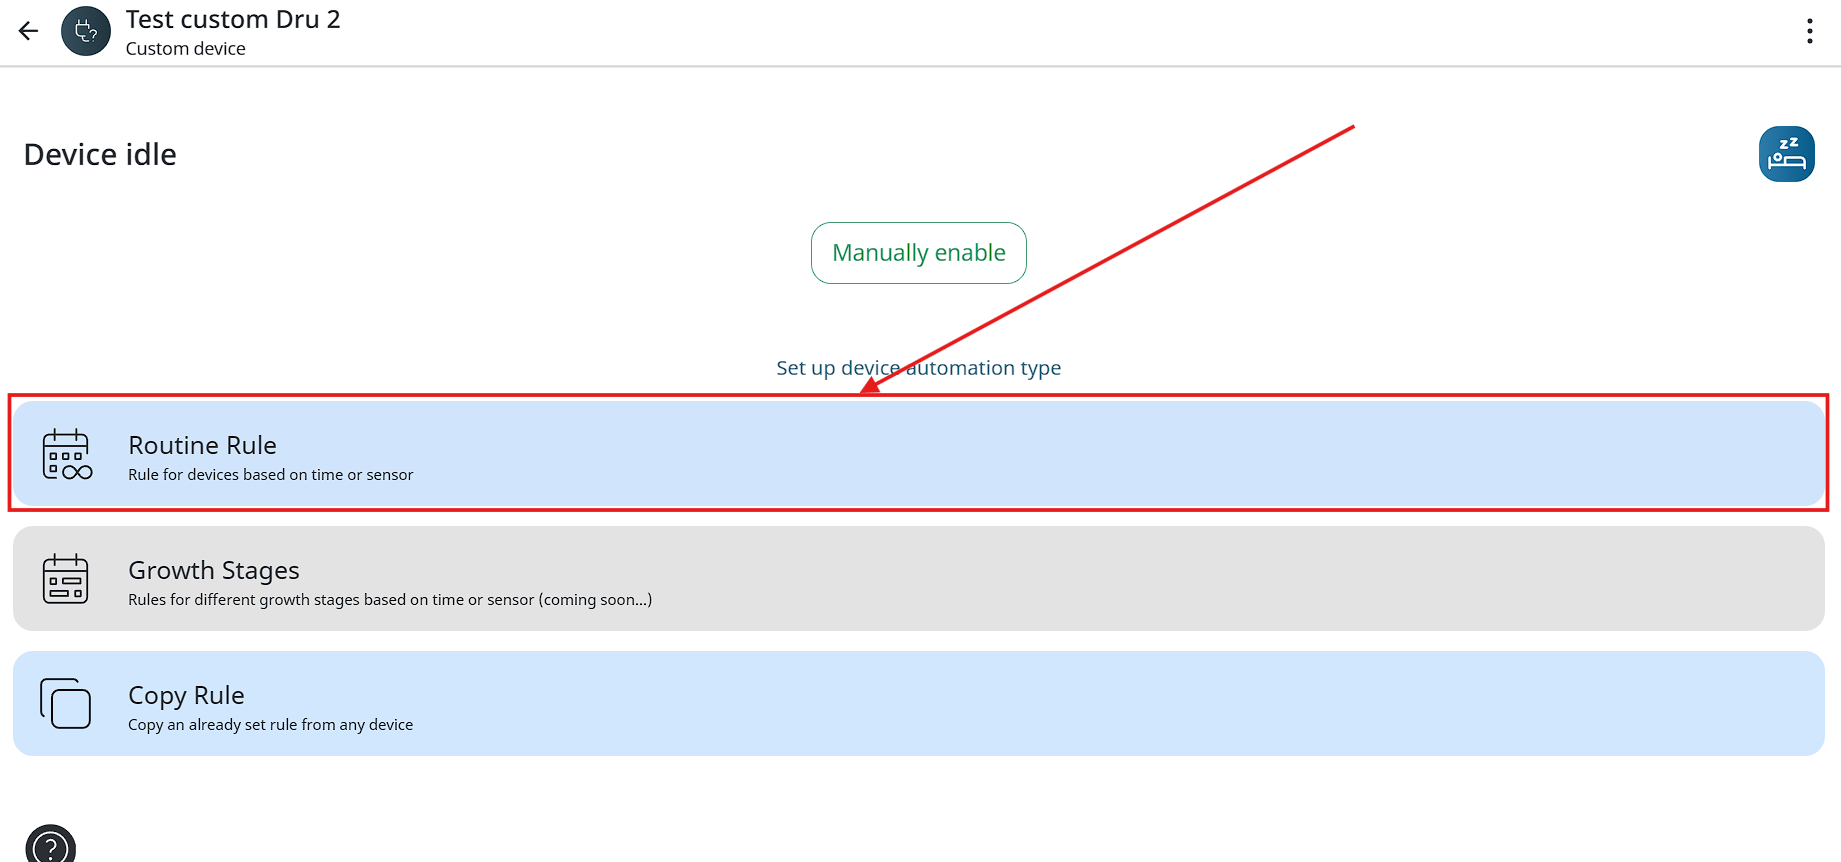
- In the opened window you need to choose “Loop rule” and then press the “Next” button.
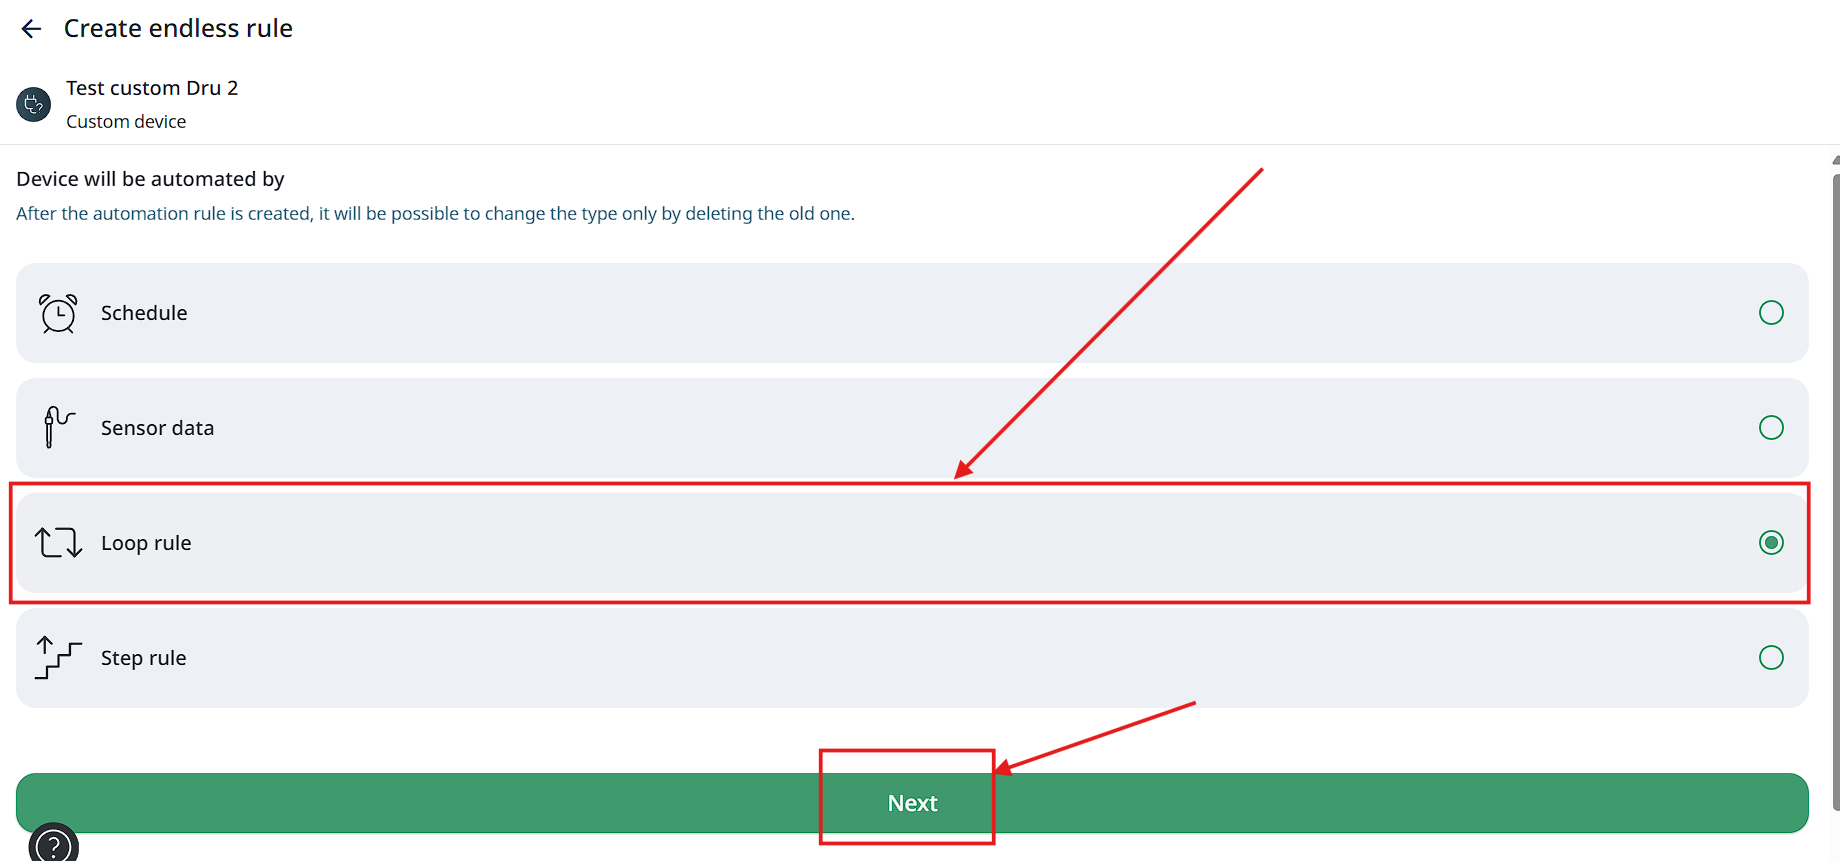
- Next you need to set working time and waiting time, after it tap on the “Set rule” button.
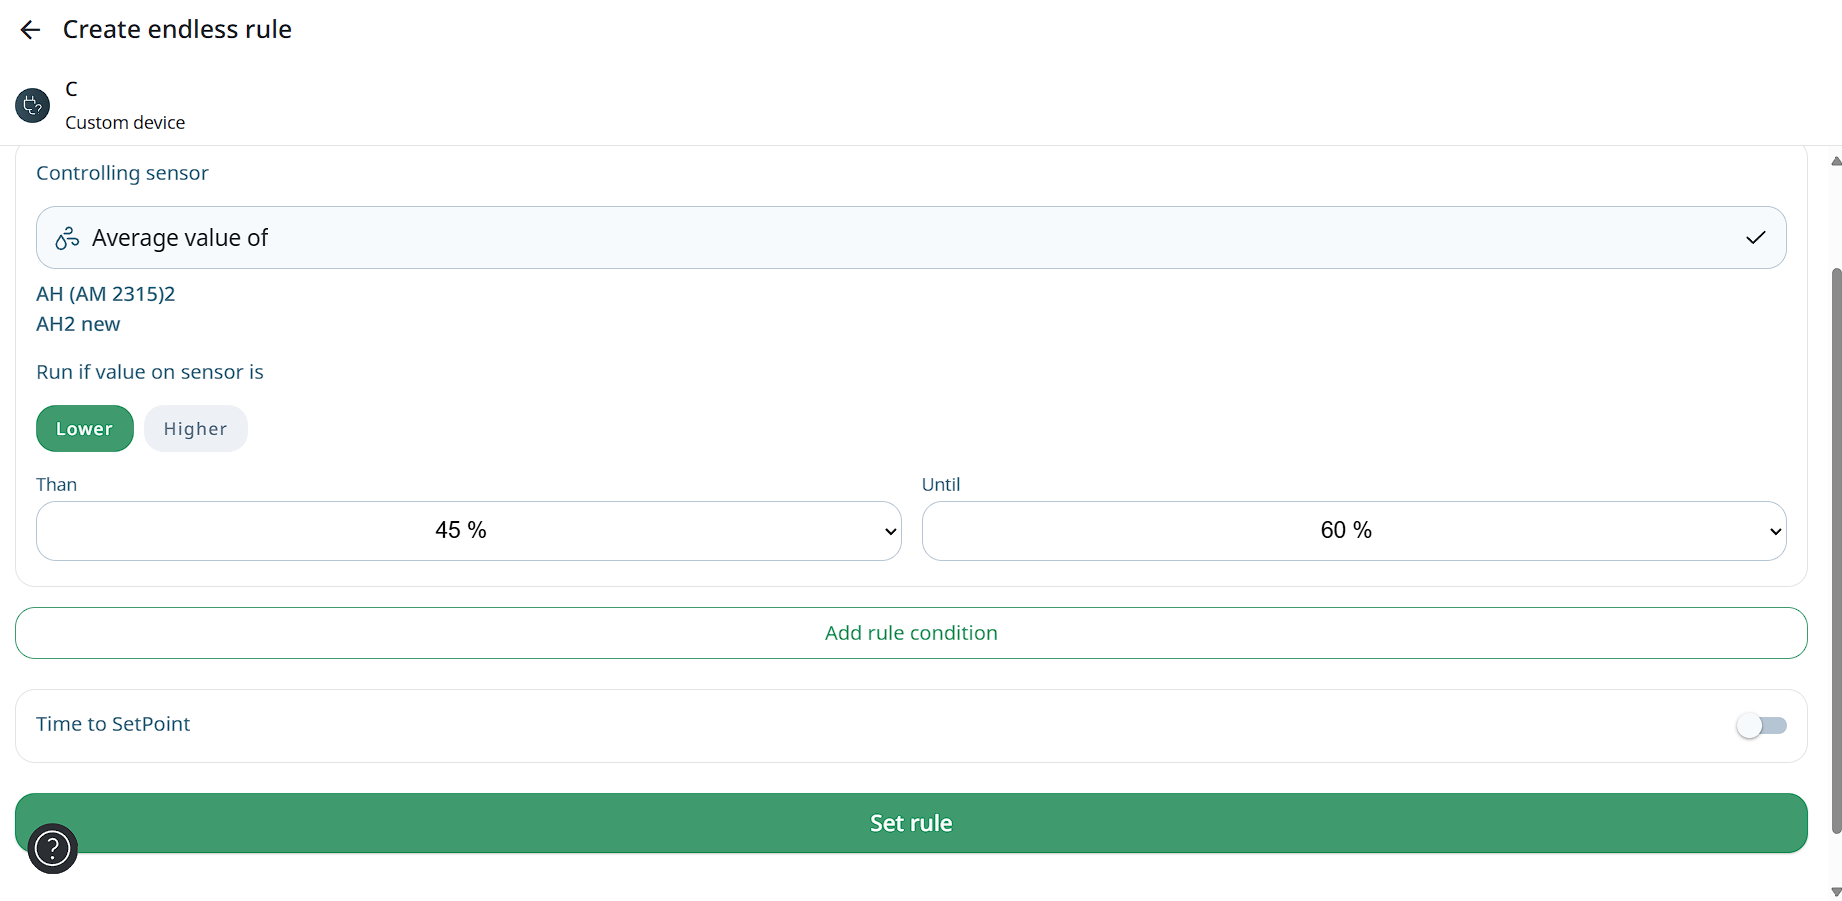
Step rules
This rule allows you to automatically control the device based on sensor readings. You can select any sensor and specify the desired value. The device will turn on when the reading is greater or less than the specified value (your choice). When the rule is triggered, the device will turn on for the time you set, after which the system will wait for the specified interval and check the sensor reading again.
Automation works like this:
-
Sensor selection - specify which sensor will monitor the readings (e.g. temperature, humidity, or something else).
-
Set Value - specify at what sensor value the rule will trigger (e.g., temperature above 25 °C).
-
Select condition - select whether the rule will trigger if the sensor value becomes greater or less than the set value.
-
Device run time - specify how long to turn on the device when the rule is triggered.
-
Wait Time - specify how long after triggering the rule will check the sensor reading again.
The step rule activates when the sensor readings reach the value set by the client, after that the rule turns on device, the device with the set rule works for a certain number of periods that the client sets himself, each period has a working time and waiting time. When the device will complete all of the set periods, the rule will end device work. This type of rules supports only custom devices.
Setting step rule:
- For creating step rule you need to tap on your device in the module menu.
- Then you need to tap on the “Routine rule” button.
- In the opened window you need to choose “Step rule” and then press the “Next” button.
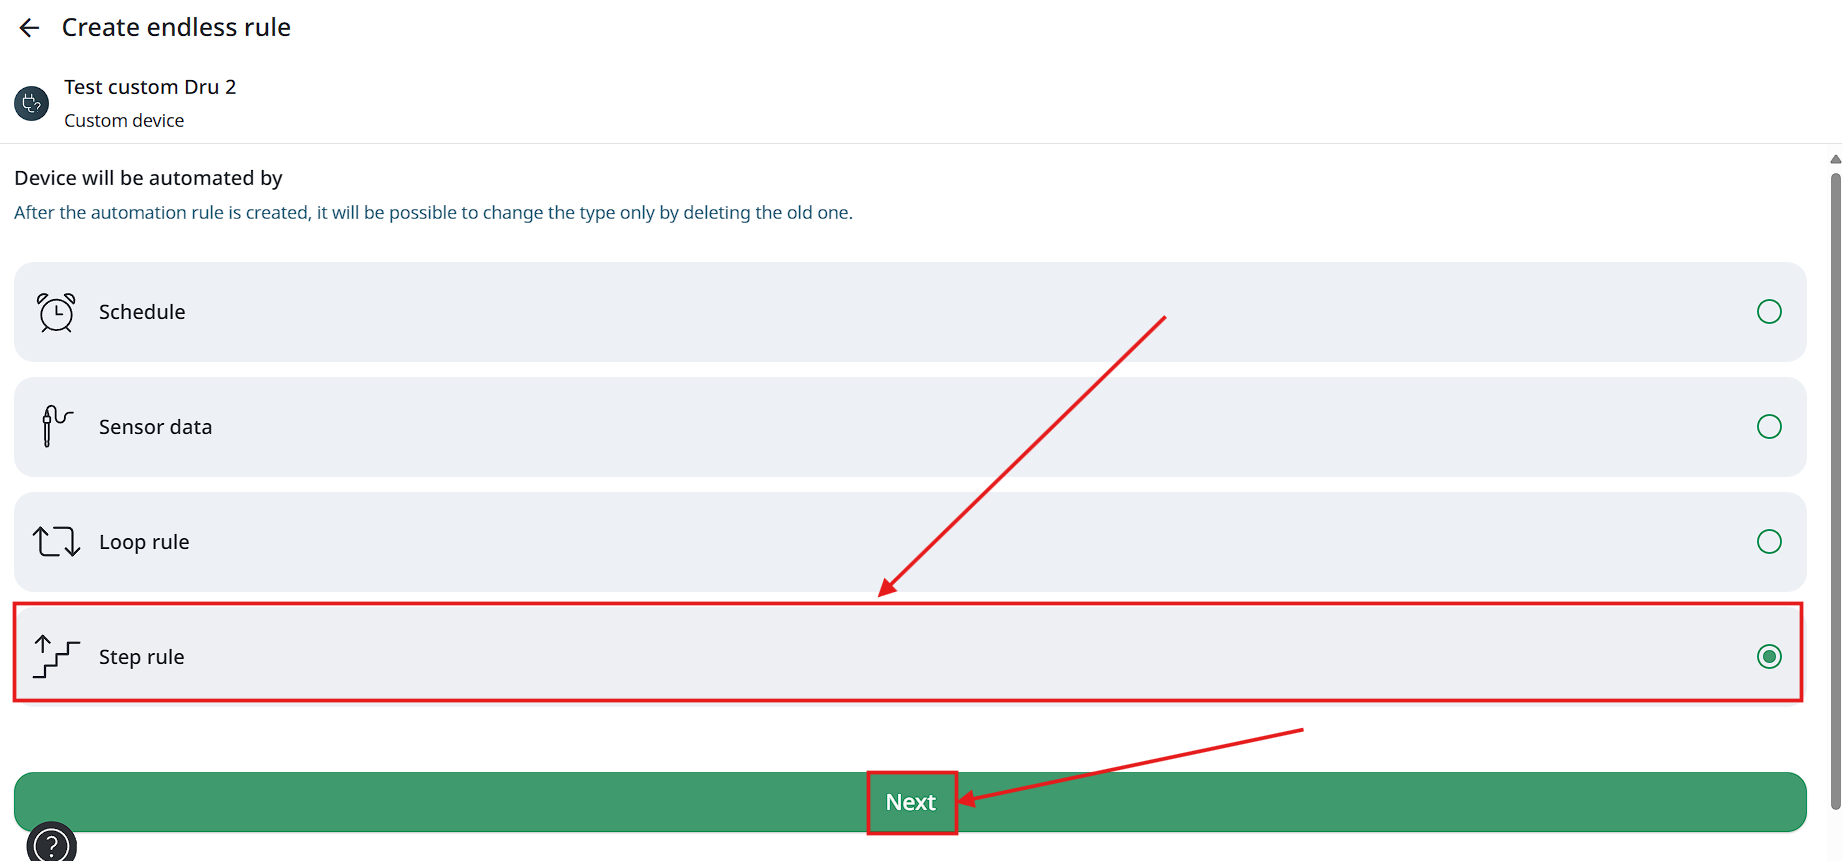
- Next you need to choose controlling sensor.
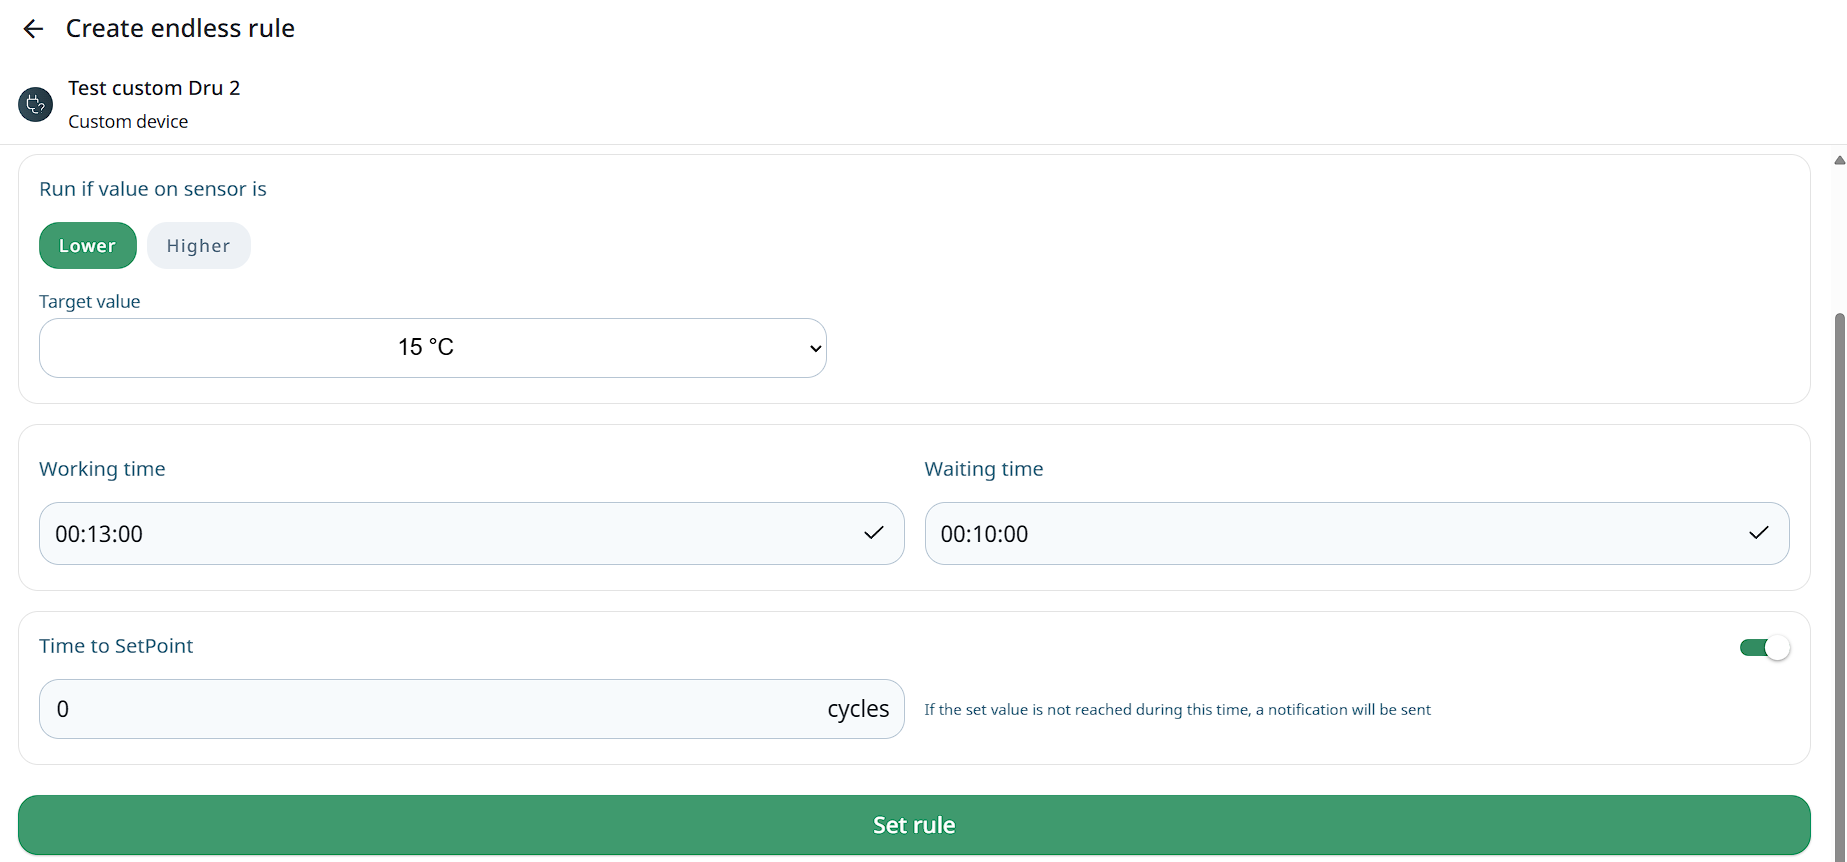
- In the opened window you need to set next parameters: run if the sensor value will be “Lower” or “Higher”, target sensor value, working time, waiting time and time to SetPoint. After parameters will set you need to tap “Set rule” button.
Time to SetPoint is a certain number of operating cycles during which the sensor readings must reach required value, if this does not happen, then the rule will continue work and user will receive message about it.
Editing/Deleting rule
To edit a rule that you have created earlier, please, follow these steps:
-
Tap on the device icon at the bottom of the screen to go to the device settings.
-
Tap the Device for which you want to edit a rule. The following screen appears:
-
Choose a rule you want to edit.
-
Edit Rule configuration or just delete rule.
Changing leading\commending sensor in a rule without deleting the rule.
- To change sensor in the rule at first user need to tap on the “Equipmqent” button.
- Then tap on the needed device.
- Than tap on the “3 dots” button in the top right corner of the rule.
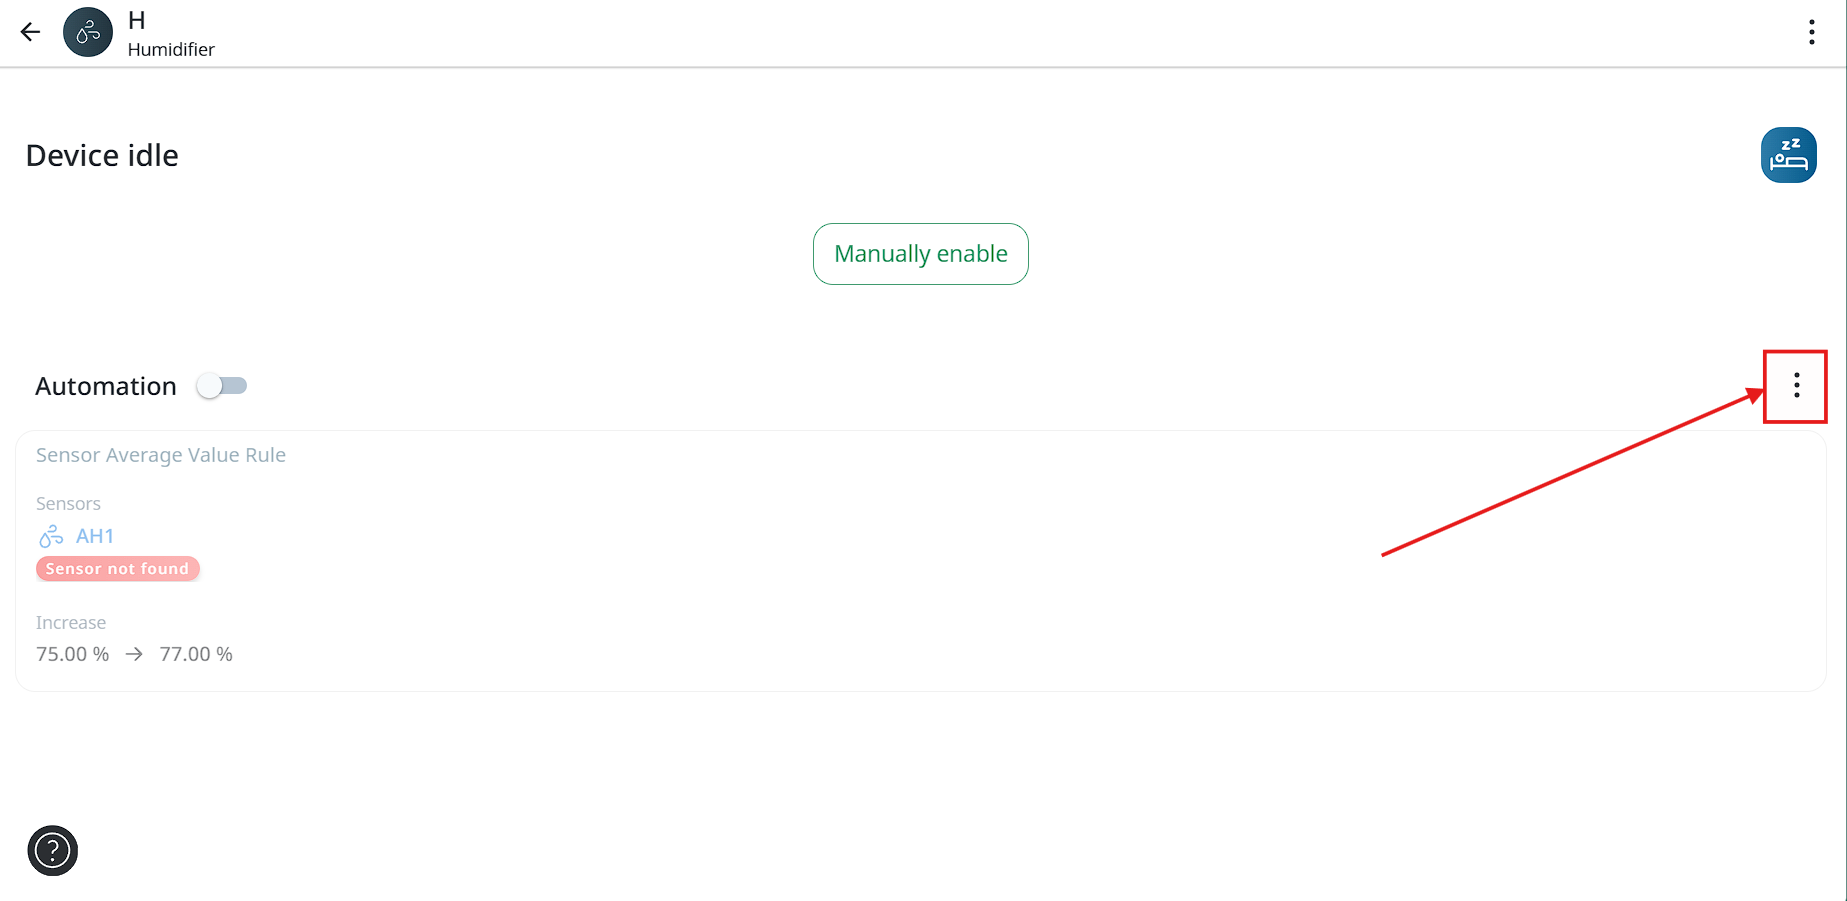
- Then tap on the “Edit rule” button.
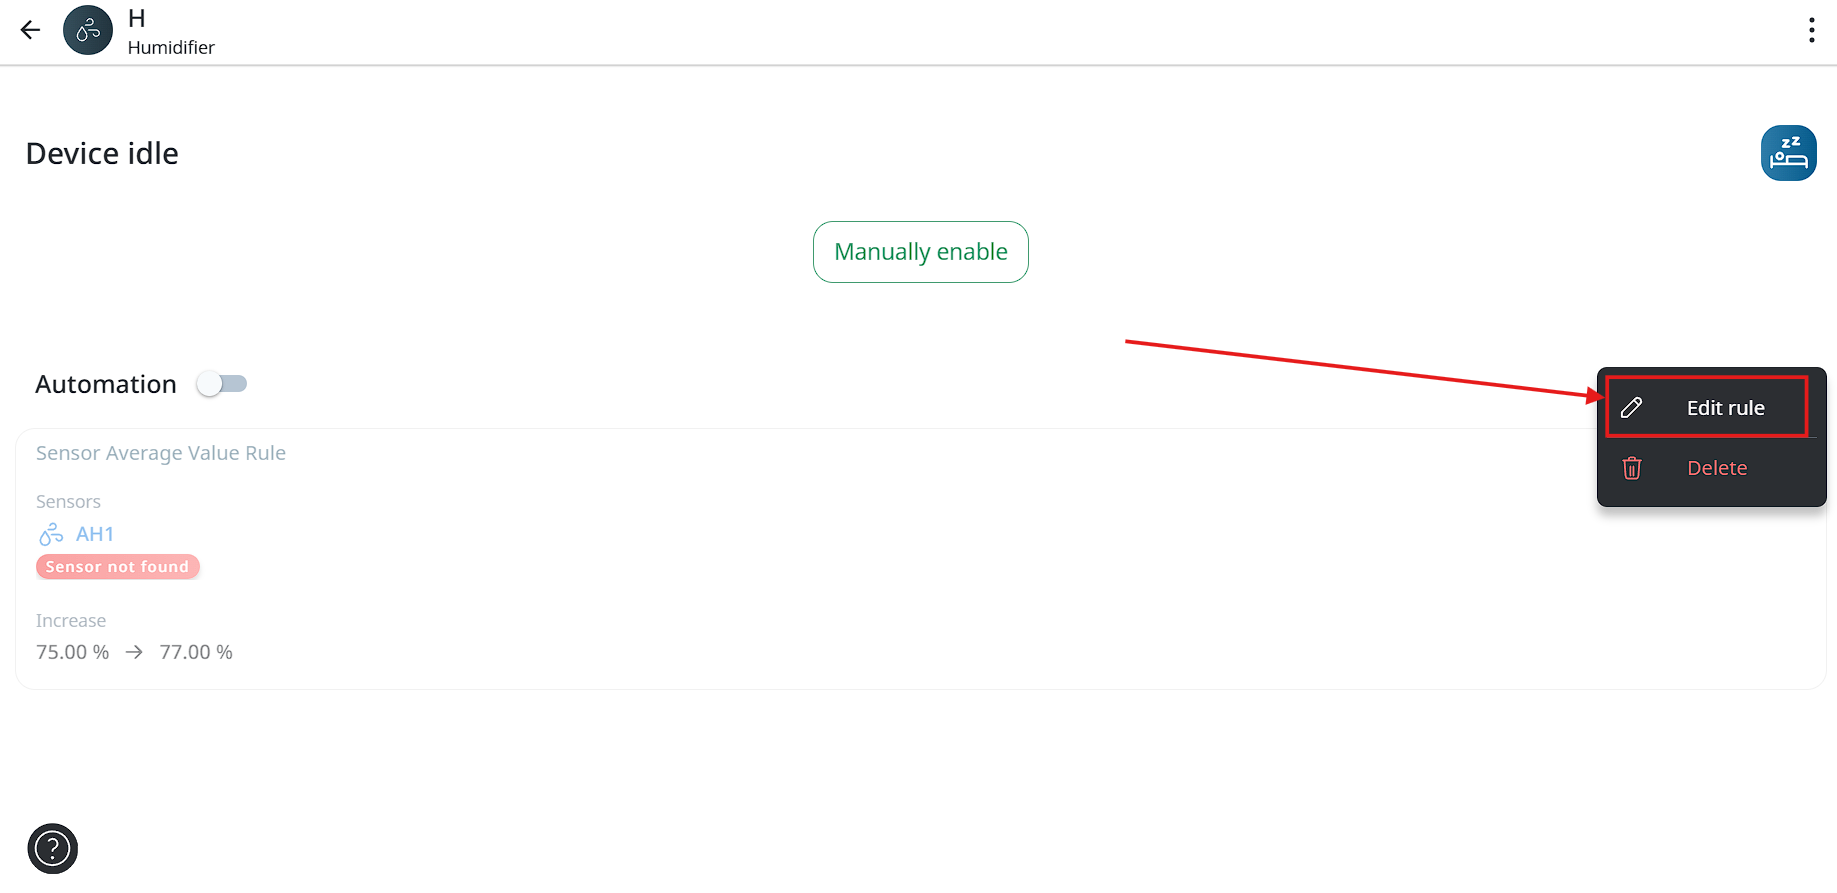
- Then user needs to tap on the sensor and choose new or add another sensor.
- To complete editing user needs to tap “Set rule” button.
Possibility to add average sensor in the rule
This is ability to create rules, based on the average of multiple sensors, connected only to sensordirector.
If user has 4 sensors in one place and want the fan to be triggered upon the threshold of the average of the 4 sensors together and not like today, which is only by one sensor only.
How to choose average sensor:
- At first user needs to tap on the “Equipment” section.
- Then choose the device.
- Then tap on the “Routine rule” button
- Then choose rule based on sensor data.
- In the opened window you can now choose more than 1 sensor, but it can be only 1 sensor type.
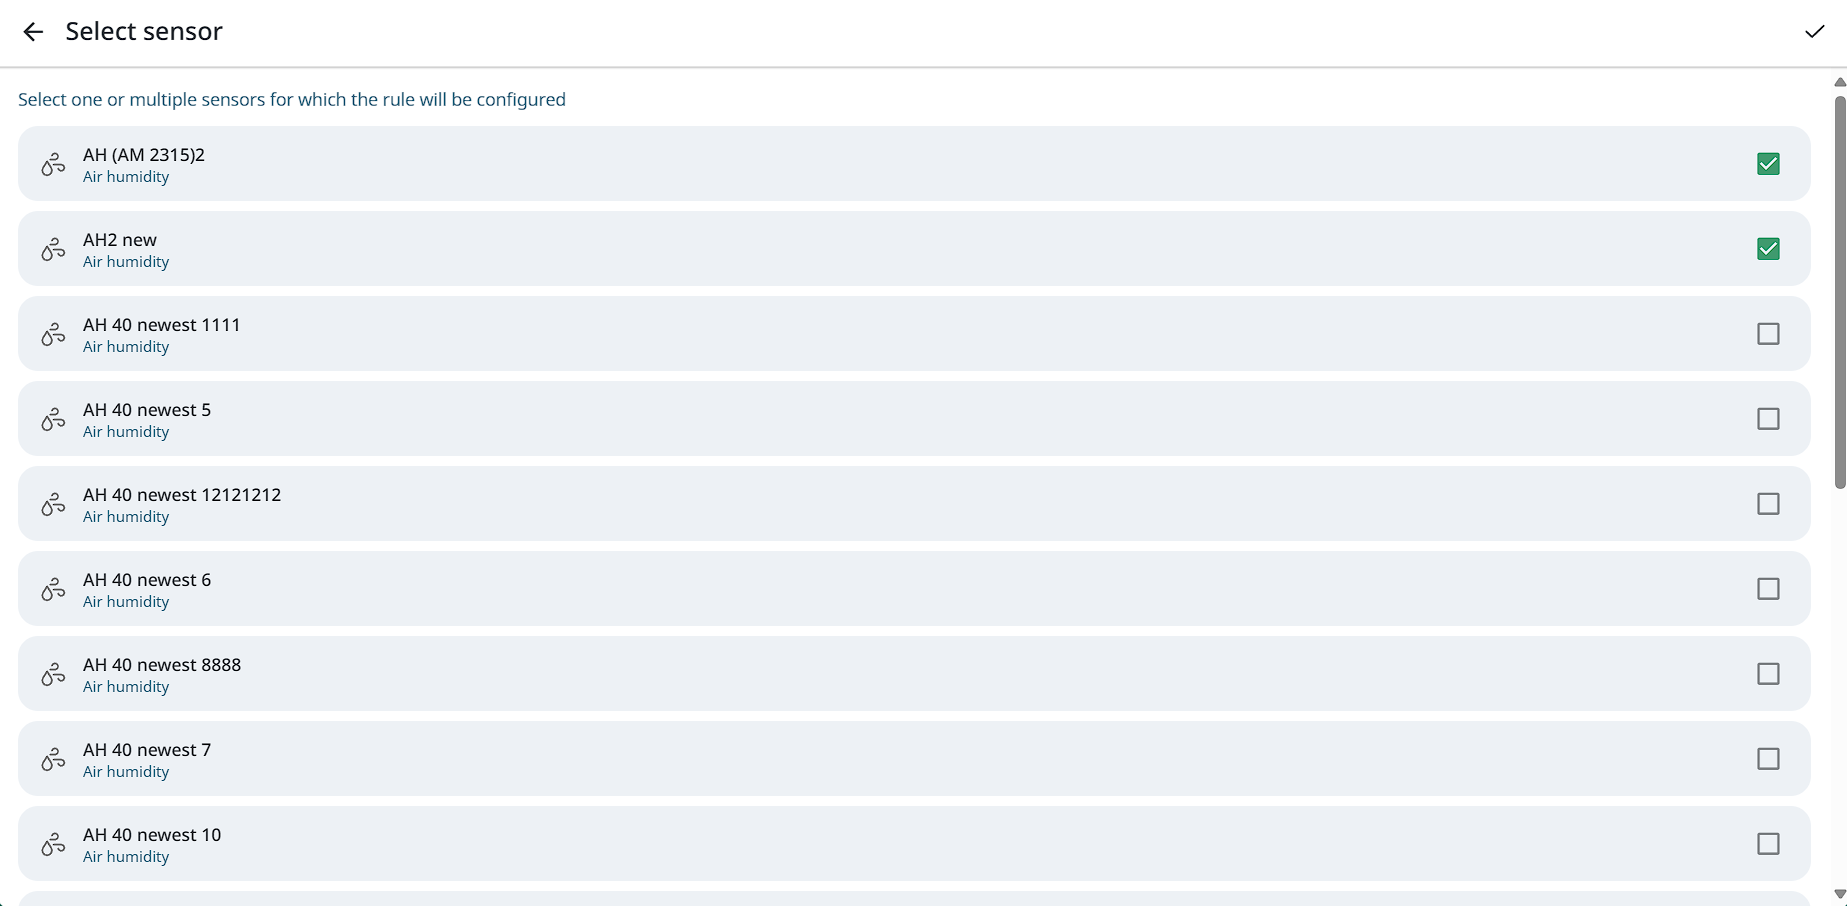
- Next user needs to set rule as always.
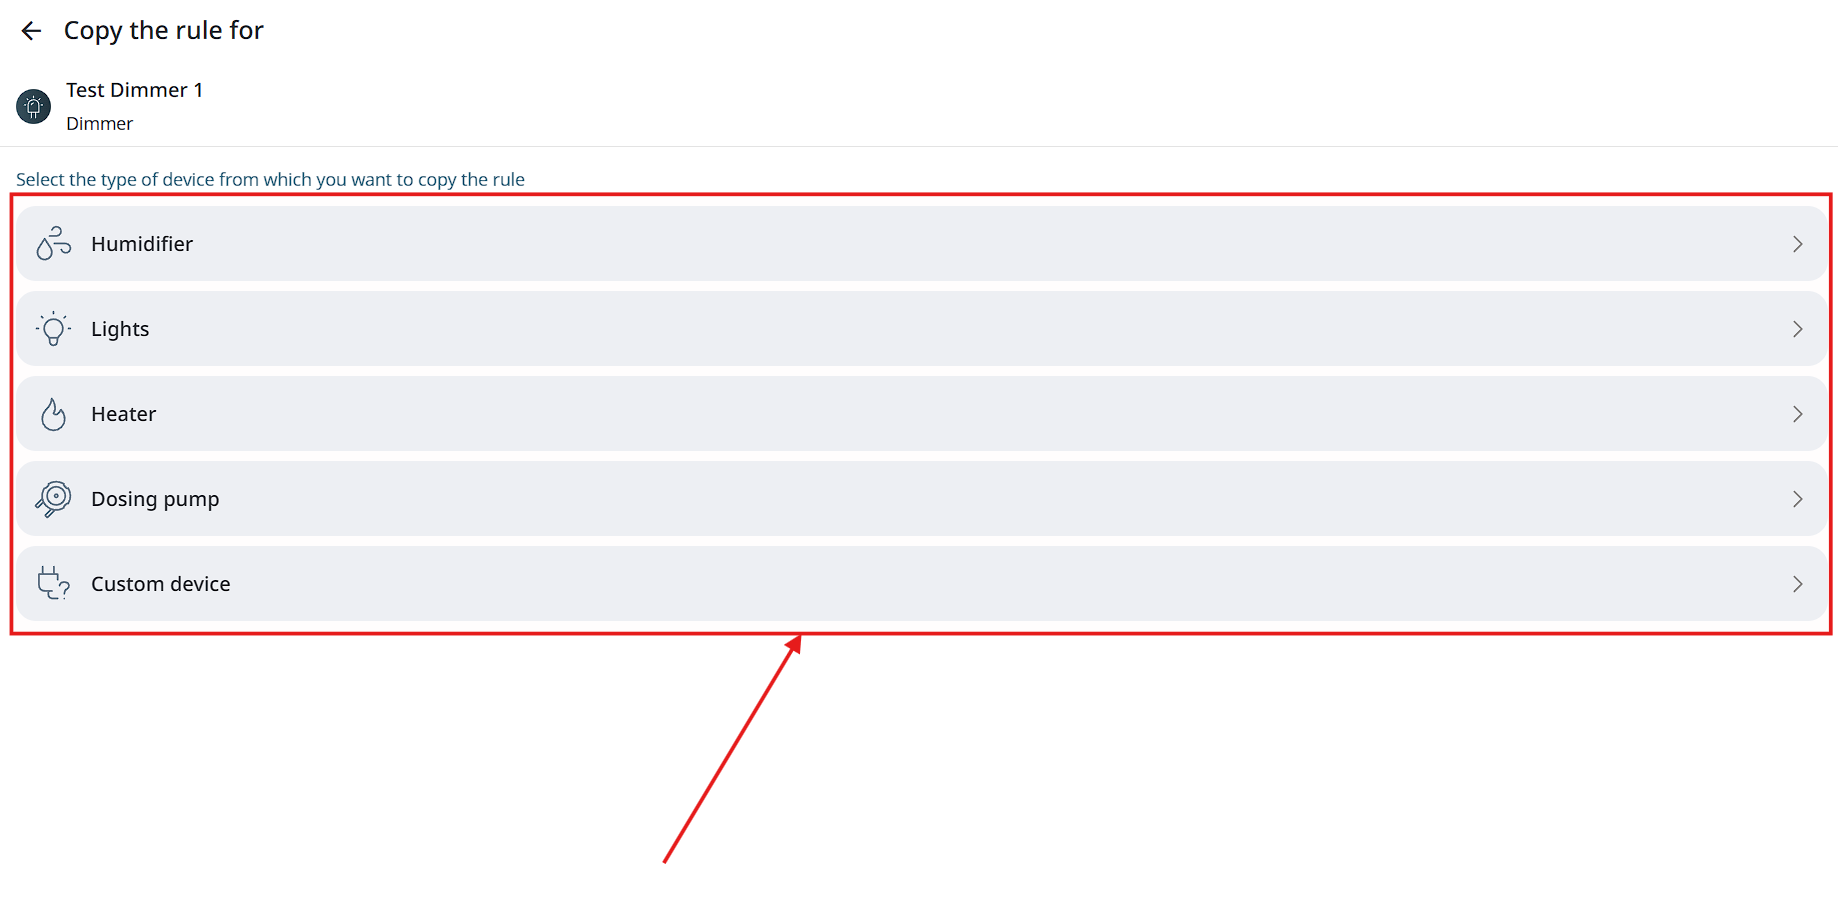
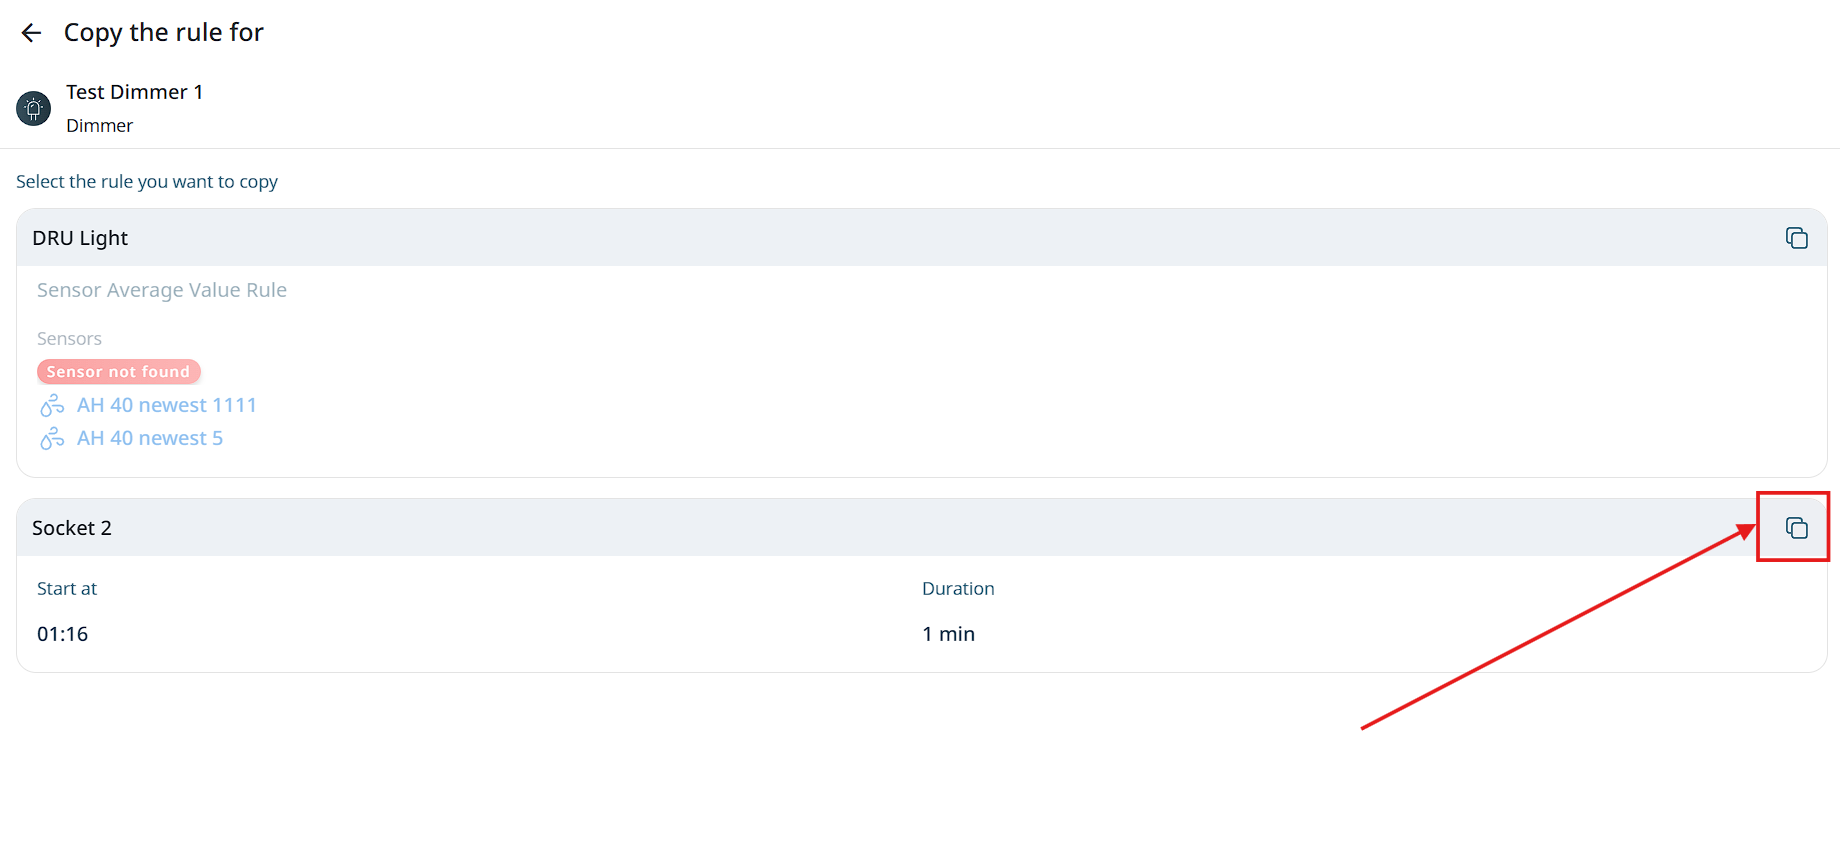
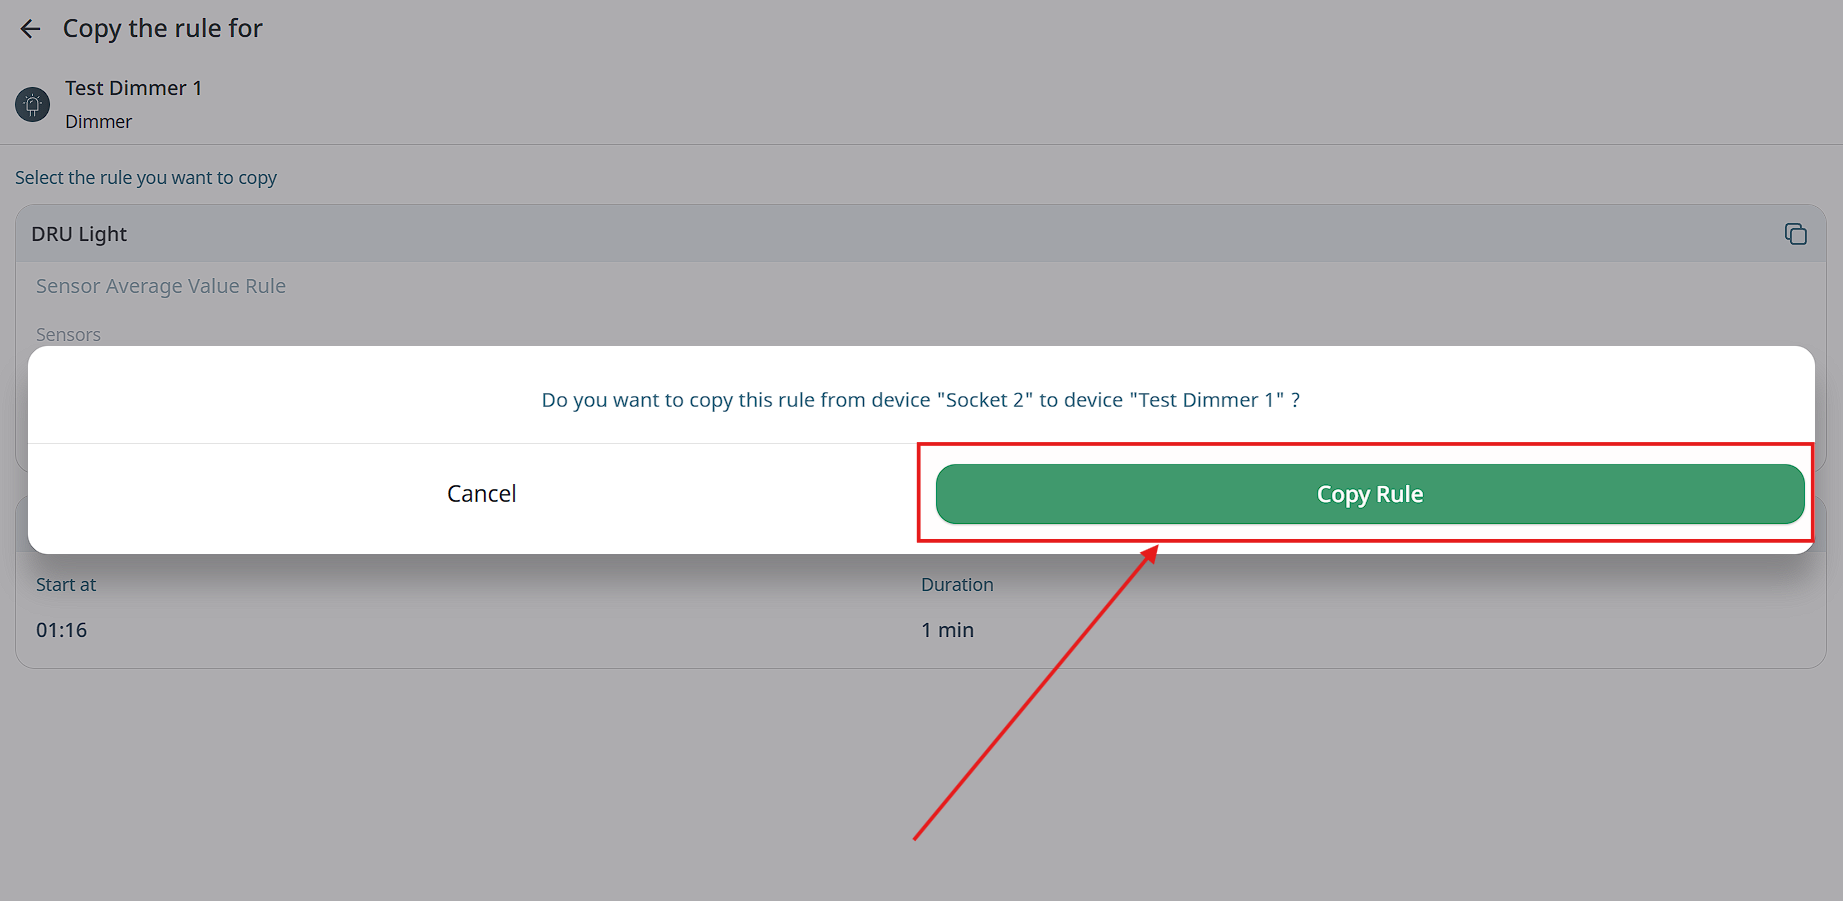
Rules transfer
Instruction how to transfer devices and rules from one module to another (e.g. when replacing a module).
-
At first user needs to add new device.
-
After adding new device user needs to tap on the “Equipment” button on the bottom menu in the App.
- Then user needs to tap on the “Devices” section in the left top corner.
- Next user needs to tap on the new added device.
- Next user needs to tap on the “Copy rule” button.
- Then user needs to select the type of device from which he wants to copy the rule.
- Next user needs to tap on the Copy button in the rule field.
- Finally user needs to tap on the “Copy rule” button.
Adding new device to DimmerDirector module
-
To connect device to DimmerDirector module you need to open your DimmerDirector menu from chapter “Modules” in the app and then press “Add device”.
-
Then you need to tap on the “Dimmer” option.
Note: “Controlled fan” isn`t realised yet to connect to DimmerDirector.
-
Next you need to name your device and press “Connect” button.
-
After it you will see connected device on the your modules page in the app.
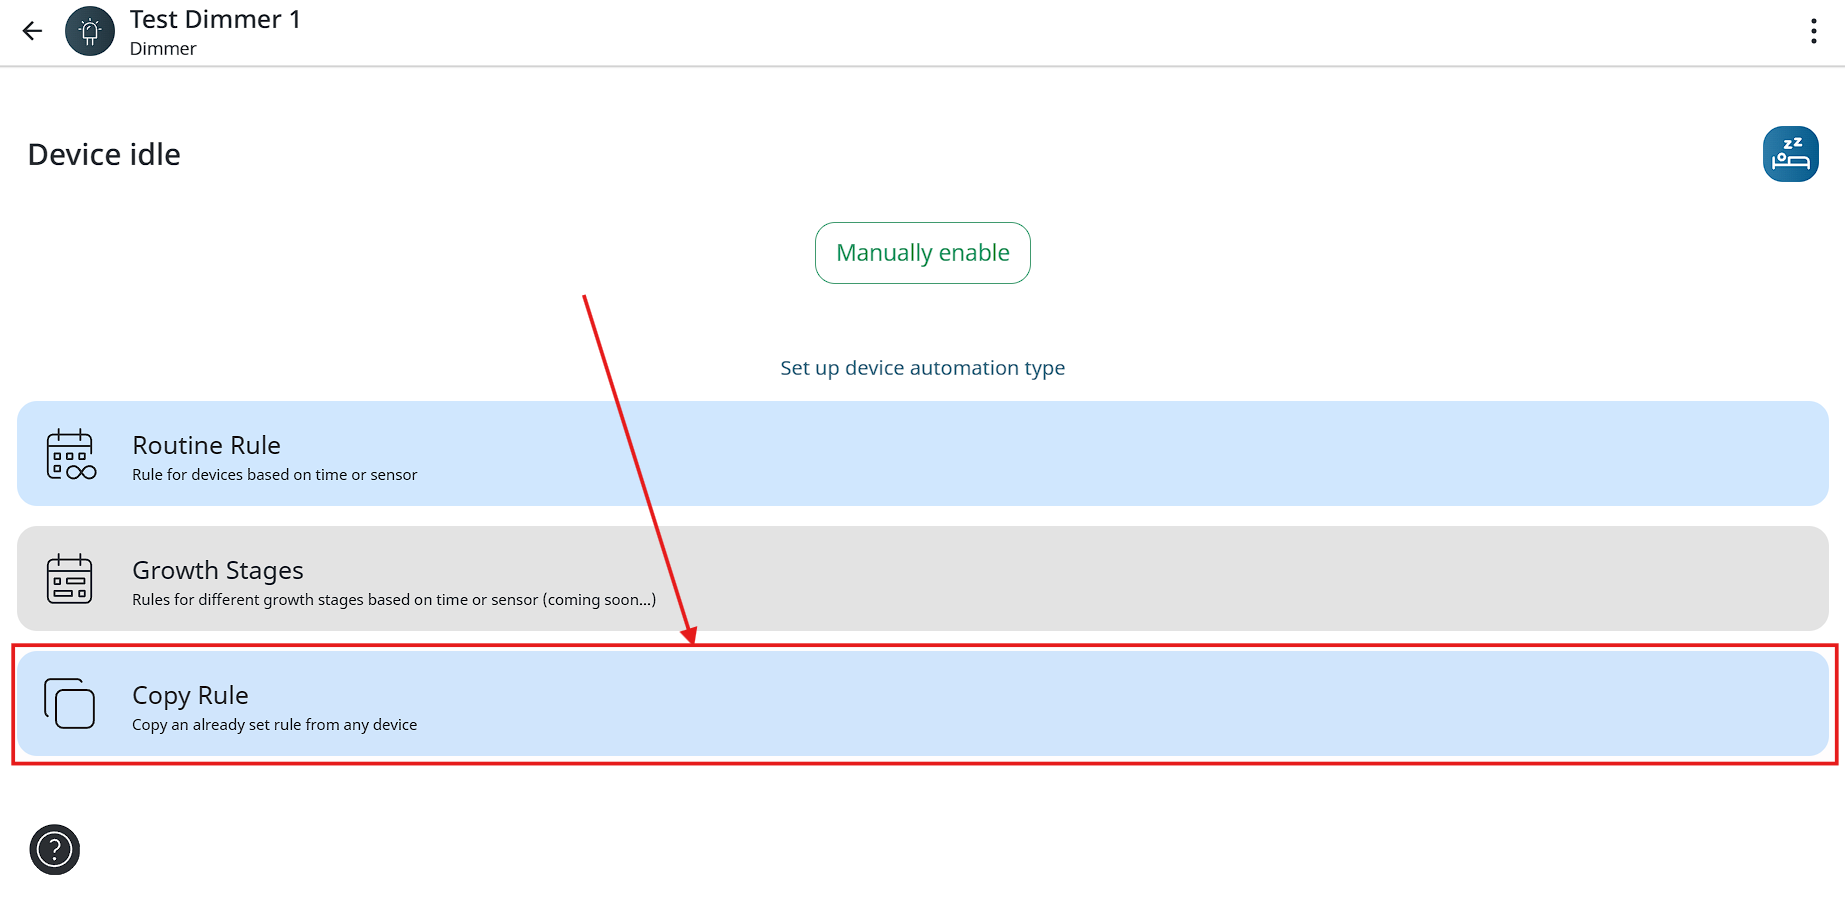
Switching on/off device on the DimmerDirector module
-
After tapping on device on the modules page user needs to press “Manually enable” button.
-
Next you will see screen with dimming and time settings. Users can choose between working by time and continuously working. For starting work user needs to tap on the “Run device” button.
-
On the next screen user may see working device and “Shutdown” button for turning off.
OR
Protective Shutdown
Automatically disables devices when they exceed defined operational limits without producing the expected effect, based on static sensor values relative to a set-point.
Core Functionality:
-
Automatic Shutdown: Triggered when a device exceeds runtime or cycles without sensor improvement.
-
Set-Point Integration: Works with the Set-Point system to monitor outcomes.
-
Customizable Scope: Can be applied per device, per module, or per sensor group (e.g., all devices linked to a humidity sensor).
-
User Notification: Push alerts notify users instantly when a shutdown occurs.
-
Manual Restart: Devices can only be restarted through user confirmation in the app after issue resolution.
-
Event Logging: All shutdowns and restarts are logged with timestamps and user actions.
Configuration:
-
Accessible via the Set-Point settings.
-
Allows enabling/disabling, setting thresholds (runtime, cycles), and selecting device scope.
Benefits:
-
Protects crops from over-dosing, overheating, and ineffective operation.
-
Enhances automation safety and system reliability.
-
Ensures traceability and accountability through logging.
Example Scenario:
If a dosing pump runs for 4 cycles without lowering EC, and sensor data remains unchanged, the pump is automatically shut down until the user intervenes.
Multiple Rules and Prioritization
Enable users to define and prioritize multiple automation rules for a single electrical device, enhancing flexibility and control in environmental management.
Core Functionality:
- Multiple Rules per Device:
Users can add several independent rules (e.g., time-based, sensor-based) to a single electrical device via the existing “Add Rule” and new “Add Secondary Rule” buttons.
- Rule Prioritization:
Users can reorder rules using drag-and-drop to define execution priority or sequence.
- Parallel Execution:
All triggered rules will be evaluated and executed concurrently to improve responsiveness.
User Interface Enhancements:
-
Updated device settings interface to support rule addition, configuration, and prioritization.
-
Introduction of a dedicated “Add Secondary Rule” button.
User Engagement & KPIs:
-
Adoption Rate: Track user adoption compared to the previous month.
-
Usage Depth: Monitor average number of rules per device.
-
User Feedback: Collect and analyze satisfaction data.
-
Training Engagement: Track use of help resources and tutorials.
Time Framework
Allow users to define time-based automation rules for individual devices, enabling different conditions and actions during specific periods of the day (e.g., day vs. night).
Current Limitation:
Rules currently operate continuously based on a single parameter (e.g., humidity) without the ability to restrict them to specific hours.
Feature Highlights:
- Time-Based Rules:
Users can assign start and end times for each rule (e.g., 10:00–17:00), allowing for context-specific automation.
- Multiple Time Ranges:
Users can add multiple time ranges for one device, each with its own trigger conditions (e.g., temperature in the evening, humidity in the morning).
- Independent Rule Sets:
Each rule is linked to a single device to prevent interference between rule sets.
- Automatic Reversion:
After a time frame ends, the device reverts to its default or previously defined rule.
User Interface Elements:
-
Time Range Selector: Define when each rule is active.
-
Condition Settings: Choose sensor type, threshold, and device actions.
-
Buttons:
-
Save Rule — Save the current rule.
-
Add Rule — Add another time range and rule.
-
Rule Summary: Displays all rules with time ranges and conditions.
Execution Logic:
-
Rules activate only during their defined time range.
-
Overlapping rules trigger a conflict warning or follow a defined priority (e.g., latest rule takes precedence).
-
Outside defined time ranges, devices follow default behavior.
Error Handling & Edge Cases:
-
Users are notified of overlapping or incomplete rule configurations.
-
Missing parameters prompt the user to complete inputs.
-
If no time-based rule applies, the system follows existing logic.
Benefits:
-
Improved flexibility and control across different times of the day.
-
Reduces need for manual intervention.
-
Enhances automation precision for greenhouses and indoor growing setups.
Trigger delay
General Description:
This feature introduces a configurable delay time before triggering device operations, designed to prevent frequent on/off cycling and enhance the longevity and stability of controlled devices.
Principle of Operation:
The system allows users to set a delay time (Y minutes) for automation rules. Upon meeting a condition, a countdown begins, and the operation is executed only if the condition remains valid throughout the delay period. If the condition changes during this time, the countdown resets, and no action is taken.
Example Use Case:
For a rule set to open a shading system if lux falls below 3000 for more than 5 minutes, the system waits 5 minutes before acting. If the lux level rises within this period (e.g., due to a passing cloud), the action is canceled, avoiding unnecessary operation.
Benefits:
• Reduces excessive wear on motors and mechanical components.
• Prevents unnecessary operations triggered by temporary environmental fluctuations.
• Enhances overall system efficiency and reliability.
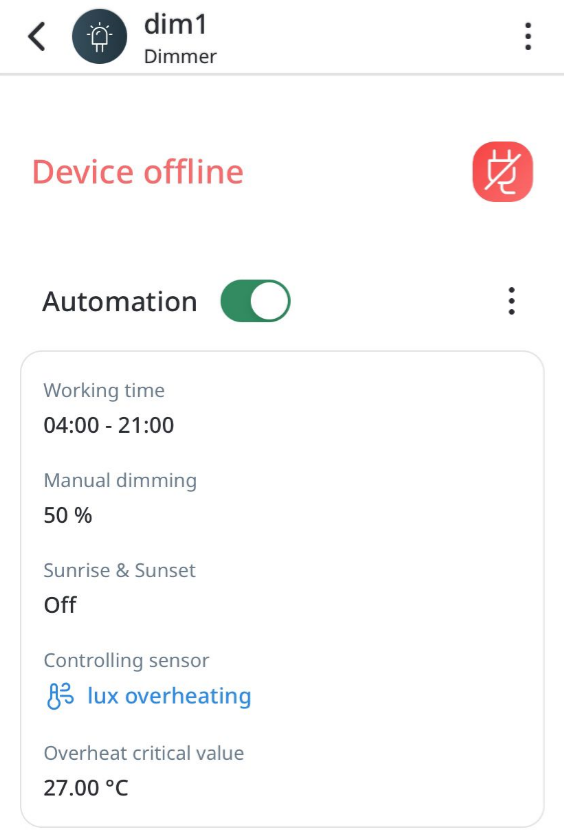
Rules on the Dimmer Director module
Rules with manual dimming
This rules works based on dimmer value in %, which user sets manually.
-
After tapping on device on the modules page user needs to press “Routine rule” button.
-
Next user needs to choose “manual dimming” and then the “Next” button.
-
In the opened screen user will see next parameters: “working time”, “manual dimming”, “overheat prevention” and “sunset & sunrise”.
-
At first user needs to set time period for rule working and press “Apply” for it.
-
Next choose dimming in percents.
-
Then user can turn on “overheat prevention” option. An then choose sensor for temperature control.
-
Next user needs to set critical value.
-
Next option which client may turn on is “Sunset & Sunrise” and after tapping on this option choose time.
-
Next for rule creation press “Set rule” button, then user will see his rule on the screen.
Rules with auto-balancing
This rules works based on PAR/LUX sensors values, dimmer will be maintain brightness level, which user will set in rule settings.
-
After tapping on device on the modules page user needs to press “Routine rule” button.
-
Next user needs to choose “Auto-balancing” and then the “Next” button.
-
In the opened screen user will see next parameters: “working time”, “auto-balancing”, “overheat prevention” and “sunset & sunrise”.
-
At first user needs to set time period for rule working and press “Apply” for it.
-
Next user needs to choose sensor and desired value
-
Then user can turn on “overheat prevention” option. An then choose sensor for temperature control.
-
Next user needs to set critical value.
-
Next option which client may turn on is “Sunset & Sunrise” and after tapping on this option choose time.
-
Next for rule creation press “Set rule” button, then user will see his rule on the screen.
Notifications about rules in Dimmer work
-
if the user has the sunrise function enabled in the rule settings, then if during sunrise the user disables the rule manually and then turns it on, then the sunrise will last less by the amount of time that has already been worked.
-
If you turn on the rule where the sunrise is set later than the time specified in the rule, then the sunrise does not occur.
Function “Overheat”
The overheat function is aimed at tracking the temperature parameters by the temperature sensor so that when the LEDs work, the temperature around the plants does not exceed the value that the user sets when setting the rule, this function allows you to prevent dangerous overheating of plants in the greenhouse and, accordingly, their damage.
Function “Sunset & Sunrise”
The “Sunset & Sunrise” function is directed to simulate sunrise and sunset for plants during the time that the client sets in the rule settings.
Dashboard
Dashboard is page in the app where user will be able to see the total useful information.
- Possibility to switch the date of the dashboard (last day by default).
- For example, a list of sensors with maximum, minimum and average values per day & night (6 parameters)
- Possibility to select and sort sensors.
-
A list of devices with the following information:
-
amount of switching on per day
-
Total operating time
-
- Possibility to select and sort devices.
How to use dashboard:
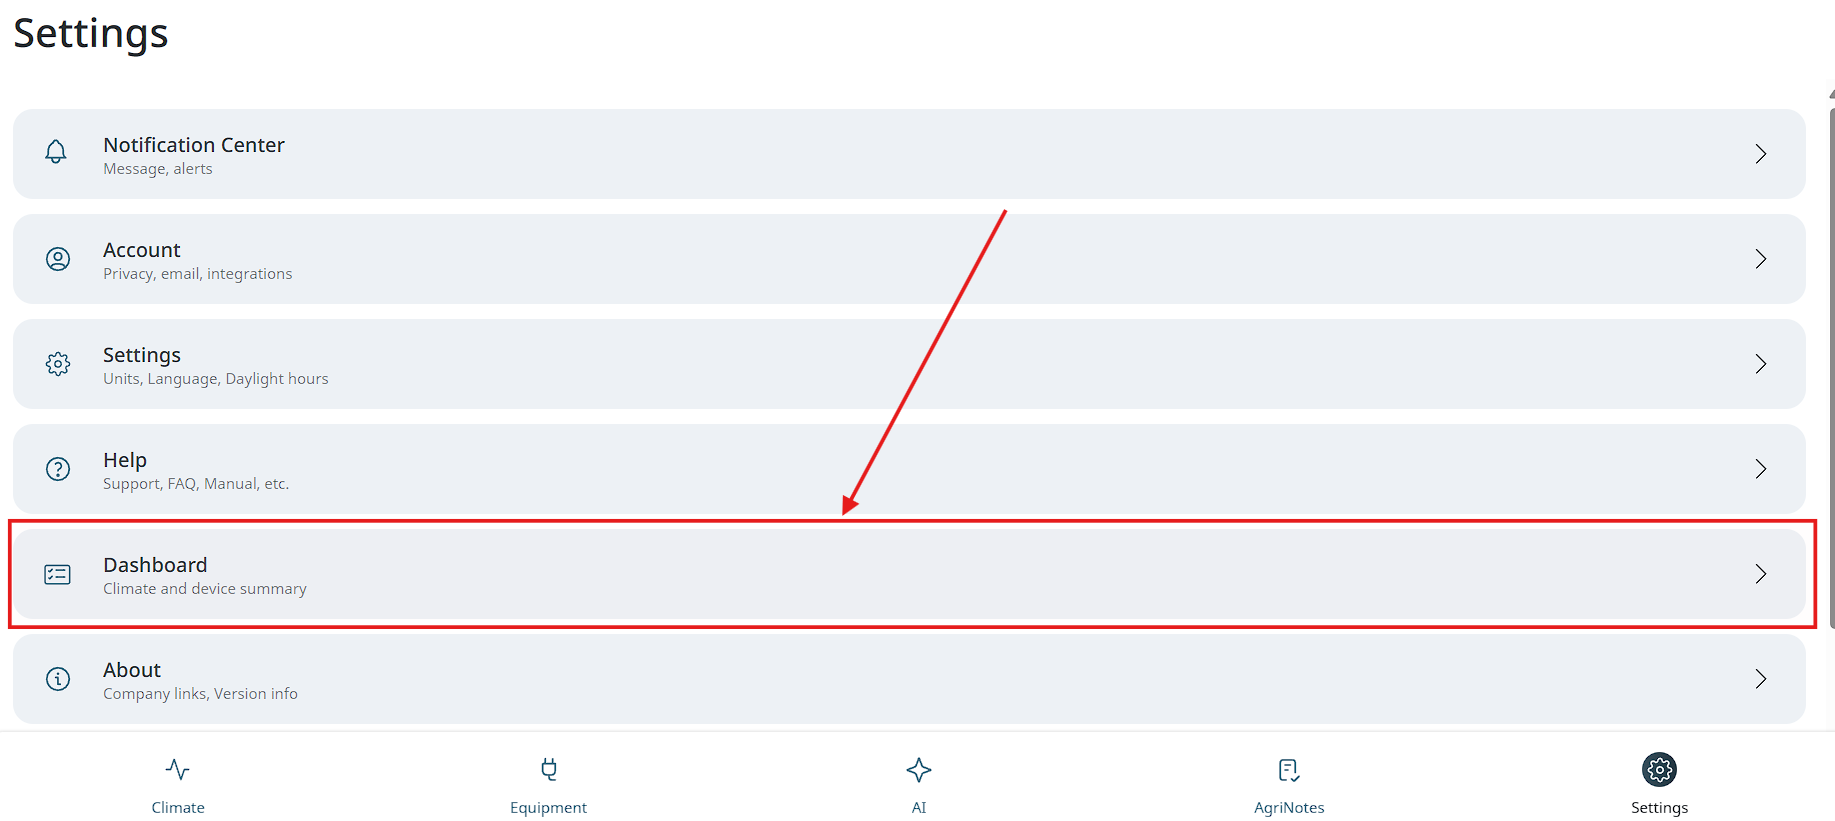
- At first you need to tap on Setting button in the bottom left corner.
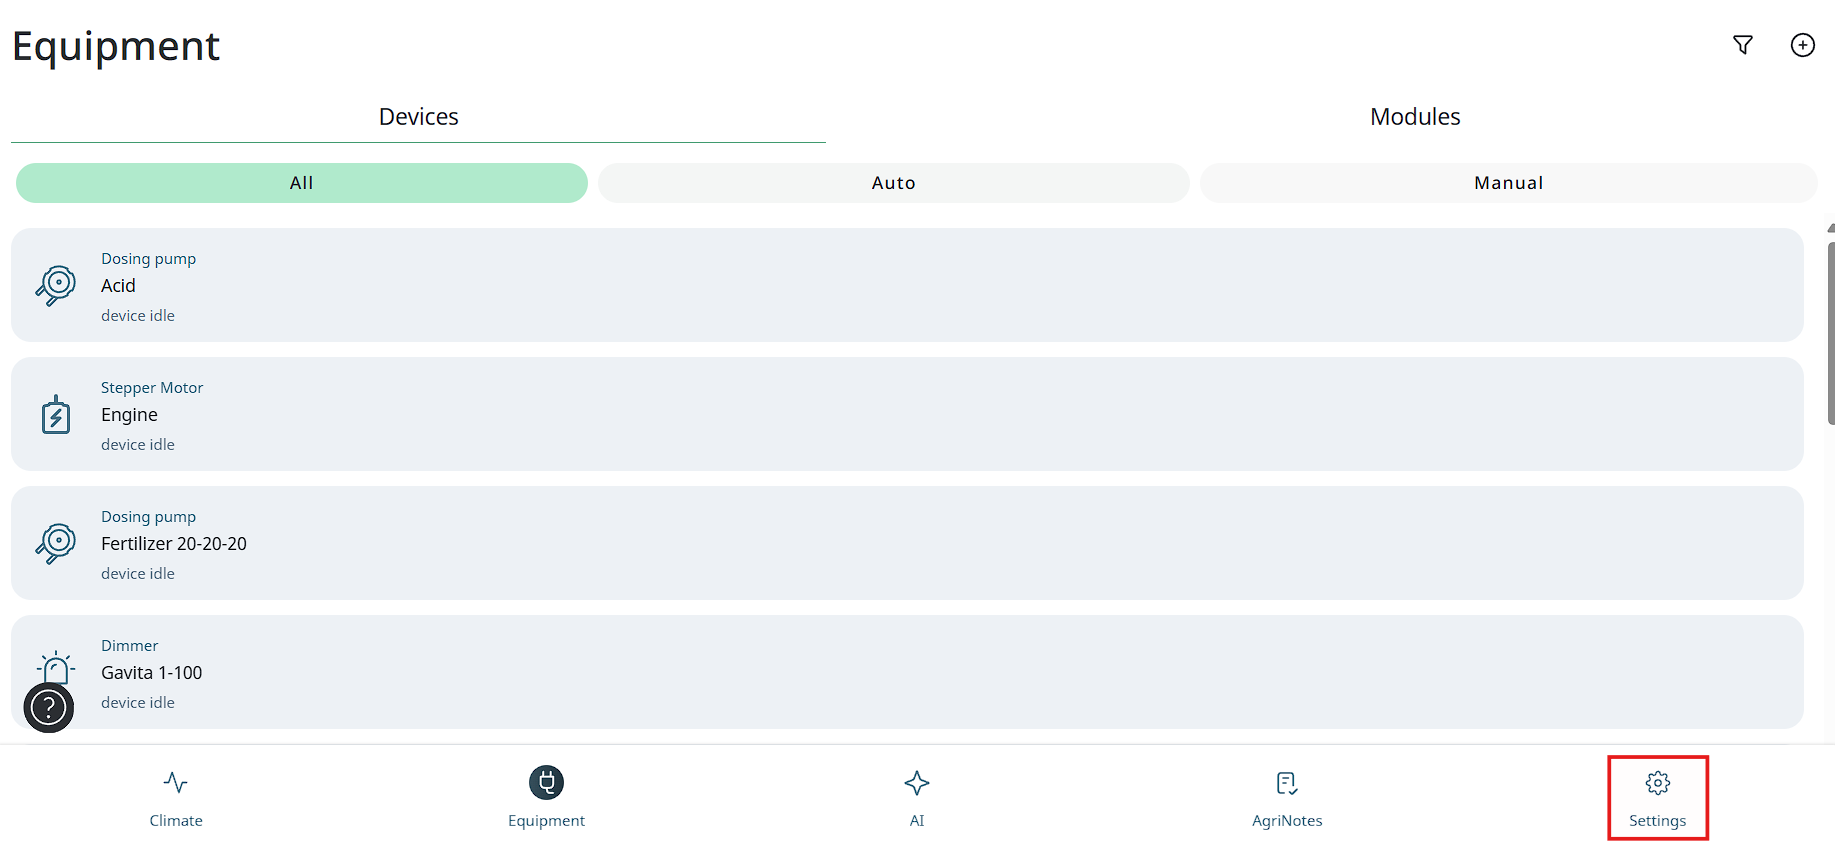
- Next you need to tap on the Dashboard button.
- Next you need to set time when day starts and day ends, after it you will see screen with next tabs: “Climate”, “Devices” and “Modules” also you can see calendar with dates.
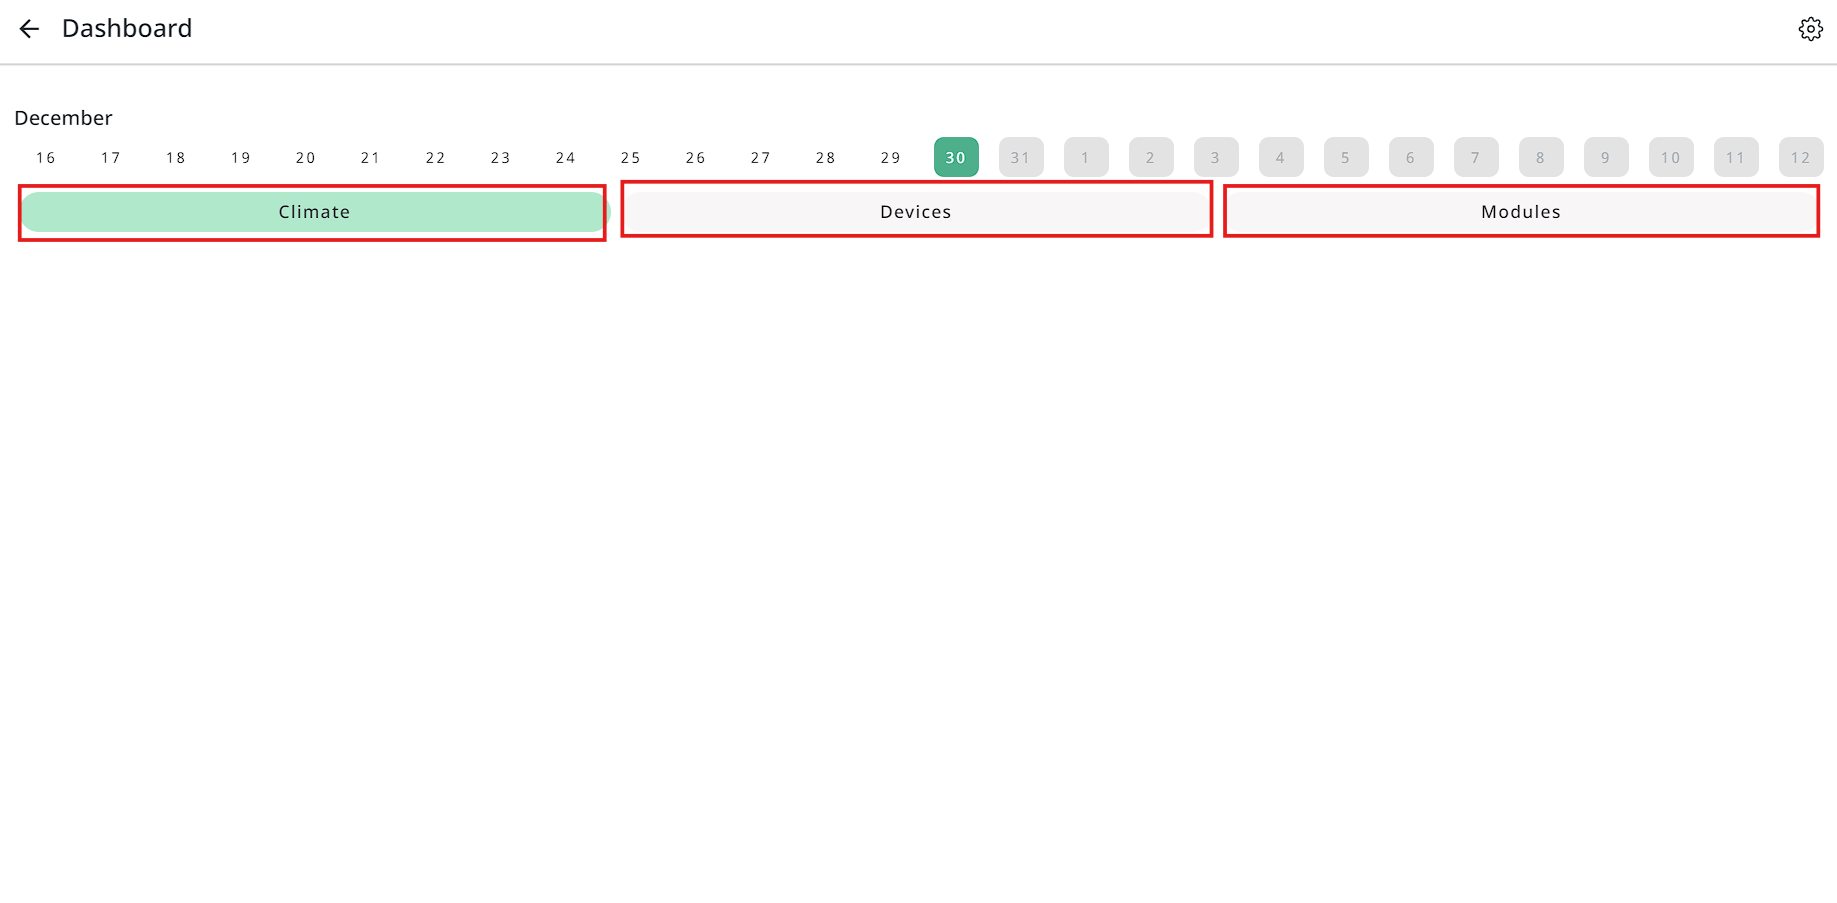
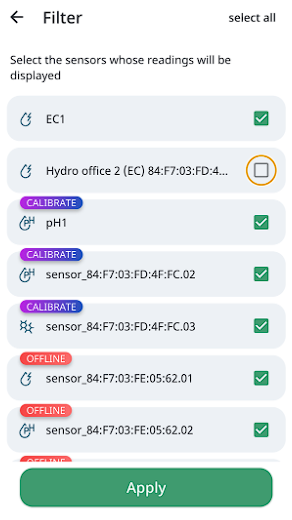
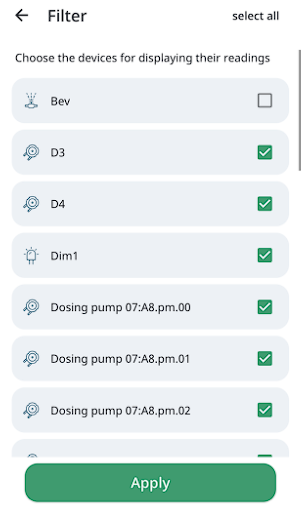
- Also you can edit sensor modules and devices which will be shown on the dashboard. You will need to tap on the settings button in the top right corner.
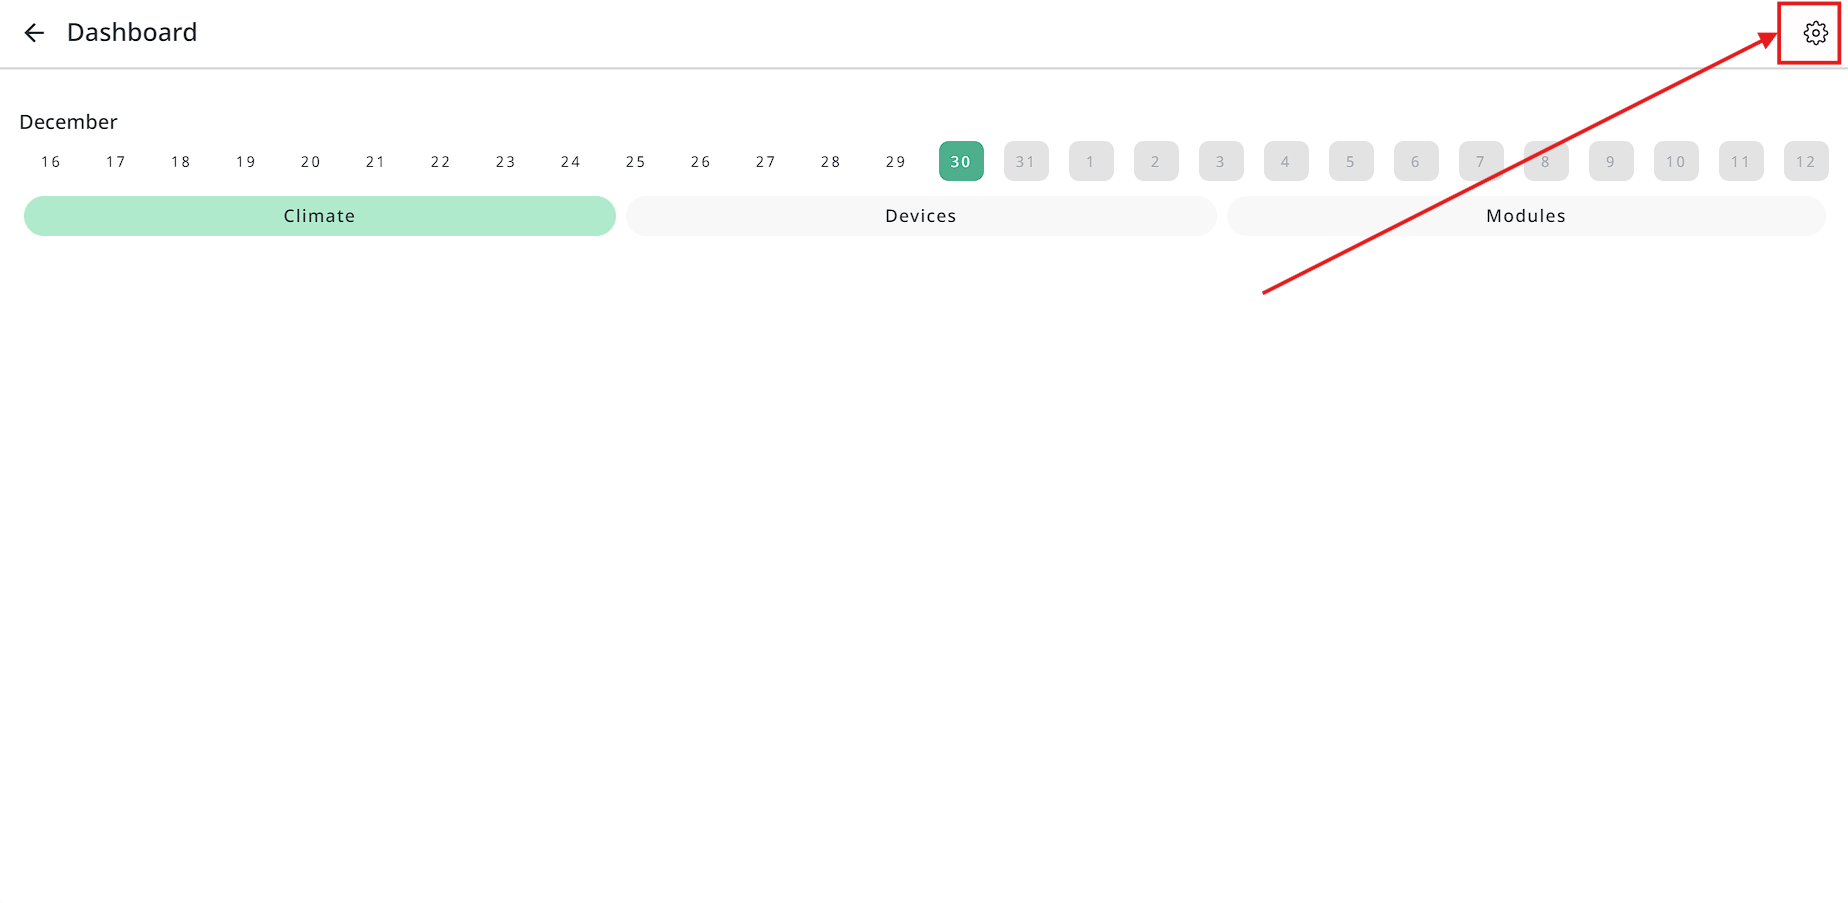
- On the opened screen you can choose and change prefferences.
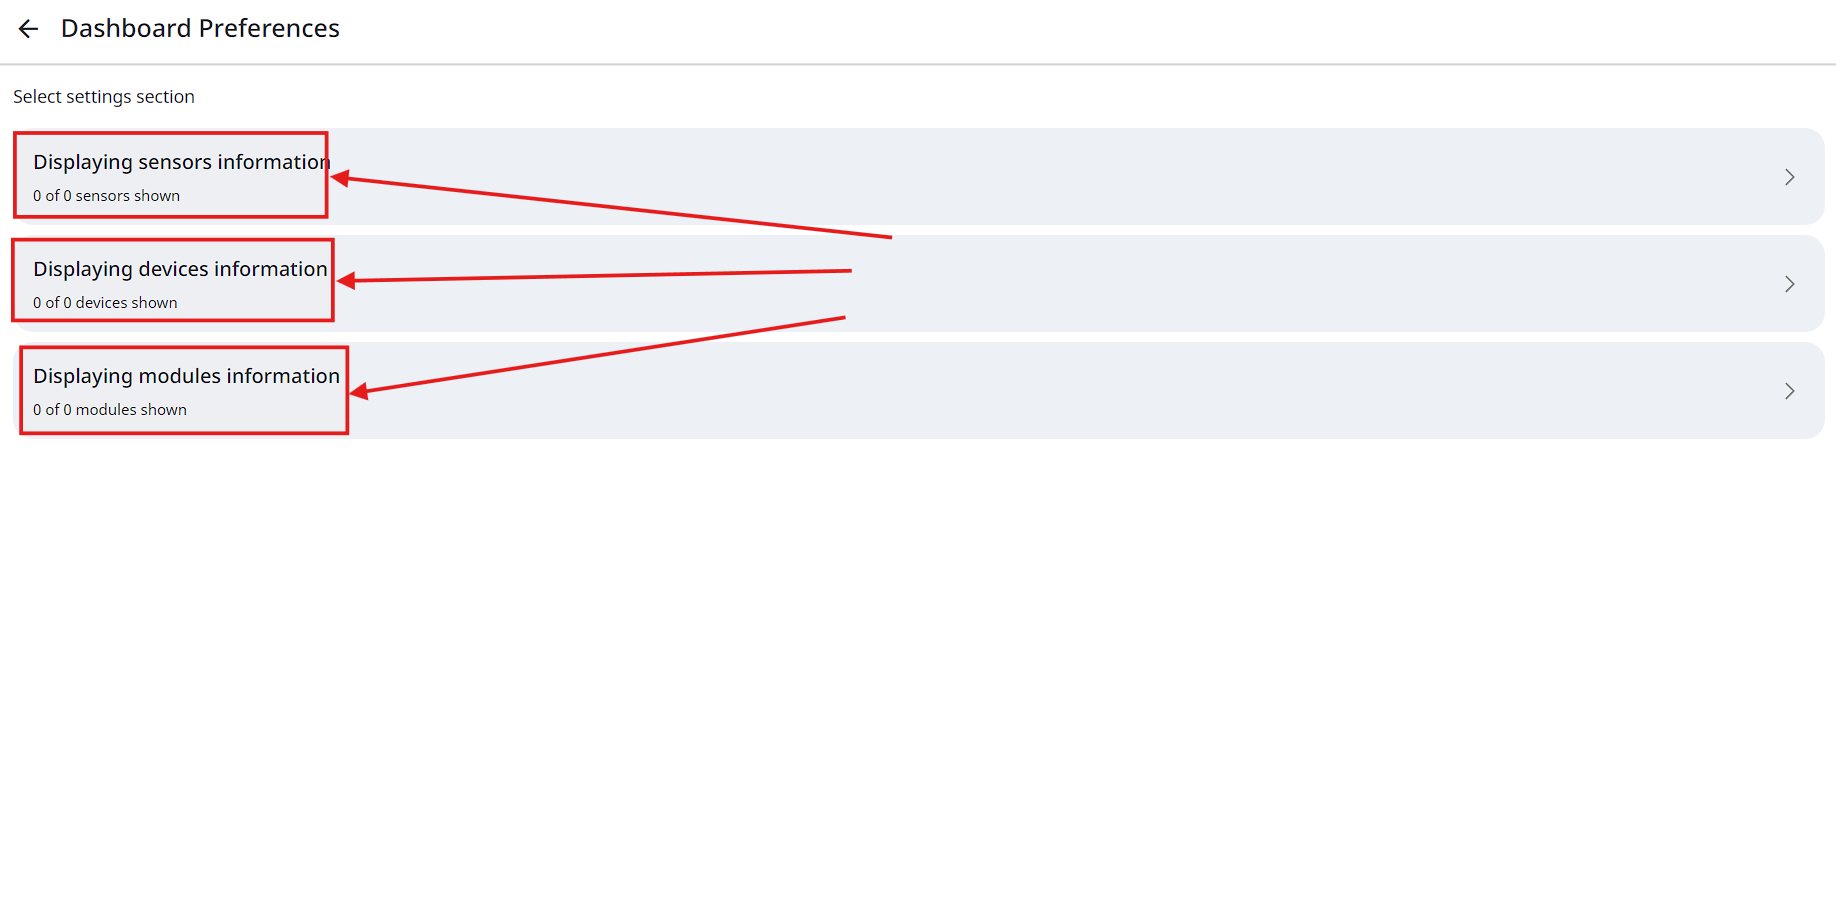
Examples:
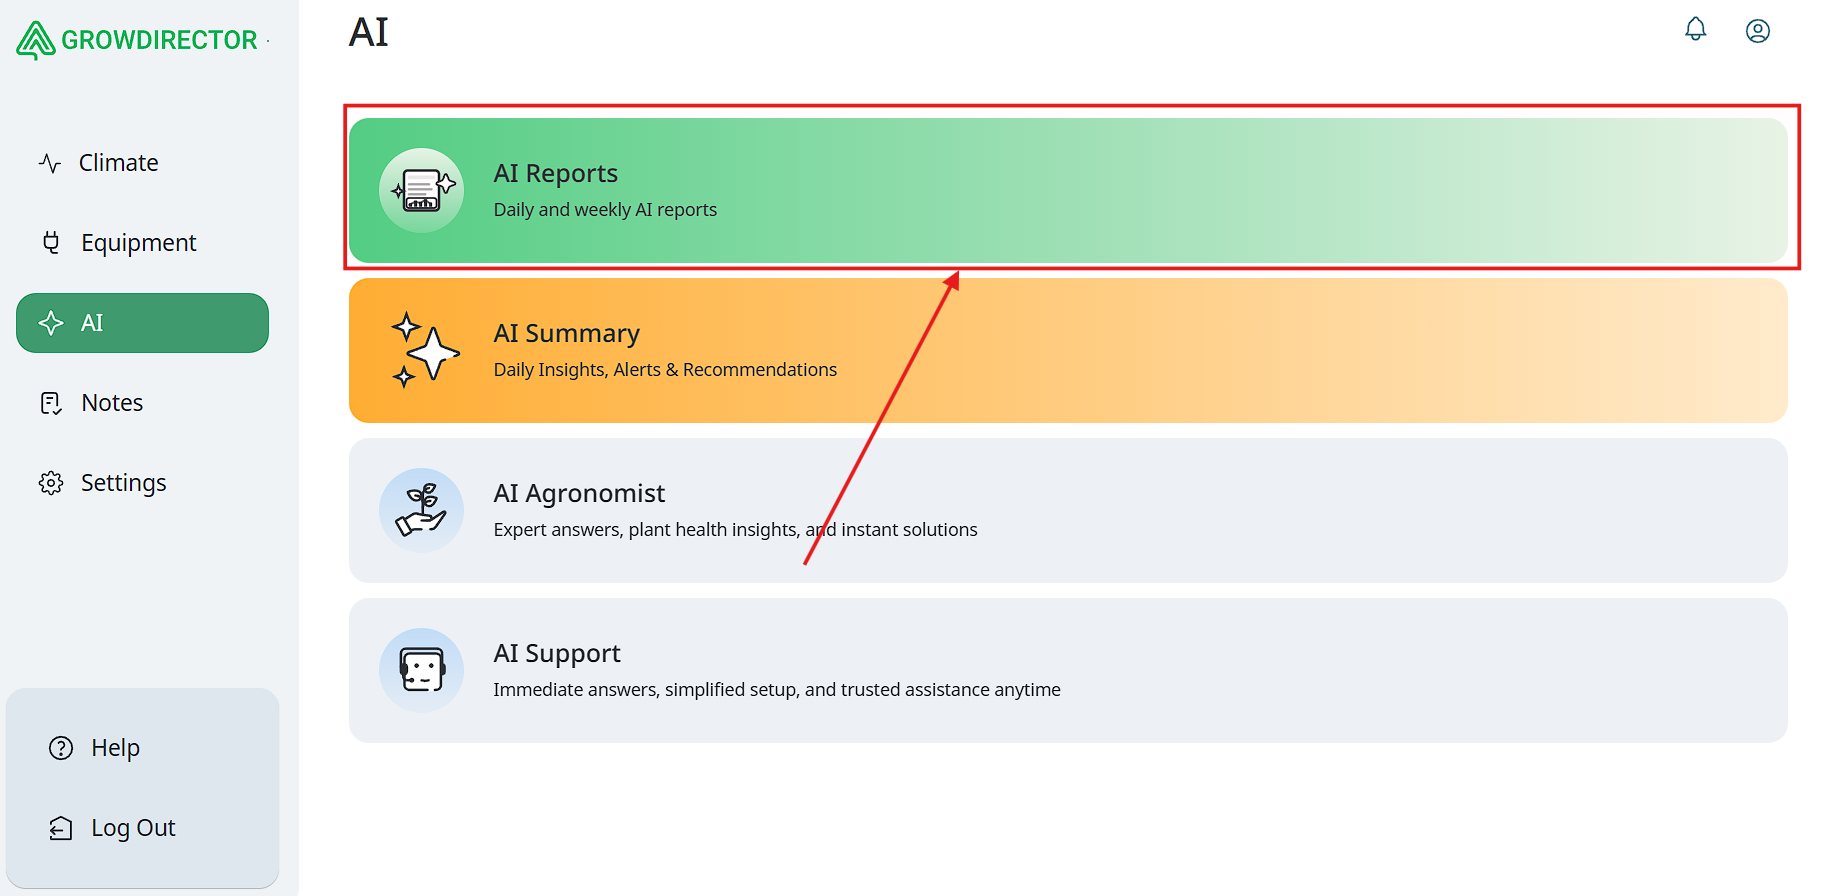
AI Section
For convenient interaction with AI, a new section has been added in application, which allows users to get quick and convient access to support.
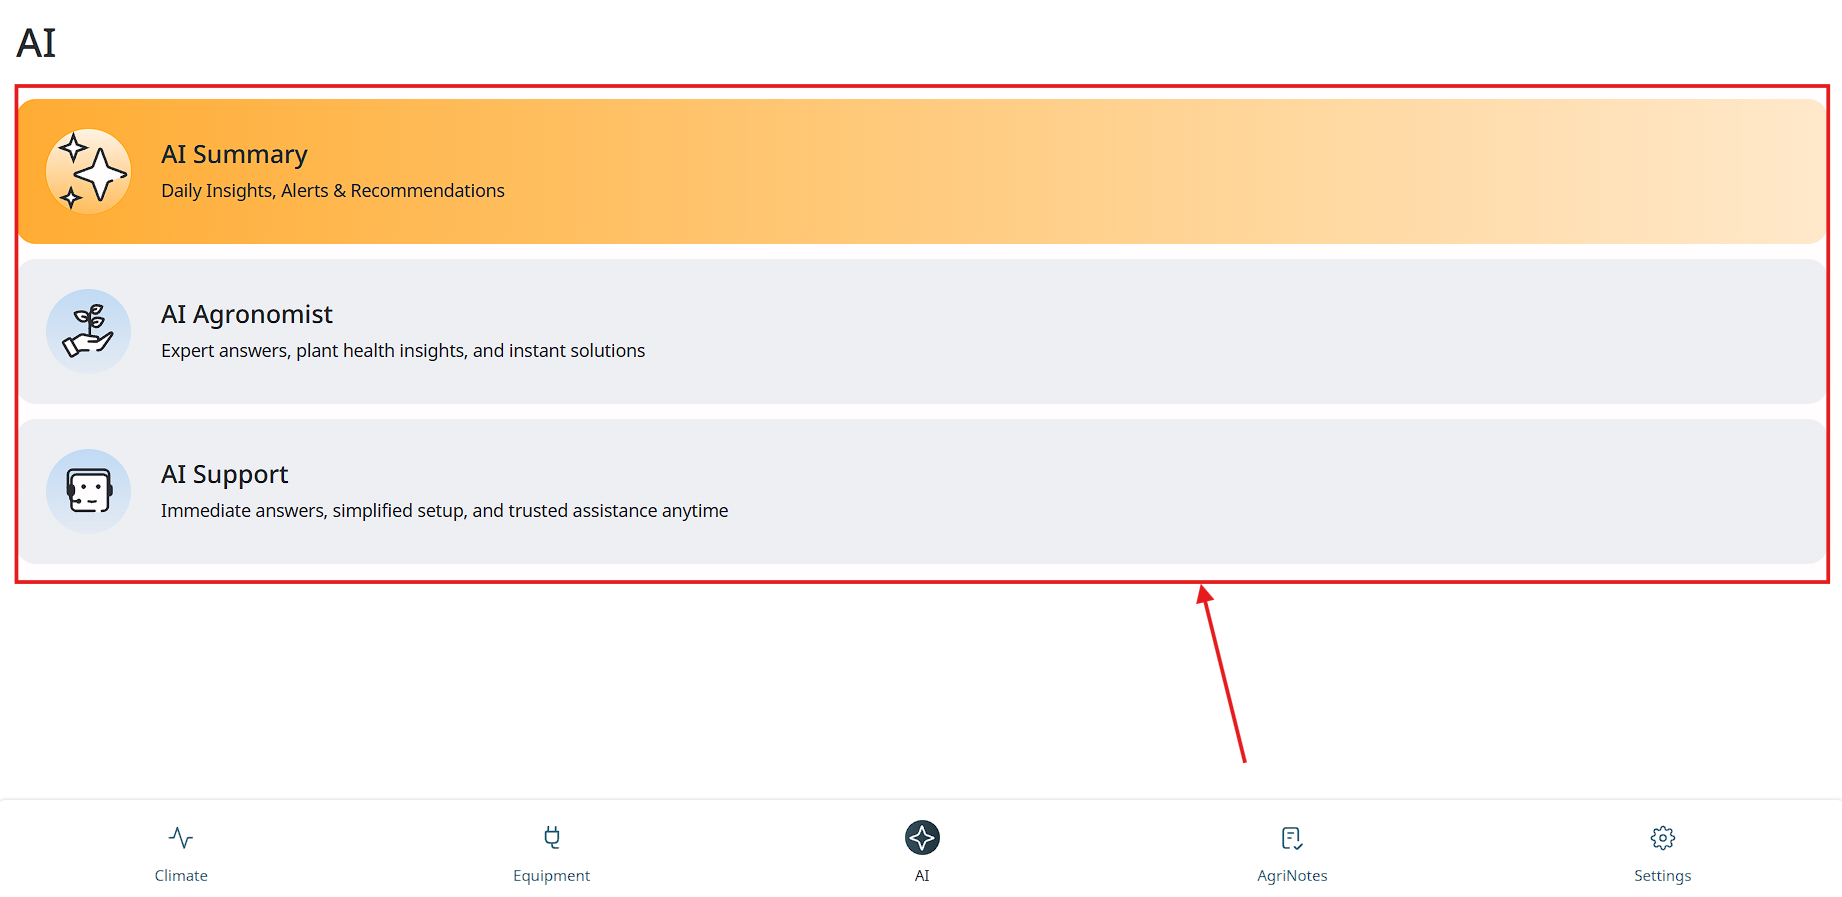
Where is AI section?
-
To enter AI section user needs to tap on the “AI” button in the bottom menu on the main screen.
-
Next user will see 3 types of AI:
AI Summary - this is a button which sends user to dashboar section;
AI Agronommist - chat with AI, which could help with agronomical issues;
AI Support - chat with AI, which could help with technical issues.
AI Summary
-
To enter AI Summary (Dashboard) user needs to tap on the “AI” button in the bottom menu on the main screen.
-
Next user will need to tap “AI Summary” button.
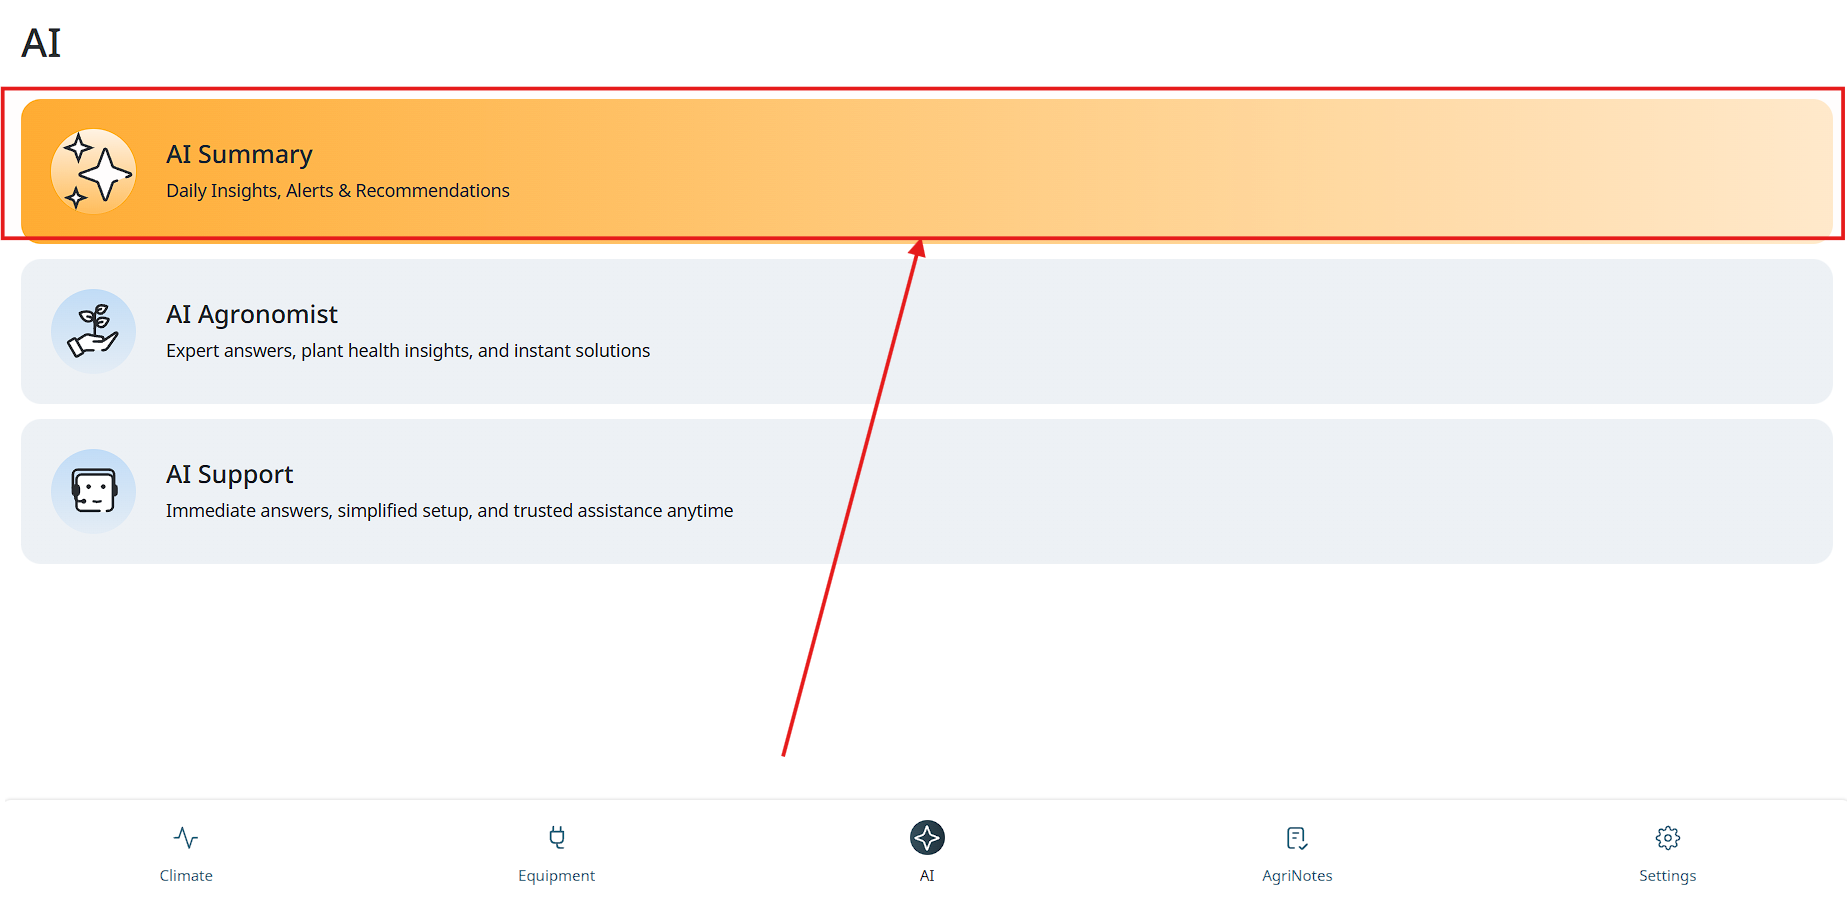
- Now user can see Dashboard.
AI Agronomist
- To enter AI Agronomist user needs to tap on the “AI” button in the bottom menu on the main screen.
- Next user will need to tap “AI Agronomist” button.
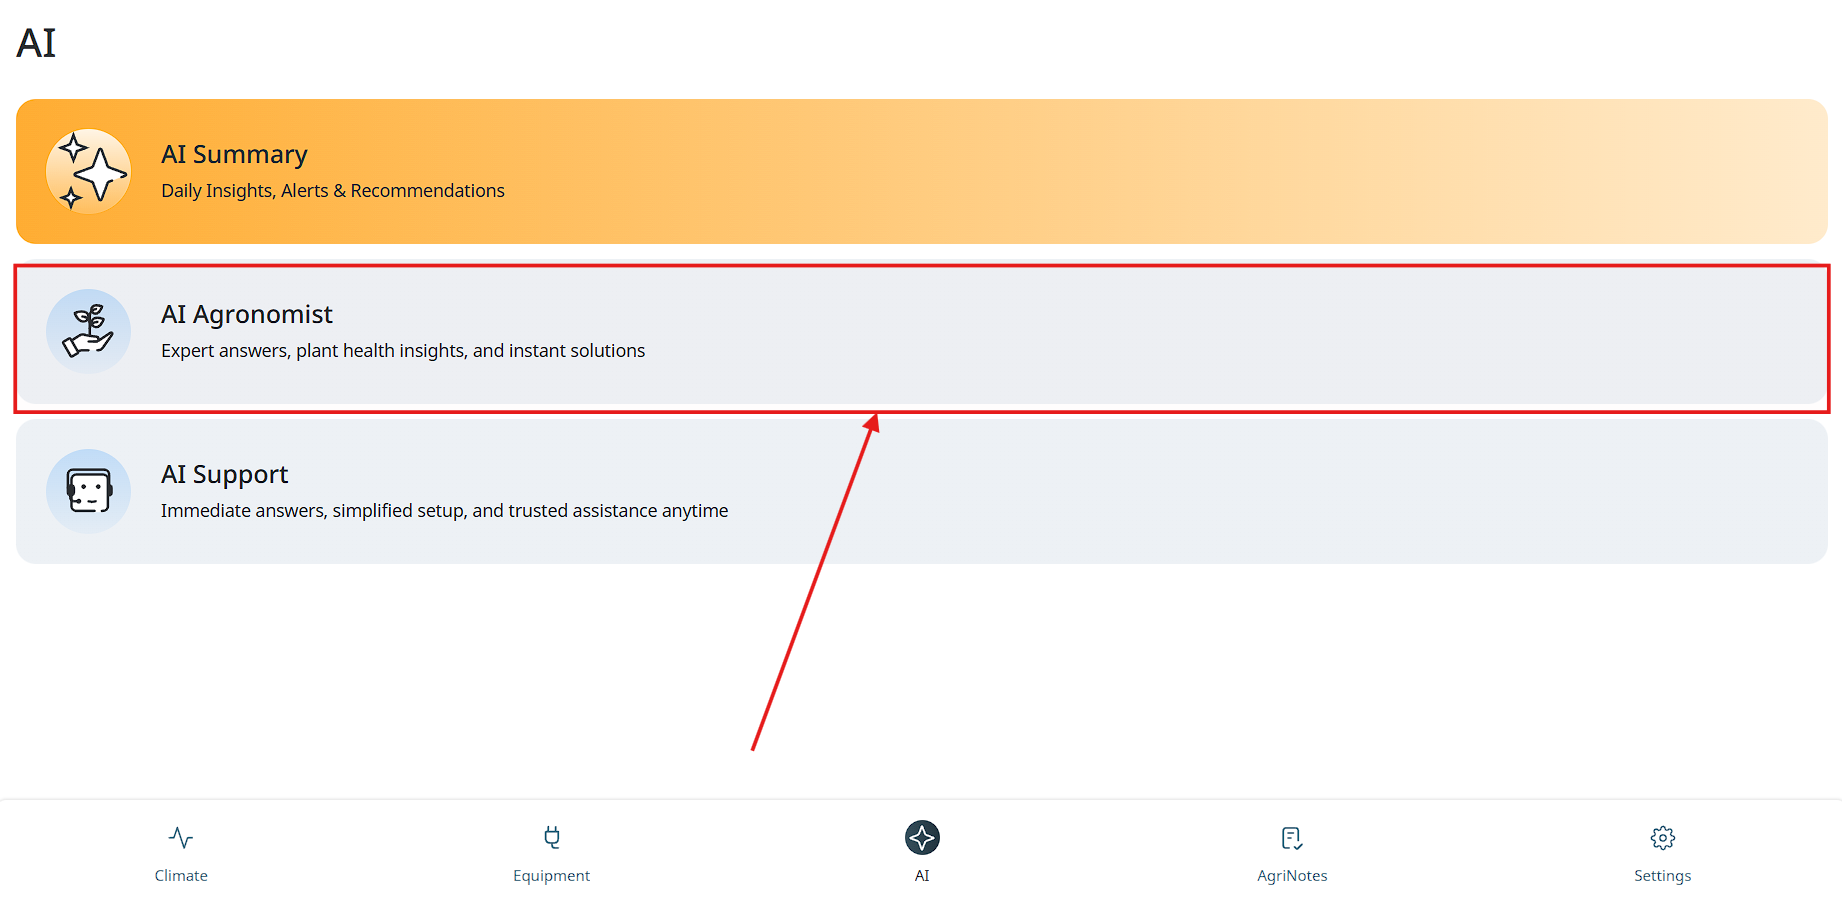
- Now user can see AI Agronomist and start a chat.

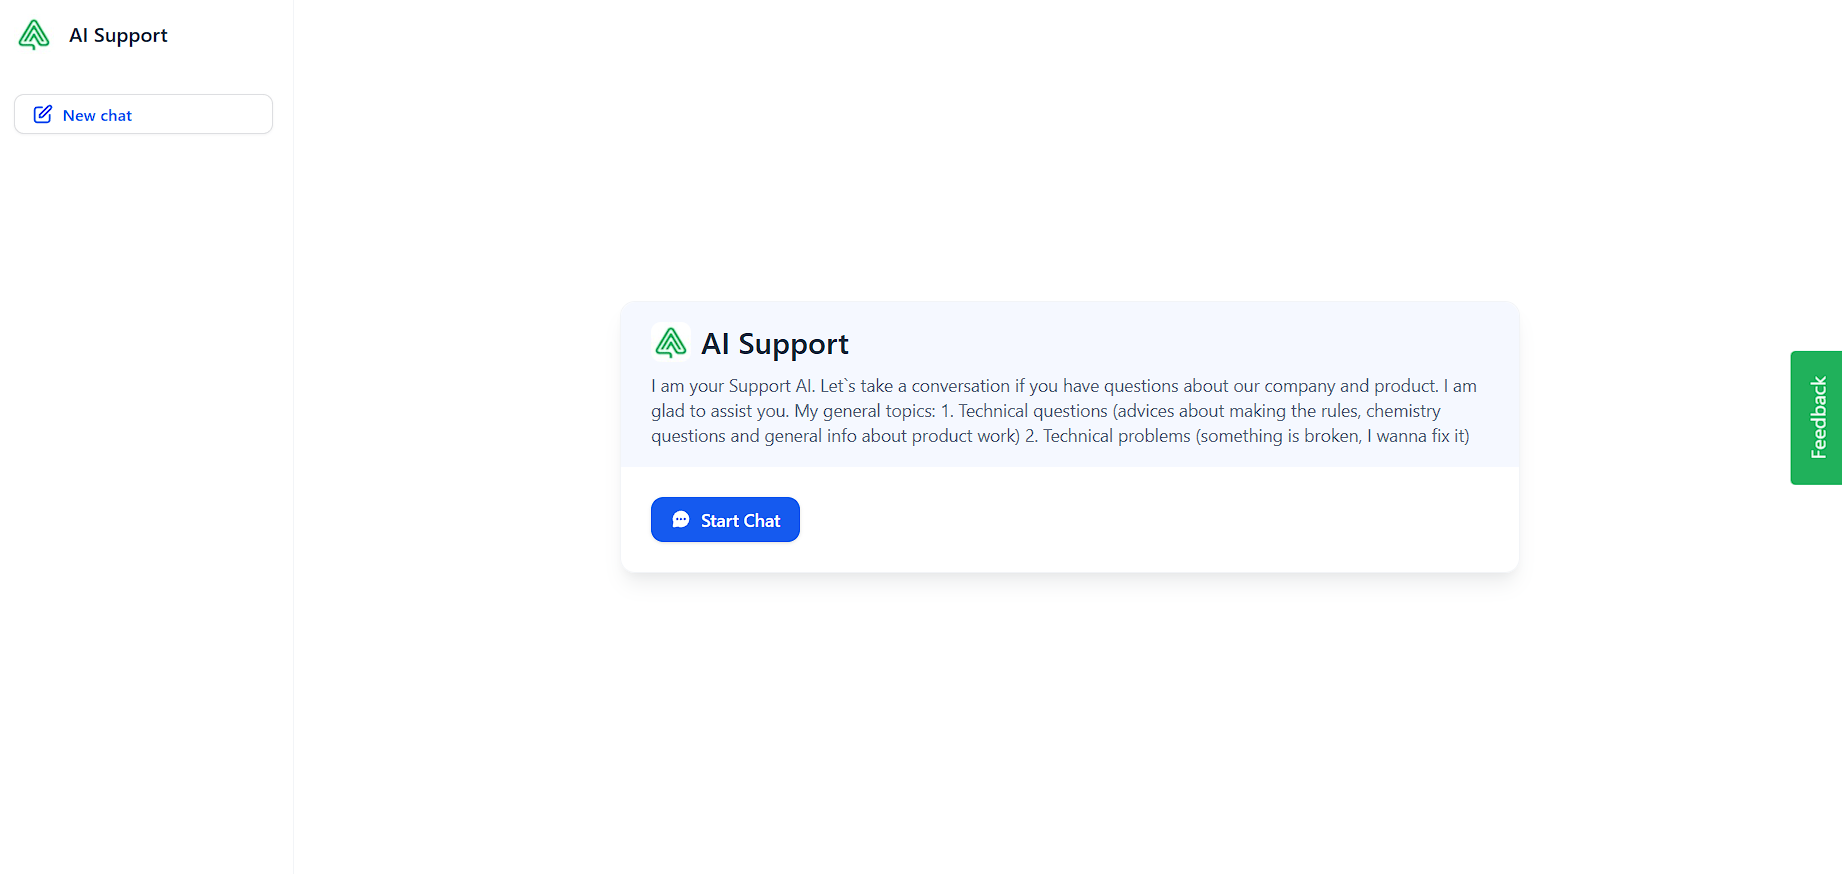
AI Support
- To enter AI Support user needs to tap on the “AI” button in the bottom menu on the main screen.
- Next user will need to tap “AI Support” button.
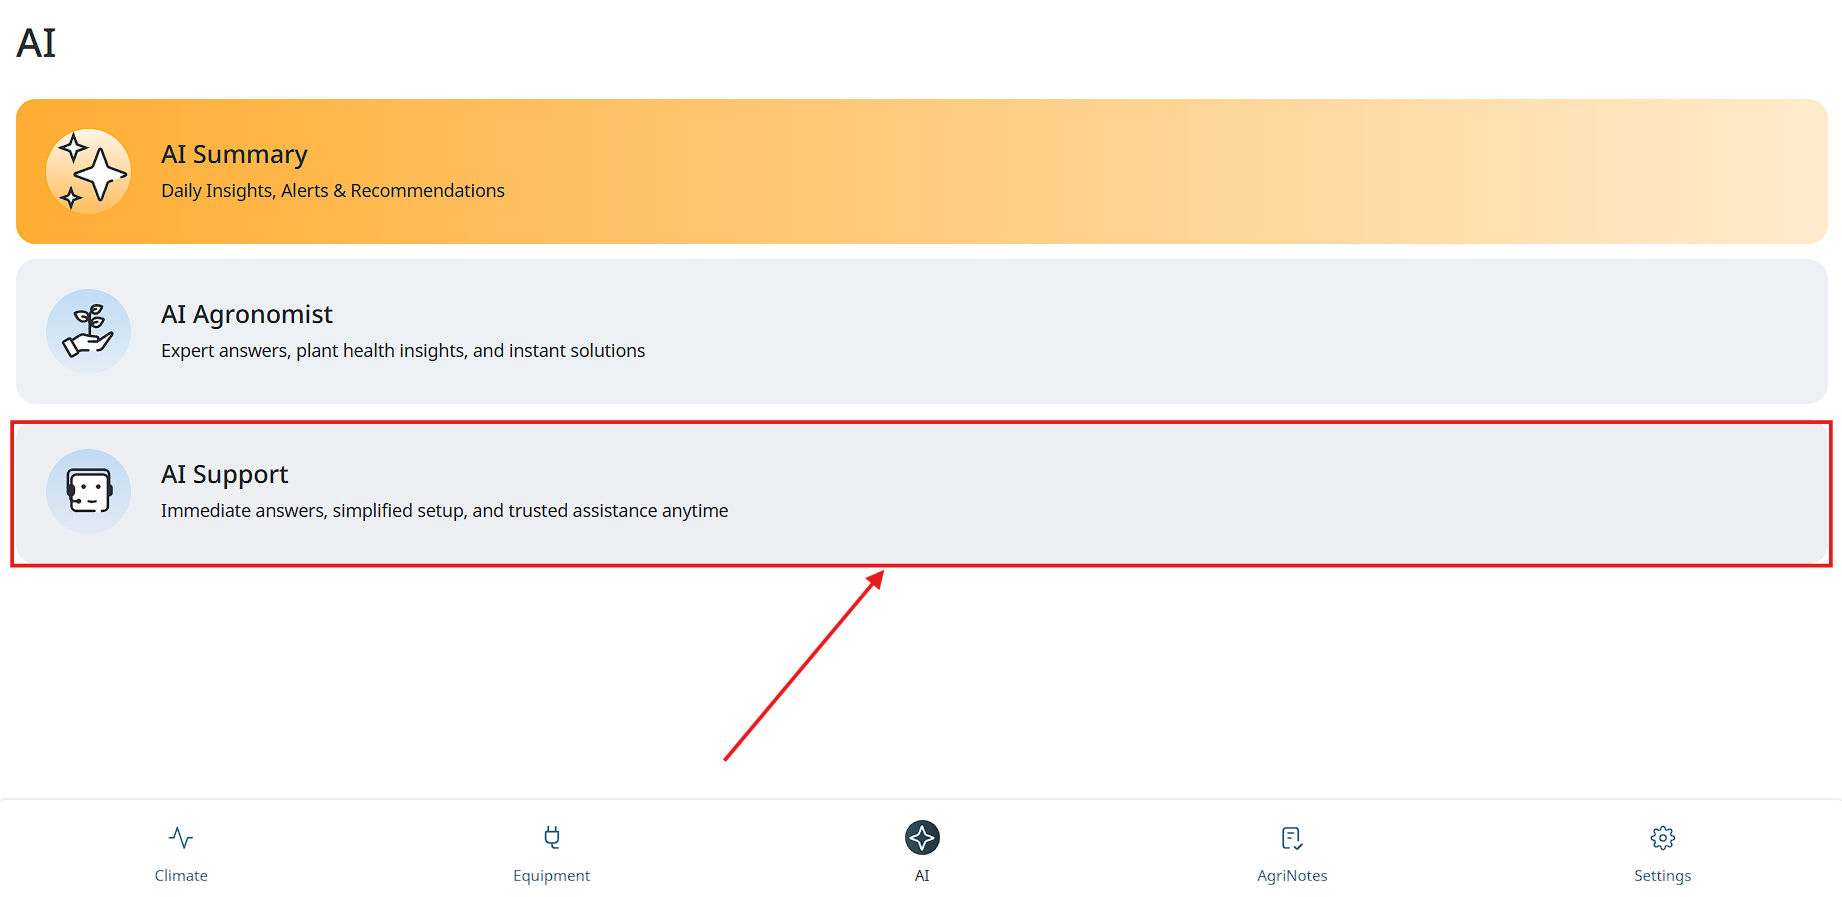
- Now user can see AI Support and start a chat.
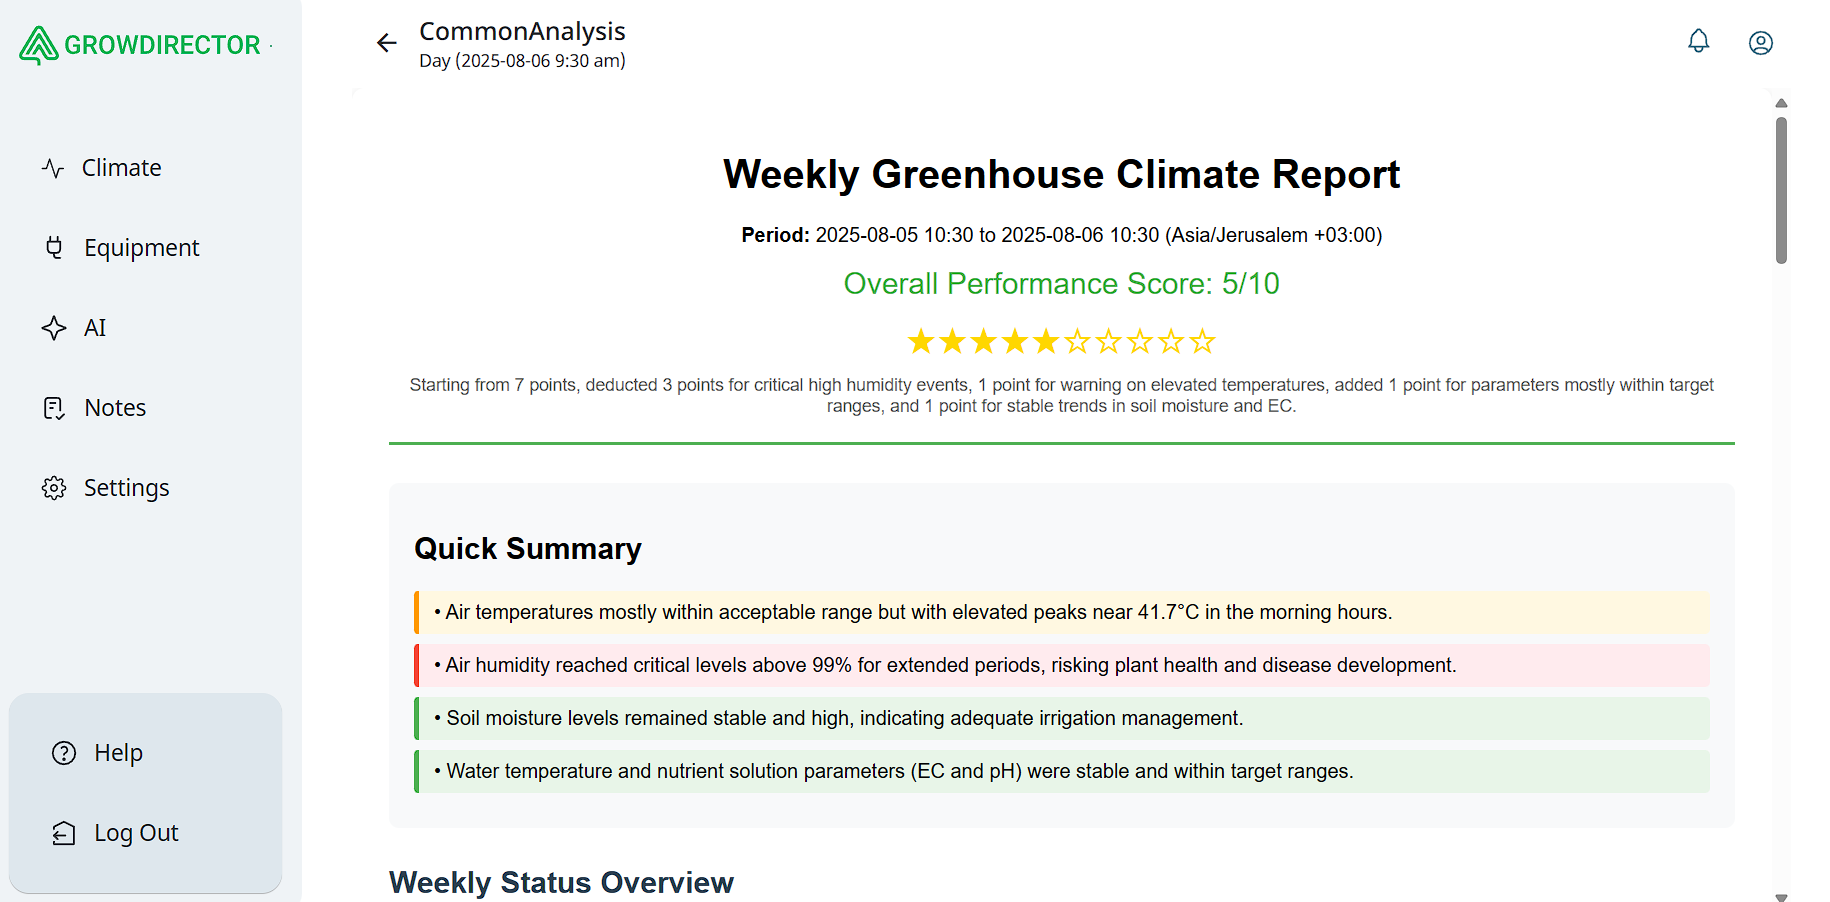
AI Reports
The AI Reports section is a newly introduced functionality in the application. This section allows users to view analytical reports generated by Artificial Intelligence for a selected time period.
Each report is structured into several key parts:
-
Quick Summary
Provides a concise overview of the most important events detected by the system.
Describes changes and anomalies observed in sensor activity. -
Weekly Status Overview
Displays detailed information for each sensor.
Includes the following parameters:
Estimated Status – the current health and condition of the sensor.
Current Range of Indicators – real-time measured values.
Selected Range of Indicators – user-defined or system-recommended thresholds.
Commentary – additional AI-generated notes and explanations for each sensor. -
Summary of Results
A brief consolidation of findings and highlights from the reporting period. -
Detailed Parameters Overview
Provides in-depth analysis of system parameters.
Includes climate control analytics, covering temperature, humidity, and related metrics. -
Device Performance Analytics
Presents insights into the operational performance of connected devices.
Detects efficiency trends, irregularities, and potential issues. -
Recommendations
A set of AI-generated actionable recommendations, divided into three categories:
Urgent Actions – critical steps that must be taken immediately.
Weekly Optimization – suggested improvements for maintaining stable operation.
Long-Term Enhancements – strategic recommendations to improve efficiency and reliability over time.
This section is designed to provide users with both a quick understanding of system performance and a detailed technical analysis for proactive decision-making.
- Navigate to the AI Section. From the main menu, go to the tab labeled AI.
- Select AI Reports. In the list of available AI features, choose AI Reports.
- Set the Time Range. After entering the AI Reports section, specify the desired time period for the report.
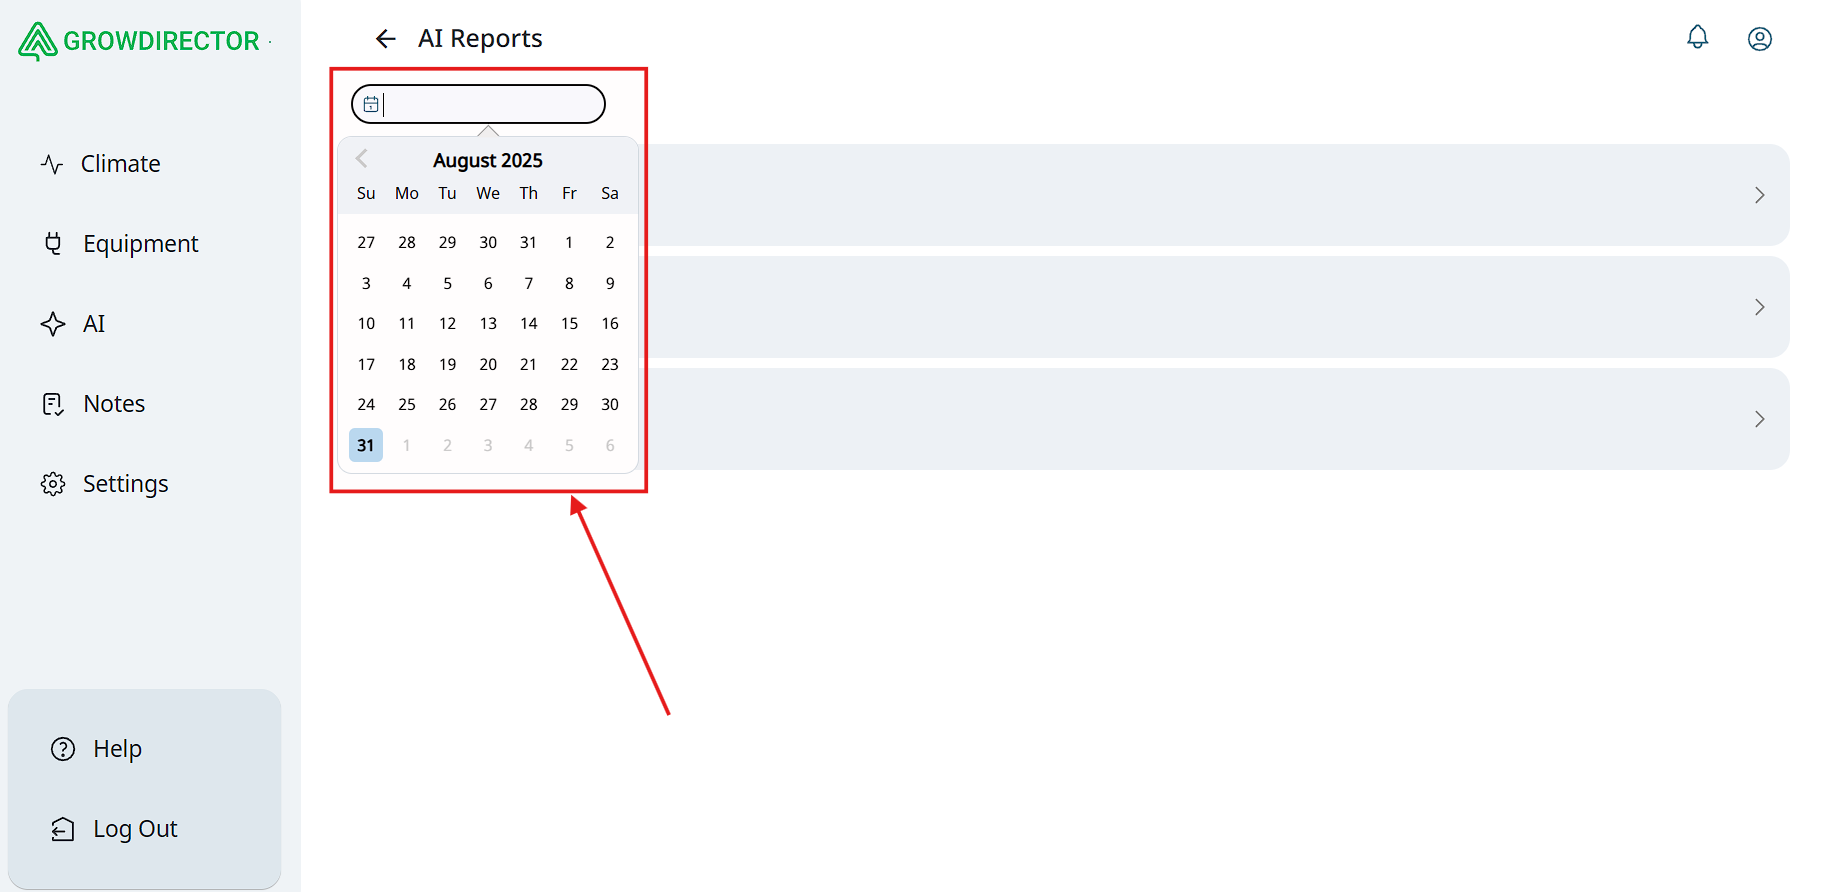
- Choose a Report. Select the required report from the available list.
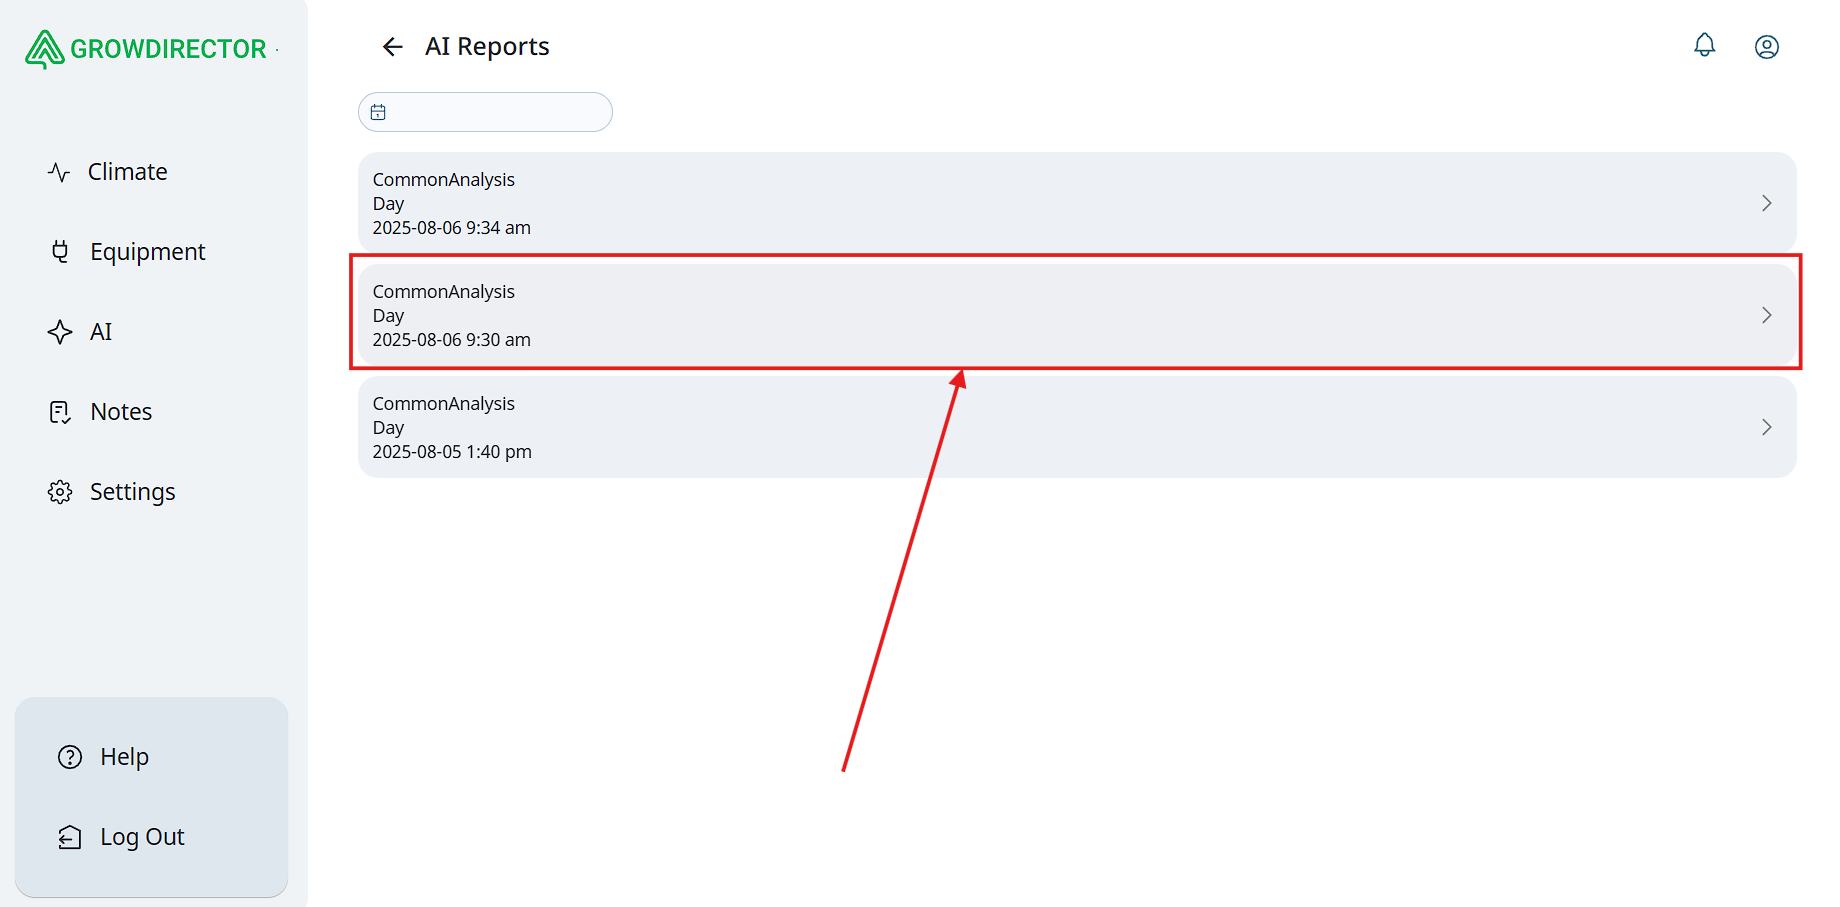
- View the Report. You can now review the AI-generated report, which includes summaries, analytics, and recommendations.